Table of Contents
Wood Lathe
- Manufacturer & Model: Powermatic 4224B
- Protohaven Tool Record: Here
A wood lathe is a machine that rotates a piece of wood on an axis and allows the operator to shape it with various cutting tools. Wood lathes are used for making furniture, bowls, musical instruments and other objects. However, working with a wood lathe can also pose some risks, such as injury from flying wood chips, contact with sharp tools or entanglement with the rotating spindle. Therefore, it is important to follow some safety guidelines before using a wood lathe. This document will provide an overview of the main components and functions of a wood lathe, the personal protective equipment (PPE) and precautions that are necessary for safe operation, and the basic steps for setting up and using a wood lathe.
The Tool Safety, Tool Care, Operation, section of this guide are what instructors use to ensure that you can use the equipment according to community expectations.
Requirements
Wood Lathe clearance is required. The clearance is provided in a class or from a proficiency based clearance.
Warnings
⚠️ Flying wood chips or dust that can damage the eyes, skin, or respiratory system. To prevent this, always wear safety glasses or a face shield, and a dust mask when working with a wood lathe. Also, keep the work area clean and well-ventilated by turning on the nearby air filter.
⚠️ Entanglement of clothing, hair, jewelry, or fingers in the rotating wood or the lathe spindle. This can cause cuts, bruises, fractures, or amputations. To prevent this, always wear tight-fitting clothes, tie back long hair, remove any jewelry. Also, consider using the guard to cover the spindle and the chuck.
⚠️ Kickback of the wood piece due to improper mounting, alignment, speed, or tool pressure. This can cause the wood to fly off the lathe and hit the operator or bystanders. To prevent this, always check that the wood is securely mounted and balanced on the lathe before turning it on. Also, adjust the speed and the tool pressure according to the size and shape of the wood. Never force a tool into the wood or apply too much pressure.
⚠️ Vibration or noise that can affect the operator's concentration, hearing, or balance. This can lead to errors or accidents. To prevent this, always use sharp and well-maintained tools that cut smoothly and reduce friction. Also, wear ear protection and avoid distractions when operating a wood lathe.
See the Safety Section for more information.
Tool Anatomy
The below image is taken from the manual and illustrated the various parts of the lathe.

- Sliding Headstock
- Rubber tool mat
- Quad receptacle
- Guard
- Gooseneck Lamps
- Vacuum Chuck
- Adjustable 14-inch tool rest with bevel
- Comparator bracket
- Tailstock quill
- Tailstock handwheel
- Tailstock storage cavity
- Magnetic-backed remote switch
- Cast Iron Legs
- Ledges for shelf support
- Leveling feet
- Ways
- Front-mounted controls
- Belt Access Door
- Digital Readout
- Tool Caddy with Accessories
- Motor
- Variable frequency drive
- Air vacuum connection
- Handwheel / Indexing System
- Spindle Lock
Closeup of Controls

- On/Off Switch (pull is on)
- Speed Control Knob
- Digital Speed Readout
- Spindle Direction Selector
- Spindle Lock
- Spindle Speed Range Control
- Vacuum Chuck Enable Switch
- Vacuum Chuck Suction Gauge
Description of Parts
Headstock
The headstock is the part of a lathe machine that holds and rotates the workpiece. It consists of a spindle, a chuck, a motor, a pully and belt system and controls.
On/Off Switch
Red button that looks like a small emergency stop on the control panel of the lathe. Pull the knob to turn the lathe on. Push the knob in to turn the lathe off. Both this switch and the remote emergency switch need to be on for the lathe to run.
Speed Control Knob
This knob will change the speed at which the spindle spins. turning it clockwise increases the speed.
Digital Speed Readout
LED display on the control panel that reads out the current RPM of the spindle. It reads the actual rpm measured so you will notice a lag between turning the speed control knob and the readout equalizing at the new speed.
Spindle Direction Selector
Forward causes the top of the work to rotate towards you, and is the standard direction when working the outside of a piece. Reverse causes the top of the work to rotate away from you, and is mostly used when sanding.
Spindle Lock
Number 25 in the diagram it's a steel button that when pressed in will lock the spindle from rotating.. This is primarily for when you want to unscrew chucks and plates from the spindle.
Spindle Speed Control
Inside the Head Stock the belt can be moved to different pulleys to change the speed range at which the lathe operates.
- Low Speed – 40-970 RPM
- Medium Speed – 80-2000 RPM
- High Speed – 135-3500 RPM
Vacuum Chuck Switch and Pressure Gauge
At the top of the control panel there is a switch and a gauge that are used when the vacuum chuck is in use. See the section on the vacuum chuck for more details.
Spindle
The spindle is a hollow shaft that supports the workpiece and transfers the rotational motion from the motor. It is not called out in the photo but it's between 6 and 24.
Tailstock
A lathe tailstock is a part of a lathe machine that supports the other end of the workpiece that is not held by the chuck. It can also hold tools such as drills, reamers, or taps for cutting holes in the workpiece. The tailstock can slide along the bed of the lathe and be locked in any position.
Slide Lock
There is a lever not pictured under the handwheel (10) that operates a clamp under the tailstock that allows you to set where it is positioned on the ways. It is loose when the lever handle is vertical and tight when it is pressed either to the front or back.
Handwheel
Illustrated as number 10 this wheel will turn a screw drive to extend and retract the quill.
Quill
Illustrated as number 9 the quill holds your tailstock tool and extends and retracts using the handwheel. The hole in the end of the Quill is a tapered fitting called a Morse Taper, these come in various sizes. the size used on the lathe is MT2.
Quill Lock
There is a small lever on the top of the tailstock that will clamp the quill into position.
Comparator Bracket
The comparator bracket can be used to hold spindles near the workpiece so that the workpiece can be made similarly to the compared piece.
Bed / Ways
This flat machined surface is precision ground, and supports the tail stock and banjo. Do not set things on this surface as they may cause damage to the machined surface. Anything placed there is likely to get bumped or vibrate off, which in the case of lathe tools can cause damage to the cutting edge.
Banjo & Tool Rest
Tool Rest
A lathe tool rest is a metal bar that supports the cutting tool when working on a lathe. It is attached to the lathe bed and can be adjusted to different positions and heights. The tool rest helps to stabilize the tool and prevent vibrations that could affect the quality of the workpiece.
Banjo
A lathe banjo is a part of a wood lathe that holds the tool rest. It is mounted on the lathe's bed and can be adjusted to different positions. The lathe banjo allows the woodturner to use the turning tool in the best way to shape the spinning wood. Not numbered in the above illustration it's the part between the tool rest (7) and the ways (16)
Remote Emergency Stop
This magnetic switch (#12 in the diagram) can be attached to any magnetic surface. Keep it close at hand especially when working on a large piece so that you always have a way to turn the lathe off in an emergency. Pull to turn on the lathe, push to turn off. Both this switch and the switch on the headstock need to be on for the lathe to run.
Work Holding Accessories
The work holding accessories that follow have different designs and methods in which they function, but they all share the same purpose of supporting the workpiece in the lathe.
Drive / Spur Center
A spur center is a type of woodturning tool that is used to hold a workpiece on a lathe. It consists of a metal shank with one or more sharp spurs that dig into the wood and prevent it from slipping. A spur center is usually mounted on the headstock of the lathe and driven by the motor. A spur center is suitable for turning spindles, bowls, and other round objects.
4 Spur Drive Center
 A 4 spur center is typically used for standard spindle turning. It has more aggressive teeth or dogs to make a strong connection with the workpiece. you may want to use a 4 spur drive center when you are working with smaller and lighter workpieces such as spindles.
Crown Drive Center
 A crown drive center is a type of lathe center that has a circular serrated edge and spring-loaded center point to prevent splitting the wood when under pressure. It is typically used for bowl turning and other projects where the workpiece is large and heavy.
Knock Out Rod
Pictured in the accessory tray (#20). The knock out rod is fed though the spindle from the outside so that it can contact the inside of the drive center taper and knock it out of the spindle.
Face Plate
A faceplate is a circular metal plate used for holding workpieces in a lathe. You can use a faceplate when you need to attach a workpiece directly to the lathe spindle with screws or bolts. This method is simple and versatile and works well for large bowls with thick bottoms where the screws won’t interfere with turning.
You may want to use a faceplate on a lathe when you need to hold an unbalanced workpiece that is difficult to hold with a traditional chucking method or drive spurs/dogs.
4 Jaw Chuck
Using a four-jaw self-centering lathe chuck is an easy and effective way to secure bowl turning blanks and small spindle turning blanks on a wood lathe. Another effective way to mount a bowl turning blank is with a screw chuck insert. This deep thread screw is secured in the lathe chuck and the bowl blank is threaded onto the screw chuck 2.
You will find the PSI Utility Grip™ 4-Jaw Lathe Chuck in the lathe checkout kit. It's a 3 inch 4 jaw chuck with 4 sets of jaws.
Vacuum Chuck
A vacuum chuck is a type of lathe chuck that uses suction to hold workpieces in place. It is used to hold workpieces that cannot be held by other types of chucks.
Live Center
A live center is a tool used in woodturning that is mounted on the tailstock of a lathe. It is designed to rotate freely and support the workpiece while it is being turned. The live center has a point that is inserted into the end of the workpiece and rotates with it.
To remove the live center from the tailstock use the handwheel to fully retract the quill, this will push the live center loose.
Tailstock Drill Chuck
A drill chuck that has a morse taper which slots into the taper on the tailstock and it holds tools like drill bits and forstner bits. The tailstock handwheel can be used to advance the tool into the workpiece.
To remove the drill chuck from the tailstock use the handwheel to fully retract the quill, this will push the live center loose.
Cutting Tools
Note: This tool tutorial focuses on carbide scrapers as that is the tool that is shop supplied for members and that beginners are trained on. Not everything mentioned here will be appropriate for other kinds of cutting tools.
Carbide scraper tools are an essential part of wood turning. They are used to shape and smooth the surface of the workpiece. Carbide scrapers are made from tungsten carbide, which is an extremely hard and durable material that can withstand the rigors of wood turning.
Carbide scrapers are also great for beginners because they are easy to use and require less sharpening than traditional high-speed steel tools. This makes them ideal for those who are just starting out with wood turning and want to focus on learning the basics before moving on to more advanced techniques.
Lathe tools commonly come in 3 different lengths, for a full size lathe 24“ tools are used for all but fine detail work.
Shop Supplied Scrapers
Savannah 7586 Carbide Turning Tool Large Size 3 Piece Set, Diamond Shape, Round and Square Turning Tools With Comfort Grip Handles
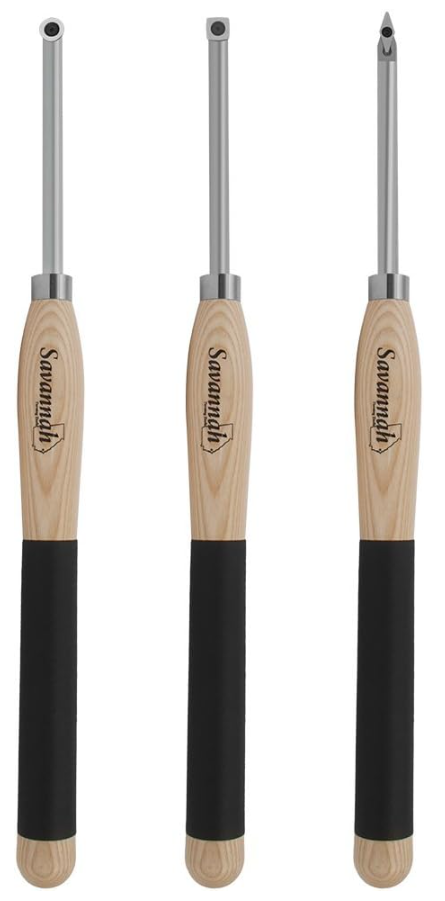
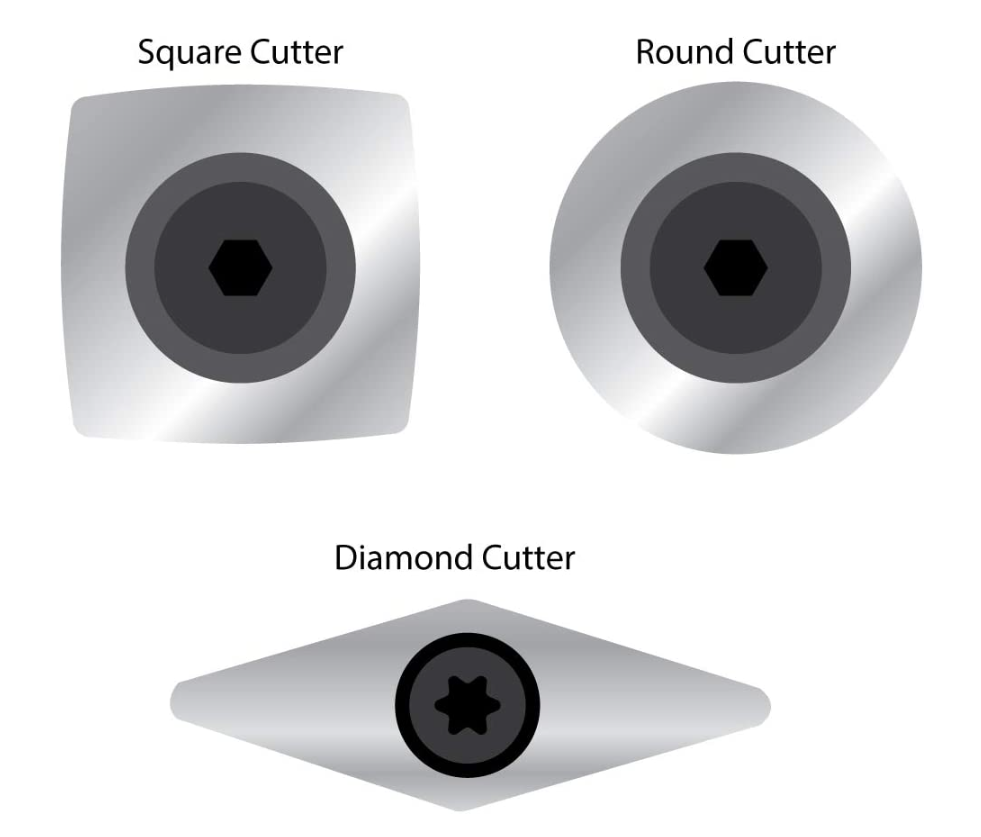
Radiused Square
You'll notice that the square scraper has rounded flats and less aggressive corners. These are easier to use than straight square inserts as the corners are swept back and not as sharp. This design makes blending much easier.
Straight Square inserts can fit in this tool as well and are good when you're removing a lot of material and not trying to have a smoothly blended surface.
Round
These are used for concave features on both the exterior and interior sides of the project. They also work well for finishing cuts as you can have fine control over a narrower contact area to take light scrapes.
Diamond
These are versatile cutters for doing acute features. Dovetails on tenons and mortices, for light scraping along the front edges.
Replacement Inserts
Here you can find Matched Replacements. But there are bulk packs if the same size scrapers available from various places.
Safety
Operating a wood lathe without proper training, safety equipment, or attention can result in severe injuries or even death. Ensure that you acknowledge the hazards and risks of using the lathe.
Personal Protective Equipment
- Users must wear Eye Protection. A full face shield is strongly recommended. Dust, shavings, chips, fragments, shards, chunks can all come loose from the workpiece when turning wood.
- Hearing protection recommended. Operating the Lathe isn't a loud activity. But there are plenty of loud tools in the woodshop that others may be using. Note that listening to the sound of the lathe and workpiece can be important when operating the lathe so finding a safe balance is helpful.
- Secure loose clothing. Remove hand and arm jewelry, tie up long hair, and roll up long sleeves. Tuck in hoodie strings. Do not wear full gloves while operating machines with rotating parts. Fingerless gloves to protect hands from shavings is permitted.
Maintain a Safe Working Area
- Never reach over the lathe to get something behind it. On our case the main thing a tall person might try to do is to reach over the lathe to plug it it or unplug it. DON'T do this! Building a habit of never reaching over the lathe is a key prevention to getting clothing or other items wrapped around the spindle. Similarly we should never put any kind of storage shelf on the wall behind the lathe to prevent happenings like this.
- Maintain a clean work space. Periodically sweep during and upon completing your project. Shavings and sawdust can cause you to lose your footing.
- Be aware of your surroundings, If people are using nearby tools make sure you're both working complimentary with each other and are aware of each others actions.
- Keep the rotation speed at the recommended values. And that there is no vibration.
- Always stand to one side and out of the firing line when starting the machine
- The safety guard can be lowered into place to help reduce the chance of being struck by the workpiece if it or a fragment of it becomes dislodged from the lathe.
Inspect Tools
Lathe Inspection
Before plugging in the lathe make sure you preform the following inspections
- Both power switches pushed in.
- Speed knob turned to the left.
- Set the rotation direction switch to forward.
- Inspect Morse Tapers on Spindle and Tailstock, Clean if necessary.
- Inspect Indexing Handwheel to insure it's not locked and that nothing is inserted into the spindle hole.
- Verify that the Belt is set at the intended speed.
- Verify the operation Banjo and Tailstock are well adjusted and move and lock as expected.
Once those inspections are complete the lathe can be plugged in.
Cutting Tool Inspection
Inspect cutting tools before use use, especially if they are shared tools where you may have not been the last user. For Carbide scrapers like the shop shared tools:
- Check for loose inserts.
- Check cutting side of insert for chips or nicks.
- Check the shaft is not loose in the handle.
- Check that the handle has no cracks.
Sharp cutting tools is a paramount consideration for wood turning. You will want to make sure you're using sharp tools / inserts. Dull tools will chatter, catch on the workpiece, kick back, and may dislodge the workpiece from the lathe.
How to spot a dull insert
When a carbide scraper is getting dull, you may notice that it is not cutting as cleanly as it used to. The surface of the wood may become rougher and the scraper may start to produce dust instead of shavings.
Another sign that the carbide scraper is getting dull is that it may start to produce a lot of heat when you use it. This can be dangerous and can cause the scraper to become damaged if it gets too hot.
Other Safety Considerations
⚠️ Make sure cutting tools are introduced at or slightly above the centerline of the spindle. Make sure you take into account the distance from the part of the tool that contacts the rest to the cutting edge. This is covered more later.
⚠️ Stabilize wood that shows signs of cracking, splitting, or contains knots.
⚠️ Running the spindle in reverse can cause the work holding tools to unscrew from the head stock.
Lathe tooling should always be supported by two hands, one controlling the tool’s tip at the tool rest, and one on the lathe tool’s handle.
⚠️ Do not allow your fingers to be between the tool rest and the workpiece, or between the tool rest and the lathe tool. Your finger will probably be amputated if the tooling catches in the workpiece.
If possible (i.e. if the lathe tool handle is long enough), use your side or waist to help control the lathe tool as you cut.
🚫 Never leave a lathe running unattended.
Always turn the lathe off when not actively using it.
Operation
Support the Workpiece
One of the most important aspects of woodturning is how to support the workpiece on the lathe. There are different methods and devices for holding and securing various types of wood, depending on the shape, size and orientation of the grain. In this introduction, we will briefly review some of the most common ways to support workpieces on a wood lathe, such as using a spur center, a live center, a faceplate, a chuck or a mandrel.
Spur Center / Live Center
- Mark the center of the workpiece on both ends with a center punch or an awl.
- Make sure the morse tapers in the headstock and tailstock are clean.
- Insert the spur center on the headstock spindle and the live center in into the tailstock.
- Mount the workpiece on the spur center by aligning the center mark with the tip of the cone and pushing it firmly onto the spurs.
- Support the other end of the workpiece with a live center or a dead center on the tailstock. Adjust the tailstock position and pressure until the workpiece is held firmly and rotates smoothly.
- Lock the tailstock in place and check for any wobble or misalignment of the workpiece. If necessary, adjust the spur center or the tailstock until the workpiece is centered and balanced.
- Spur centers will tend to dig in as you start to turn the piece, the tail stock should be re-tightened shortly after starting your work, and checked periodically.
Sometimes you may want to set the spur center into the workpiece with a hammer. if you do this ONLY use a wooden or deadblow. A metal hammer will flare or chip the taper of the center.
🚫 Do not hammer on anything installed on the lathe as it will damage the bearings.
Face Plate
A faceplate is usually the most sturdy option for mounting workpieces. they are good for work where using the live center would be cumbersome. The downside is that you have to contend the screws when cutting and the holes that they leave afterwards.
- Ensure the side that you want to attach the face plate to is flat
- Mark the center of the workpiece drilling a small hole at the center will help with later alignment.
- Align the centers of the faceplate and the workpiece.
- Use #12 wood screws or sheet metal screws to secure the workpiece to the face plate. Make sure the screws are long enough to penetrate the workpiece but not too long to interfere with the cutting tool.
- Check the balance and clearance of the workpiece and adjust if necessary.
- Turn on the lathe and test the rotation speed. If there is excessive vibration, reduce the speed or re-balance the workpiece.
Face Plate Tips
- Drywall screws have deep, sharp threads but aren't hardened don't use them.
- Wood Turners like sheet metal screws because they are case hardened with deeper and sharper threads than wood screws.
- If you don't want screw holes in your workpiece you can glue a spoil piece to it and screw the face plate into that. Use wood glue only on dry wood, if you gluing green wood you will want to use CA glue. The spoil piece can be cut off after turning.
4 Jaw Chuck
The PSI 4 Jaw Chuck is a lathe chuck system that is designed to hold workpieces securely in place while you work on them. It has 4 sets of jaws to accommodate various sizes of workpieces.
- Thread the chuck onto the lathe headstock.
- Open the jaws
- Insert the end of the workpiece into the jaws.
- Insert the tightening posts into the holes on the rings of the chuck.
- Rotate the rings to tighten the posts.
| Jaw Style | Gripping Dowell Interior Diameter | Gripping Hole Exterior Diameter |
|---|---|---|
| #1 Step Jaws | 11/16” to 3-3/8“ | 0” to 1-7/8“ |
| #2 Round Jaws | 2” to 3-7/8“ | 1-1/2” to 3-3/8“ |
| #3 Wide Jaws | 3-1/16” To 4-3/8 | N/A |
| Pin Jaws | 1/4“ to 1” | 7/8“ to 1-5/8” |
This chuck requires the 1 1/8“ to 1” adapter to be able to attach to the spindle.
Gripping Round Stock
Consult the table above for the size ranges of each jaw set. The strongest grip is with the jaws about 1/4“ separated from each other. If you look carefully you will see that the jaws circle is most circular with a gap between the plates. When it's closed the whole way it's more of a rounded diamond.
Gripping Square Stock
The jaws can grip square stock where the corners exit the gaps in the jaws.
Cutting A Tenon
Check out this video for cutting a perfect tenon, there is nothing I can add.
Cutting a Mortise
You can use the forstner bits in the tailpiece drill chuck holder to cut a mortise. Then use the detail scraper to add a dovetail to it.
Mandrel
The 4 jaw chuck also has a mandrel that can clamp into the center of the jaws. You can drill a hole in the center of your workpiece and screw it onto the mandrel until it's snug up against the top of the jaws.
Vacuum Chuck
The vacuum chuck consists of a few parts. There is the chuck cup itself that threads onto the spindle. It has a gasket on the cup side that seals against the workpiece. The second part is the spindle vacuum adapter. This is inserted into the spindle at the handwheel and held in place with the green painted holding bracket. Once that is installed it's time to attach the hoses. The female air hose coupler that is on the back of the headstock goes into the spindle vacuum adapter. The male air hose coupler from the headstock plugs into an shop air compressor line.
Any time that the shop air line is connected to the lathe it will be consuming a significant amount of shop air and will cause the air compressor to cycle on frequently. Don't leave it connected needlessly.
On the control panel there is a knob/switch and a pressure gauge. When the switch is set to off the venturi vacuum system inside bypasses the air and it is just exhausted into the shop. This is why you don't want to keep the hose connected when not actively working. When the switch is turned to on. it enables the vacuum. Hold your workpiece up against the cup until it starts to hold.
The recommended air supply pressure for the chuck is 90 psi.
The manual does not supply any tips on what vacuum pressure readings on the guage are sufficient or tips on how to use the chuck, These can be added here as more knowledge is gained.
The gasket on the chuck is attached with contact cement. If it needs to be redone there is contact cement in the back and the gasket and the cup can be cleaned with acetone.
Consider using tape to prepare the surface of your workpiece so that the vacuum chuck has a smoother surface that is less air permeable to hold onto. Painters/Masking tape helps slightly but isn't ideal. Other kinds of tapes should be tested.
Check Balance
Once your workpiece is supported you will want to check the balance of of the lathe. Before powering on the lathe with a new workpiece spin it by hand and make sure everything looks ok. Then you can rotate the lathe at a slow speed and observe the rotation.
After checking balance if you're using a spur center check the tension on the live center. You will likely need to tighten it several times as you start working the piece and the spur center digs into the wood.
Setting Tool Rest
Once your workpiece is supported and rotation is checked in the lathe you can set the tool rest.
Distance From Workpiece
You want the tool rest as close as you can get it to the workpiece that still allows you room to maneuver the tool along the rest. 1/2” is the ballpark that you want to be in. 3/4“ is usually too far away and it should be adjusted.
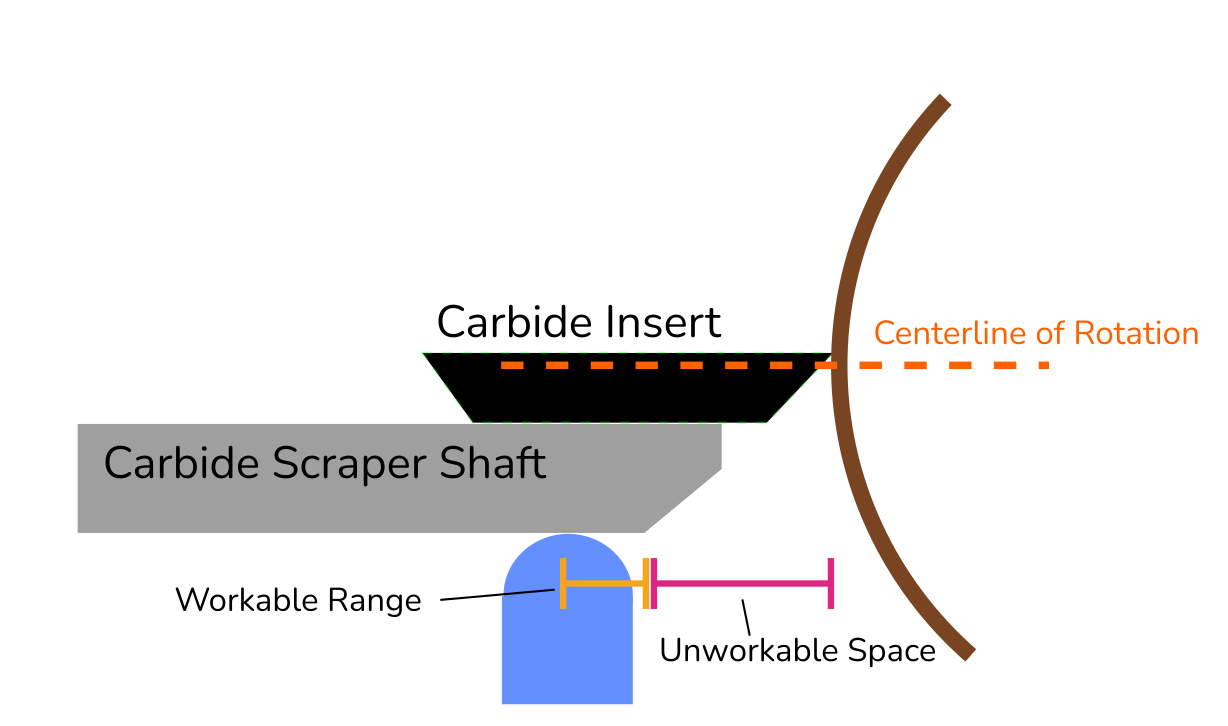
Having the tool rest too close can be problematic as there is not enough room to maneuver the tool along the rest before it contacts the workpiece. Tools like Carbide Scrapers have some distance from the tip of the cutting insert to where the bottom of the shaft becomes flat. You will want to ensure that you have enough space that you can set the flat shaft on the rest without contacting the workpiece.
As you advance the cut you will need to adjust the tool rest many times to keep the optimal distance from the workpiece.
⚠️ Having the rest too far away from the workpiece will increase the leverage that the workpiece has on the tool against you. The cutting edge of the tool won't be as stable and will increase risks of rough cutting and catches.
⚠️ Always stop the lathe when adjusting the rest. Having a corner or high spot of a spinning piece hit the rest is a hazardous situation that could dislodge the workpiece forming a projectile. Or it could break the post off the rest.
⚠️ When roughing out a piece you may have high spots or uneven rotation to contend with. Always rotate the piece by hand after adjusting the rest to ensure none of the high spots contact the rest.
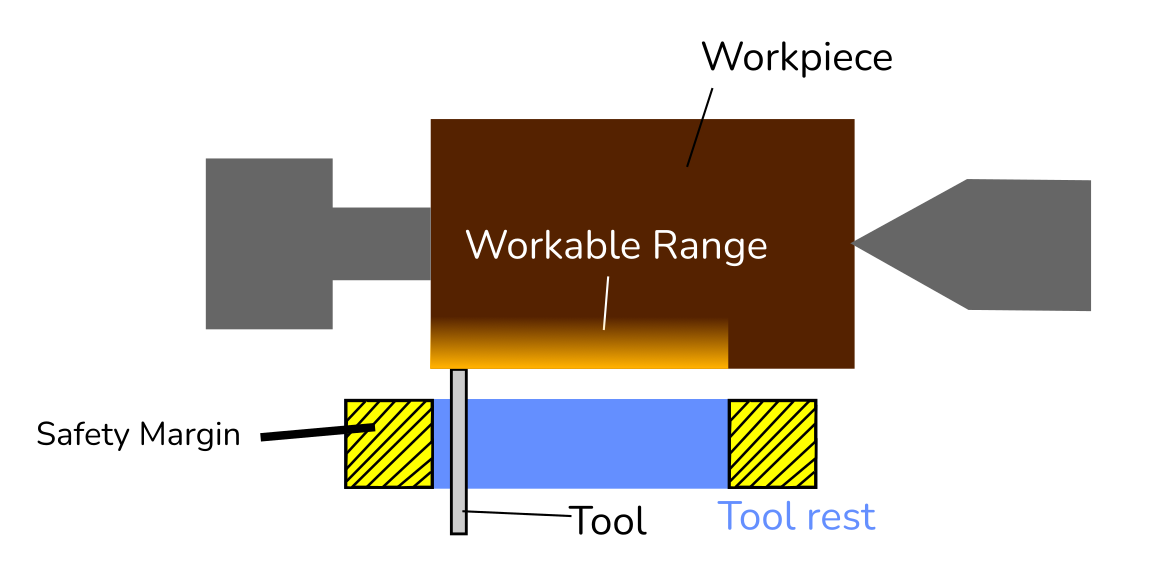
Horizontal Position of the Tool Rest
Always leave a margin on the end of the tool rest 3/4” past the area that you're working. Running the tool off the end of the rest can be hazardous. In the diagram above the tool rest will need to be moved to finish the work on the right side.
Height of the Tool Rest
The ideal spot to engage with the workpiece is slightly above the centerline of the spindle rotation. Project a horizontal plane out from the center of the spindle and then aim for roughly 1/8“ above that line. The actual distance above the center of rotation will vary based on personal preference, diameter, and material of the workpiece.
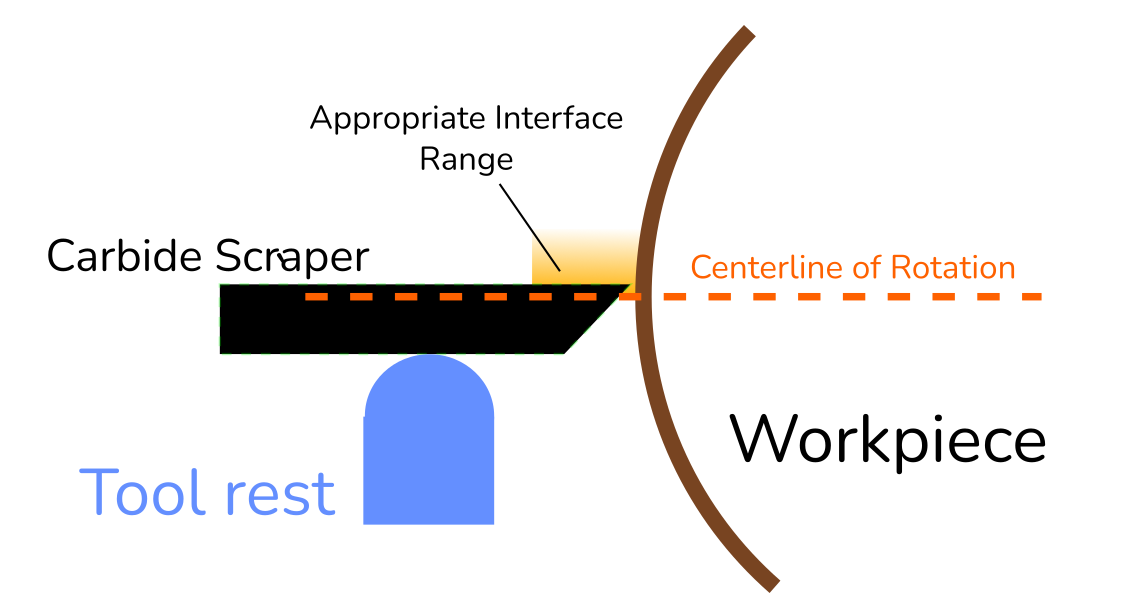
⚠️ When setting the height of the tool rest you need to take into account any additional height that the cutting tool adds above the rest.
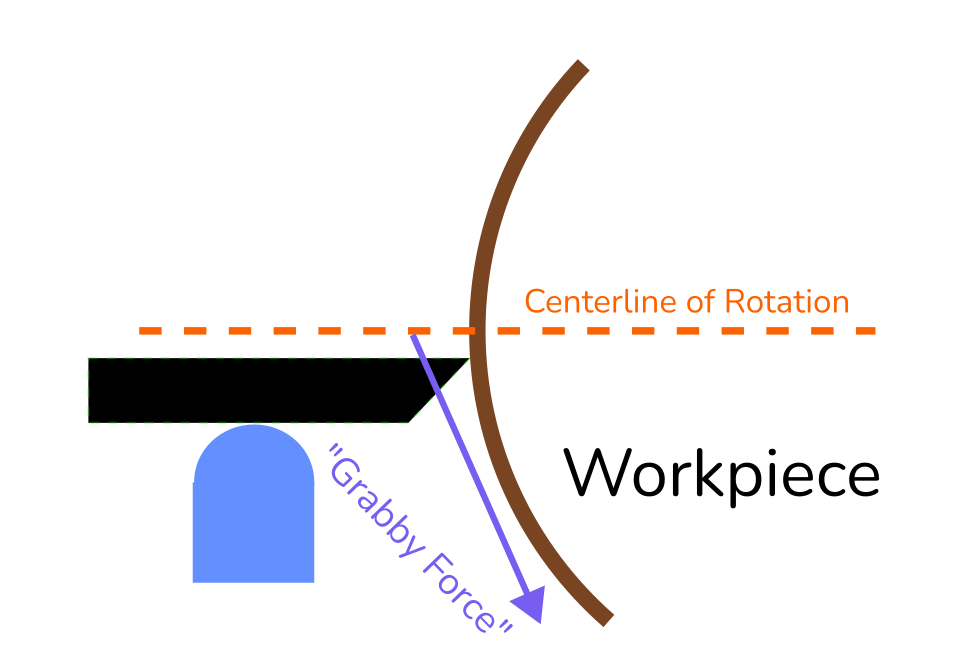
⚠️ Introducing the tool below the centerline will increase the risk of a catch. With the material moving angularly away from the tool it will have a tendency to grab the tool and pull it deeper into the work.
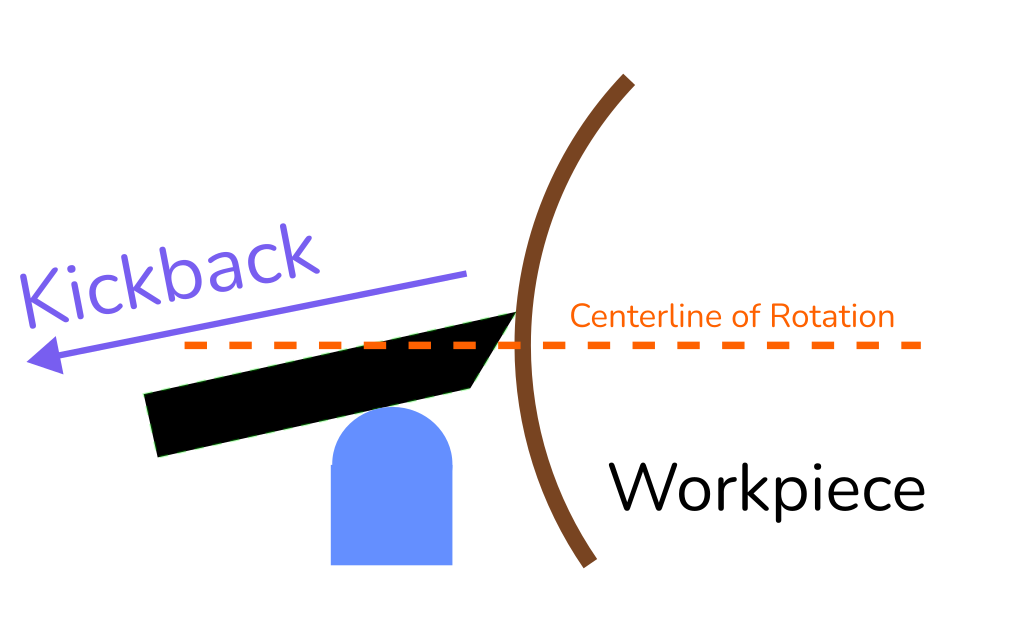
⚠️ Angling the scraper up into the workpiece will have a similar effect to raising the tool rest but there is an increases risk of tool kickback as the forces aren't perpendicular to the tool rest.
⚠️ If the tool is too high the workpiece might not engage the cutting edge rather riding the bevel and failing to make a proper cut.

Once the position of the tool rest is set spin the workpiece by hand and ensure the clearance is appropriate.
Starting Lathe
When starting a wood lathe with a newly mounted workpiece, you should turn on the power and start the lathe. Keep one hand on the E-Stop and immediately stop the machine if there is any vibration or wobble from the spinning workpiece. You should adjust the speed as appropriate for turning technique, workpiece material, and configuration.
⚠️ When starting on a new workpiece, stay out of rotational plane of the workpiece incase the work holding isn't sufficient.
Start slow for roughing based on the info in the table below and keep an aye out for vibration and remember to check the tension on the live center a few times.
Recommended Lathe Speeds
The table provided here is from the Powertech Manual
| Diameter of Work | Roughing RPM | General Cutting RPM | Finishing RPM |
|---|---|---|---|
| Under 2” | 1520 | 3000 | 3000 |
| 2“ - 4” | 760 | 1600 | 2250 |
| 4“ - 6” | 510 | 1080 | 1500 |
| 6“ - 8” | 380 | 810 | 1125 |
| 8“ - 10” | 300 | 650 | 900 |
| 10“ - 12” | 255 | 540 | 750 |
| 12“ - 14” | 220 | 460 | 640 |
| 14“ - 16” | 190 | 400 | 960 |
| 16“ - 20” | 175 | 325 | 450 |
| 20“ - 24” | 175 | 260 | 375 |
Too Fast?
An unbalanced workpiece spinning at the wrong speed can cause the lathe to shake and become unbalanced. High RPM can dislodge the workpiece, whereas a low RPM can lead to a poor surface finish. Flawed wood can break apart due to the centrifugal force created by excessive speeds1. Excessive lathe speed generates too much friction, which results in heat. Heat can cause the wood to check, and it causes the sandpaper to breakdown. Excessive lathe speed also can cause dust to build up between the sandpaper and the wood, which prevents wood abrasion
Also when turning bowls there is a rule of thumb to keep it under 1000 RPM. According to a FAQ on turnawoodbowl.com, you should keep the lathe speed under 1,000 RPMs when turning wood bowls. The bowl blank will fall from the lathe at this speed. Speeds faster than 1,000 RPMs can send the bowl upward.
Holding Cutting Tools
Proper holding of the tools will help you be safe, have better control, and become less fatigued while turning.
- Always hold tool with 2 hands.
- Hold tool handle against body for optimal rigidity and stability.
- Ensure tool shaft is resting against the tool rest.
- Front hand on shaft behind lip of tool rest.
- Underhand grip ideal for detail work
- Overhand grip for roughing work. Additional stability is created by applying pressure down into tool rest.
- Move your body to move the tool, keep handle against your body for maximum support.
Starting a Cut
I'll be describing how to use a carbide scraper as those are the shop supplied tools. Techniques vary with other tools and are not in the scope of this document.
- Ensure the workpiece spins freely and does not contact the tool rest
- Start the lathe and bring it toe the appropriate RPM for the task at hand, if you are starting it for the first time stay out of the plane of rotation until you have confidence the workpiece is well supported.
- Observe any high spots on the workpiece and where you can place the scraper on the reset without it contacting the workpiece.
- Place the shaft of the tool on the tool reset horizontal to the ground.
- Slowly advance the scraper into the workpiece, If using a square cutter it is often better to only engage 1/3 to 1/2 of the width of the cutter at the edge of the workpiece to reduce the risk of a catch.
- Work the scraper across the tool rest slowly and remove material.
There is a good trick for monitoring your progress, instead of trying to look at the wood where you have the cutter, look at the top side of the workpiece you can often better see the cut on the top side.
⚠️ Running the lathe in reverse may make the threads on the spindle want to unscrew. Please do not run the lathe in reverse when hollowing out the inside of a bowl, especially if no set screw is preventing the workpiece from unscrewing from the spindle.
Additional Resources
- Read Pages 22-28 of the manual There is some good stuff in there.
- Youtube has tons of great info. I've learned tons from Kent at https://turnawoodbowl.com.
Tool Care
Clean
Clean is the name of the game with the lathe. It makes a terrible mess when in use. And dust, dirt, chips, etc can cause problems.
- Dirt in the morse tapers can lead to unreliable support of the workpiece potentially leading to damage of the spindle or quill
- Dirt and chips on the bed ways can jam up the banjo or tailstock and causing their clams to need accelerated maintenance.
- Excessive Dirt on the ground can lead to unstable footing.
Keep things clean and you will be happier.
Sharp Tools
Having tools that are less than sharp is a huge contributor to issues when using the lathe. one instantaneous catch can ruin hours of work. It can be hard to know when your scraper needs to be changed and I'll keep looking for ways to document but follow the guidance above.
Inspection
Before you start using the printer you are expected to do an initial inspection of the printer and access its readiness for use. This was covered in the safety section
Tool Reports
If you observe anything noteworthy big or small about the machine please file a tool report. It helps the staff and volunteers keep our tools running optimally and prevents downtime.
- Record issues at https://www.protohaven.org/tools/. This notifies our staff and volunteer maintenance crew of any issues.
Troubleshooting
Lathe won’t start
- No incoming power. Check power supply, lead connections
- Remote switch stop is active. Reset remote switch.
- Problem with inverter. Contact Powermatic Technical Service.
Motor or spindle stalls or will not start
- Excessive cut. Reduce depth of cut.
- Improper belt adjustment, or worn or broken belt. Adjust or replace belt as needed.
- Improper cooling of motor. Blow out sawdust from motor housing fan.
- Worn spindle bearings. Replace bearings. Worn motor. Replace motor.
Excessive vibration
- Workpiece warped, out of round, has major flaw, or was improperly prepared for turning. Correct problem by planing or sawing workpiece, or discard entirely and use new workpiece.
- Worn spindle bearings. Replace spindle bearings.
- Worn drive belt. Replace drive belt.
- Motor mount lock handle is loose. Tighten lock handle.
- Lathe on uneven surface. Adjust leveling feet.
Tools tend to grab or dig in
- Dull tools. Keep tools sharp.
- Tool support set too low. Reposition tool support height.
- Tool support set too far from workpiece. Reposition tool support closer to workpiece.
- Improper tool being used. Use correct tool for operation.
Tailstock moves when applying pressure
- Cam lock nut needs adjusting. Tighten cam lock nut.
- Lathe bed and tailstock mating surfaces are greasy or oily. Remove tailstock and clean surfaces with a cleaner/degreaser.
Staff Use
| ⚠️ AUTHORIZED MAINTENANCE GROUP ONLY |
If you are part of the maintenance group please log on to the #maintenance channel of our Discord server to:
- Perform a Maintenance Action
- Request a Maintenance Purchase
- Review complete Maintenance Logs for each machine
- Generally chit-chat about maintenance
Tools
Regular Maintenance
Before doing maintenance on the lathe, disconnect it from electrical supply by pulling out the plug or switching ff main switch. Failure to comply may cause serious injury.
Maintenance on the 4224B Lathe should be performed at periodic intervals to ensure that the machine is in proper working order, that all fasteners are tight, and all necessary adjustments have been made. Inspection and maintenance should be performed at least twice a year, but more frequently if the lathe receives constant use.
Clean and oil the lathe bed(s) so that headstock, tailstock and tool support base will slide easily. Clean any rust spots that may develop on the bed with a commercial rust remover.
Use compressed air to blow out the interior of the headstock, in order to keep sawdust and chips from accumulating on belts and sheaves. Also blow off debris that accumulates in the motor fan, and on the inverter. Do not disassemble inverter to clean!
Frequently clean out the morse tapers on both headstock and tailstock.