Table of Contents
Walking Foot
- Model: Juki Walking Foot DNU 1541s
- Manufacturer: Juki
- Manual: Download
This machine is intended for use on heavy materials like vinyl, leather and heavy layers of upholstery. The stepping feeding motion promises the consistent feeding of multiple layers or heavy duty materials without stitch gathering or layer unevenness.
Maximum sewing speed is 3,000 stitches per minute!
Requirements
Industrial Sewing Machine clearance or class equivalent is required before use.
Warnings
🚫 Do not push or pull material while stitching.
⚠️ Power off the machine before threading, inserting the bobbin, or handling the needle.
⚠️ This machine retains some power in the motor after powering off. Drain it by pressing the foot pedal while keeping hands away from the machine.
⚠️ Keep hair, loose clothing, and fingers away from all moving parts!
See the Common Hazards section for more information.
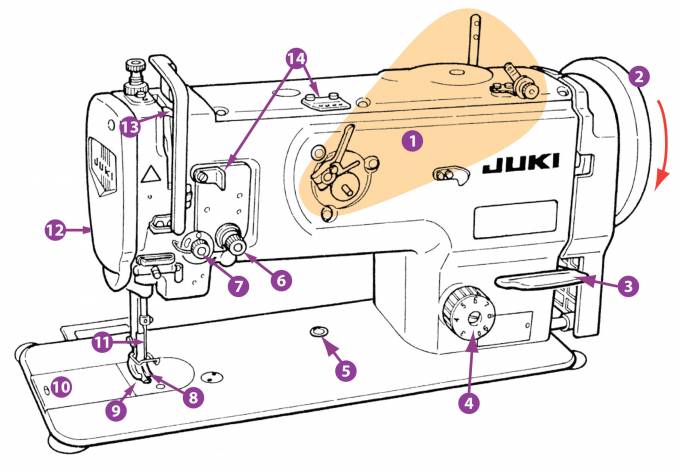
MACHINE ANATOMY
1. Bobbin Winding parts - pre-tension bar, tension, and winder
2. Hand Wheel - Manually advances the machine (turns downwards only)
3. Reverse Lever - to allow back-stitching at the end of seams
4. Stitch Length Selector - Adjusts size of stitch
5. Safety Clutch - Release button for safety lock out mechanism
6. Tensioner - keeps stitches even
7. Check Spring - Keeps the thread taught as the take-up lever moves.(Do Not Adjust!)
8. Walking Presser Foot - Holds material down to the bed while sewing
9. Feed Dog Mechanism - Moves with presser foot to feed material
10.Bobbin Hatch Cover
11.Needle
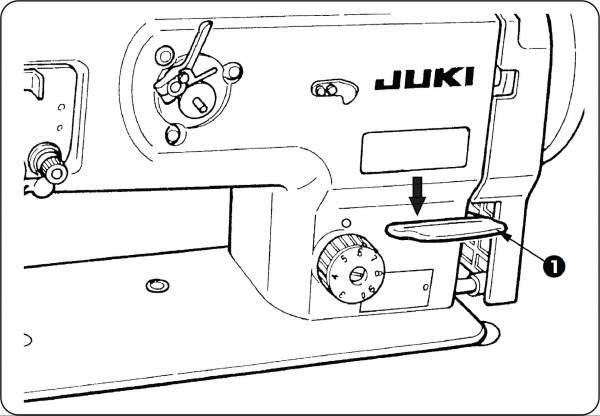
12.Manual Presser Foot Lifter (back of machine head)
13.Thread Take-up lever - part of the thread feeding mechanism that pulls thread off the spool
14.Flat 4-hole Thread Guide and 2-hole Thread Guide
Tool Safety
COMMON HAZARDS
The most common hazards are thread jams and broken needles. Watch for binds and jams —stop immediately if they occur.
- This machine has a safety mechanism to avoid jamming. It must be reset after a jam before continuing. (See Safety Reset)
- Ensure the needle and thread are removed before winding a bobbin
- Avoid pulling/pushing fabric, which may misalign and break the needle
The most significant hazard is injury. Always power off and run the machine until the motor drains before handling, adjusting, or threading.
- Keep fingers 3” away from the needle
- Power off and drain the motor before:
- Threading
- Replacing needles
- Removing jams
- Tie back hair and scarves
- Tuck sleeves behind elbows
PROHIBITED MATERIALS
Thread Jams and needle breakage are critical concerns. Material that is too thick or rigid will lead to needle breakage.
Industrial machines will not “step over” pins in the fabric. Hitting one will break the needle and send broken parts into the hook below.
For those reasons, it is important to avoid:
- Pins in the fabric
- Abrasives
- Paper and cardboard products
- Plastics
- Rigid Material (non-fabric)
Initial Setup
Wipe down the machine and bed to clean up any oil or dust. Power on the machine. Ensure safety is not engaged, if the machine seems to be jammed, see Troubleshooting. Wind the bobbin. Power off the machine to insert the bobbin and thread the machine. Ensure the needle is usable and appropriate for the material and thread. Set the needle position. Begin operation.
CONSUMABLES
Appropriate needles and bobbins are available in the consumables section of our store front. Both are sold individually for ease and convenience.
Members are responsible for bringing their own thread and fabric.
- Bobbins: Size “M”, standardized metal bobbin
- Thread
- Must be in a Cone or Vicone to accommodate high speed
- Always use the same thread in the upper tension and in the bobbin
- Fabric: light to heavy weight fabrics
- Needle (see chart below):
- Size Range for machine: 135 x 17, 135 x 16 (Nm160) Nm125~Nm180
- Point Type: appropriate to fabric
- Eye: must be 40% larger than the thickness of the thread
| Needle Type (shape of the point) | Needle Size (Fine to heavy) | Fabric Type | Thread Size (Measured in Tex, Denier, mm and weight) |
|---|---|---|---|
| Universal R or DP | 70 up to 230 | Light to heavy woven | Light to medium |
| Ballpoint RG, FFG, G | 100 to 125 | Light to medium knits, jerseys, stretch, bulky knit | Light to medium |
| Jeans R | 100 - 110 | Medium to Heavy | Medium to Heavy |
| Leather/Vinyl LR, LL, P, PCL, S, D, GH | Range of sizes | Heavy/Layers | Heavy |
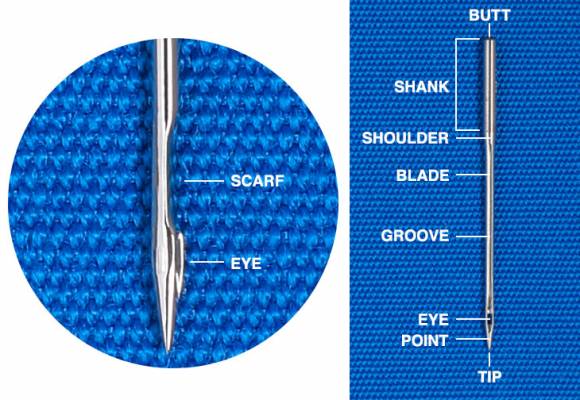
NEEDLE ANATOMY
CHECKING NEEDLE SIZE
- Grab a needle and about 12 inches of the intended thread
- Thread the needle
- Hold both ends of the thread, creating a 60 degree slope with one end to see if the needle is able to slide along the slope
- Reverse the process to see if the needle slides back
If the needle does not freely slide down the thread, the size may be too small. As a general rule, you’ll want the smallest size needle that will slide freely down the thread.
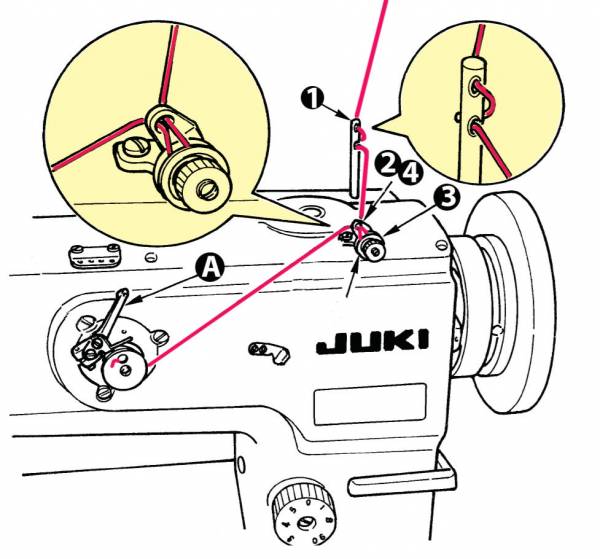
WIND THE BOBBIN (Size M available in the Protohaven store)
Caution : Be sure all object are off the table! The needle does not dis-engage like a consumer machine. It is preferable to remove the needle to avoid injury.
- Check the bobbin housing for lint, brush it out if necessary.
- Pass the thread in order of (1) through (4)
- Lift the manual presser foot lever to raise the presser foot.
- Gently push the foot pedal until the bobbin is full—it shuts off automatically.
Please Note: If the bobbin is lop-sided, it can be used with caution, although it can affect tension.
WINDING THE BOBBIN WHILE SEWING
For large projects, a second bobbin can be wound while sewing.
- A second spool of thread is required.
- The needle and presser foot remain in place
- Follow all other instructions in “Bobbin Winding” above
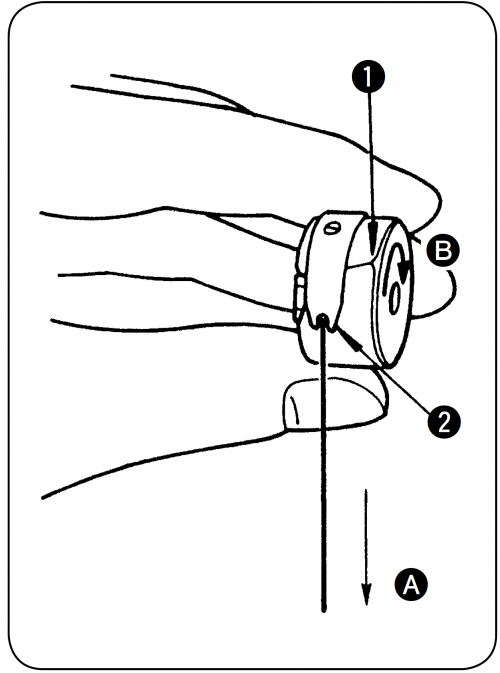
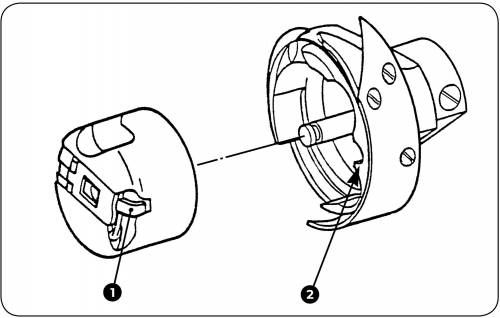
ATTACH BOBBIN CASE
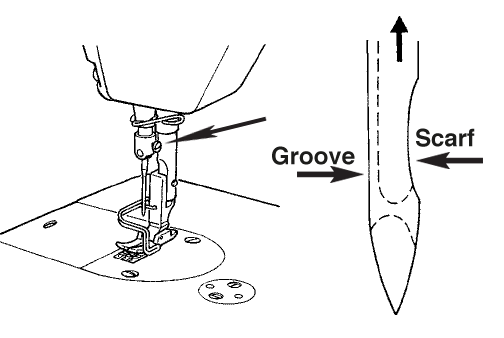
INSERT NEEDLE
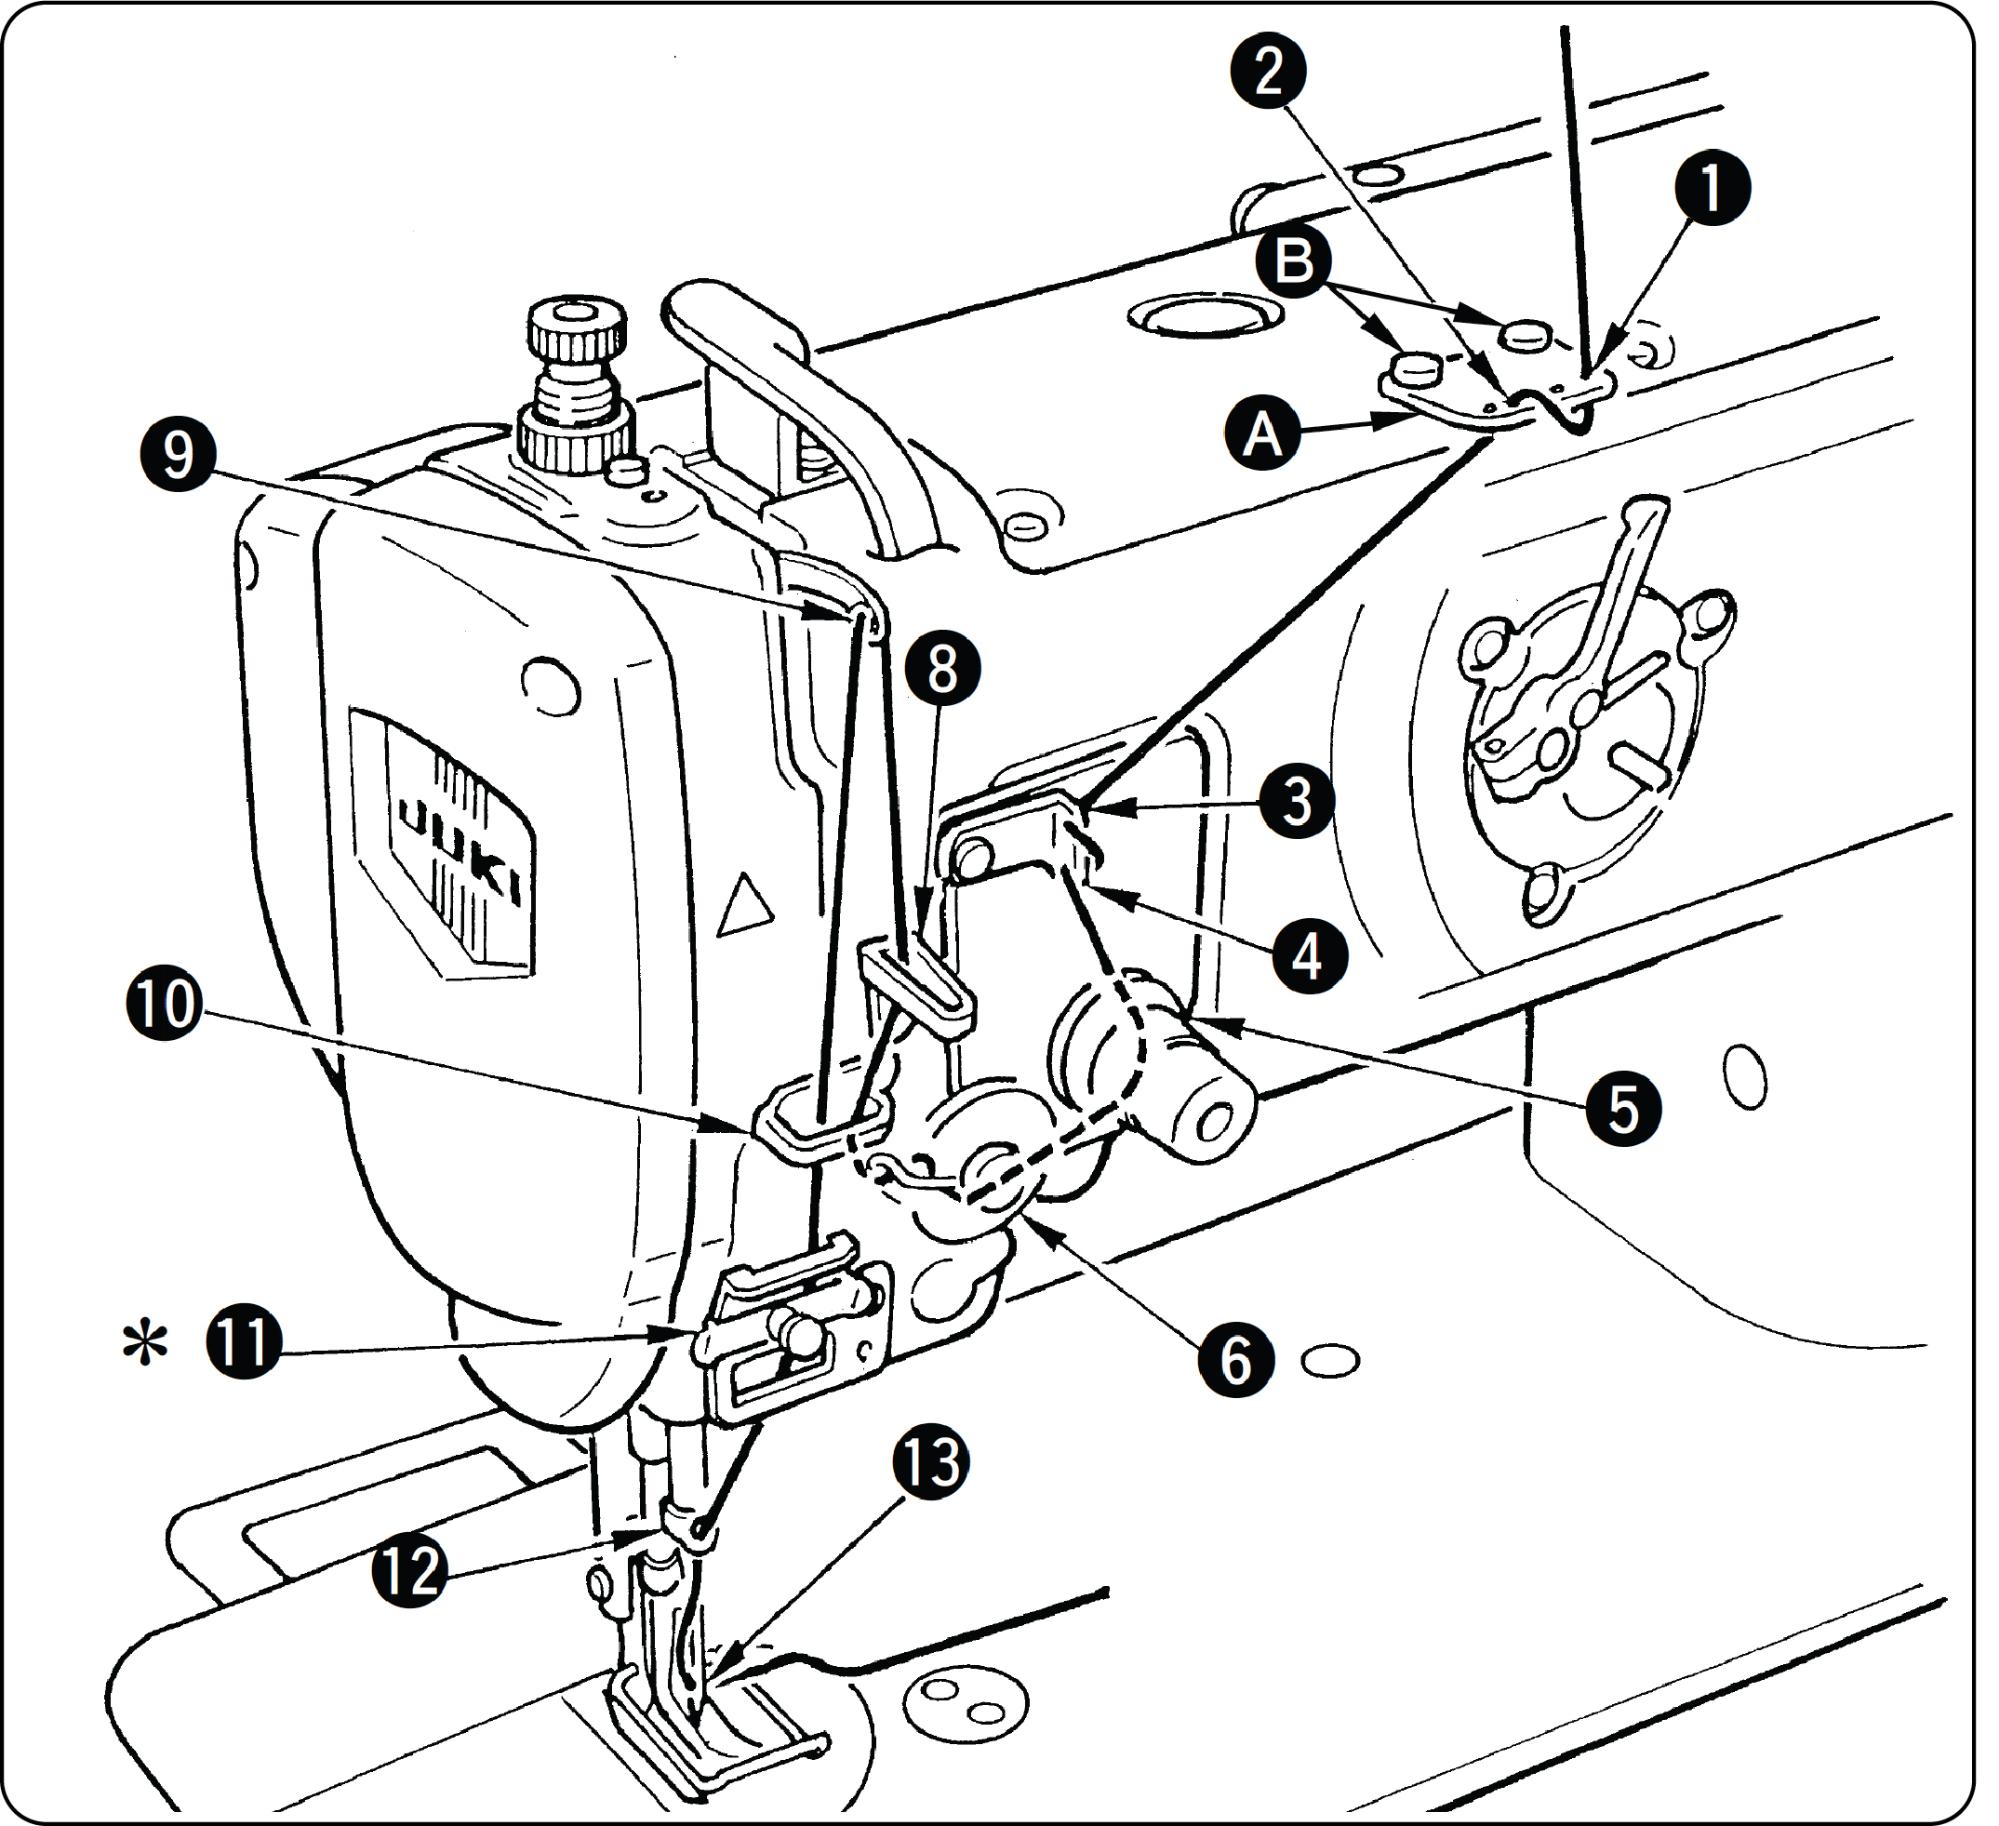
THREAD THE MACHINE
Thread the machine following the order of (1) through (13) as shown above.
Move the handwheel towards you, never away to get the top thread to take up the bobbin thread.
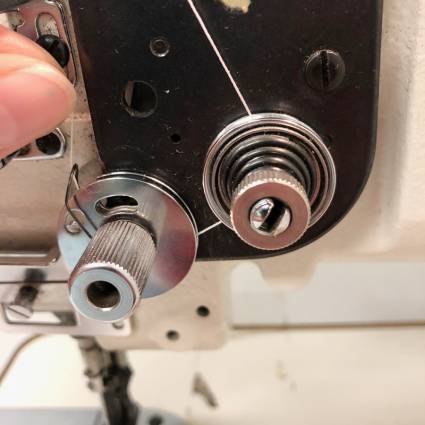
CRITICAL THREADING DETAILS
|  |
|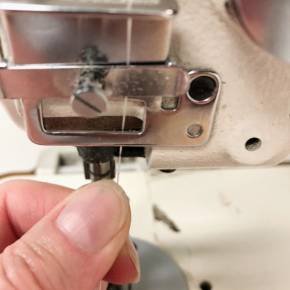 |
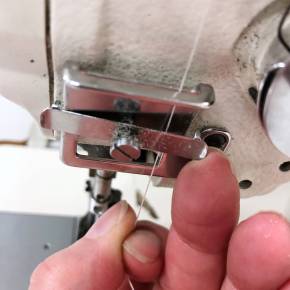
| 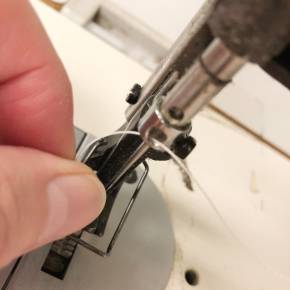 | Down through and under the next two guides and the bottom slot, then through the hole above the needle
Basic Operation
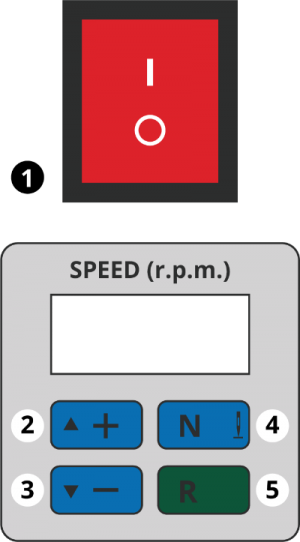
CONTROL PANEL
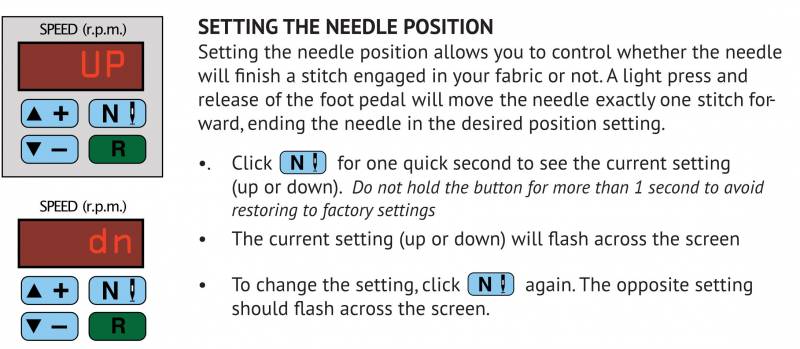
SETTING THE NEEDLE POSITION
Setting the needle position allows you to control whether the needle will finish a stitch engaged in your fabric or not. A light press and release of the foot pedal will move the needle exactly one stitch forward, ending the needle in the desired position setting.
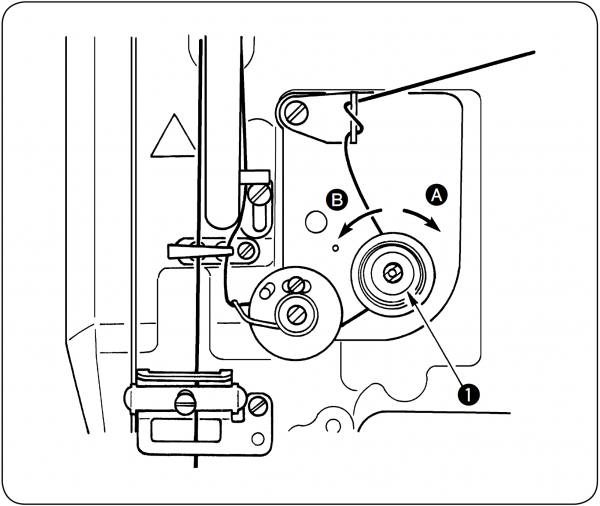
ADJUSTING THE TENSION
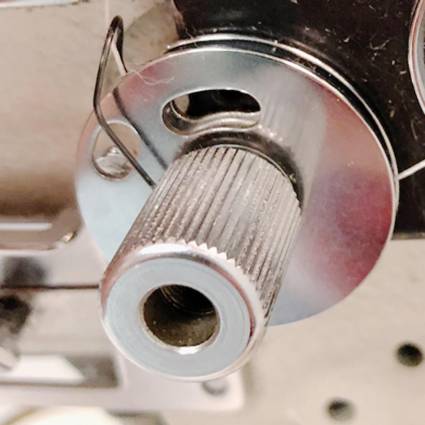
To increase the tension, turn the tension nut (1) clockwise (A). To reduce the tension, turn the tension nut (1) to the counterclockwise (B).
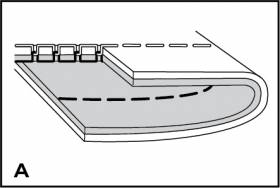 | 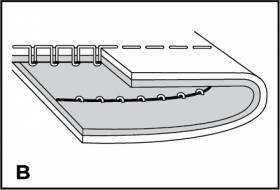 | 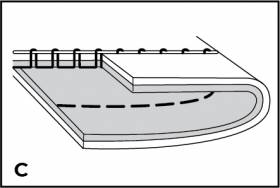 |
| Normal tension for straight stitch sewing. | Too loose for straight stitch sewing. | Turn the dial clockwise to increase tension. |
BACK STITCH/REVERSE SEWING
SAFETY RESET
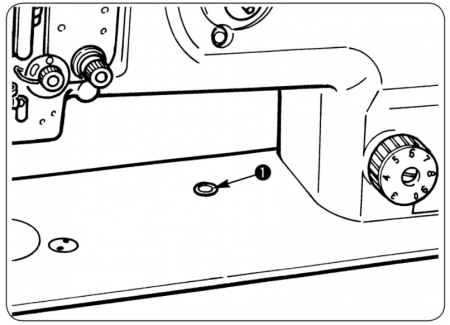
This machine has a safety to protect the mechanism from damage during a jam. The handwheel will be frozen, and the hook will not rotate around the bobbin.
Cleanup
- Power off and drain the machine
- Unthread machine head and spool
- Remove bobbin
- Wipe down, vacuum, and brush out lint and stray clippings
- Sweep up threads, lint, and debris and deposit in waste bins
- Return checkout kit
Maintenance Requests
If you encounter any of the issues listed in the Inspection area or have any other issues with the tool not working properly:
- Update the physical Maintenance Tag at the machine
- 🟢 Green can be used without issue
- 🟡 Yellow can be used with caution
- ⛔ Red cannot be used without hazard to either the user or the equipment
- Record issues at http://protohaven.org/maintenance. This notifies our staff and volunteer maintenance crew of any issues.
Troubleshooting
| Common Issues | Possible Causes | Resolutions | |
| Machine stops working after a jam—the hand wheel will not turn, or the hook does not rotate around the bobbin. | The safety mechanism has locked the hook. | Power off and drain the machine. (see Safety Reset above) Remove the jam near the needle and below, inside the bobbin housing. Reset the safety. | |
| Thread comes out of the tensioners | The thread around the check spring disk isn’t pulled up until it clicks. | Re-thread the machine with the presser foot raised to take tension off during threading. See Critical Threading | |
| The check spring disk may be loose. | Make a maintenance request at http://protohaven.org/maintenance and notify the tech on duty. | ||
| Missed stitches | The needle is inserted improperly. | Be sure that the scarf is to the right | |
| The needle is threaded right to left | Re-thread left to right | ||
| The needle is bent or broken | Replace the needle | ||
| Loud noise while winding the bobbin | The presser foot is down. | Use the manual lever to pick it up. Unthread the needle, (preferable take it out) be sure nothing can roll towards the drive shaft. | |
| Thread seems stuck—can’t pull stitched fabric away from the presser foot after sewing the seam. | The tensioners are not dis-engaged | Push the knee pedal HARD to the right to dis-engage the tension. |
Special Setups
CHECK SPRING
The Check Spring is used to alter the amount of thread being pulled away from the thread spool above, used for very small or very large stitches or very thick material..
To adjust the stroke of the check spring, please make a Special Setup Arrangement with a Protohaven Staff Member to gain clearance in advance of use.
Additional Resources
HOW-TO GUIDES
Juki Walking foot overview:
www.youtube.com/watch?v=qfXDo4xr-FU
www.youtube.com/watch?v=cr2VmyJDZFk
How to thread and oil the Juki walking foot:
www.youtube.com/watch?v=aaNsmgHQzTo&t=31s
www.youtube.com/watch?v=Y1ZYwIwYRC0&t=2s
Sewing Gold Channel: Operating videos on many machine models, and how-to’s on sewing a range of fabrics
SUPPLIES
Wawak —Place to buy Needles and thread of every type, including heavy duty and embroidery
The Thread Exchange - thread and needles
Staff-Use
| ⚠️ AUTHORIZED MAINTENANCE GROUP ONLY |
If you are part of the maintenance group please log on to the #maintenance channel of our Discord server to:
- Perform a Maintenance Action
- Request a Maintenance Purchase
- Review complete Maintenance Logs for each machine
- Generally chit-chat about maintenance
Tools
The following should be in a Maintenance tool kit for the….
- item1
- item2
Regular Maintenance
Lubrication
- Faceplate, manual p. 15
- Top plate, manual p. 16
- Hook, manual p. 17
Safety Clutch Release
- Resetting the Safety Clutch, manual p. 43
Adjusting the Check Spring
The check spring must always be taut so that it naturally bounces back. If the nut has been loosened, and the spring is not pulling back down, it must be reset.
- Adjusting the thread take-up spring, manual p. 28

