Table of Contents
Serger
- Model: Juki Serger MO 6700
- Manual: Download
A serger can bind the edge of fabric while sewing the seam. This machine can be used with three threads, resulting in a “Merrow” which works well on knits and finishing raw edges, or with the second needle, which adds a chain-stitched seam as a durable seam next to the bound edges. Several widths of stitches are possible. The Tool Safety, Tool Care, Operation, section of this guide are what instructors use to ensure that you can use the equipment according to community expectations.
Requirements
Industrial Sewing Machine clearance or class equivalent is required before use.
Warnings
⚠️ 1. Power off the machine before threading or handling the needle.
⚠️ 2. Do not force material while stitching.
⚠️ 3. Keep hair, loose clothing, and fingers away from all moving parts!
See the Tool Safety section for more information.
Machine Overview
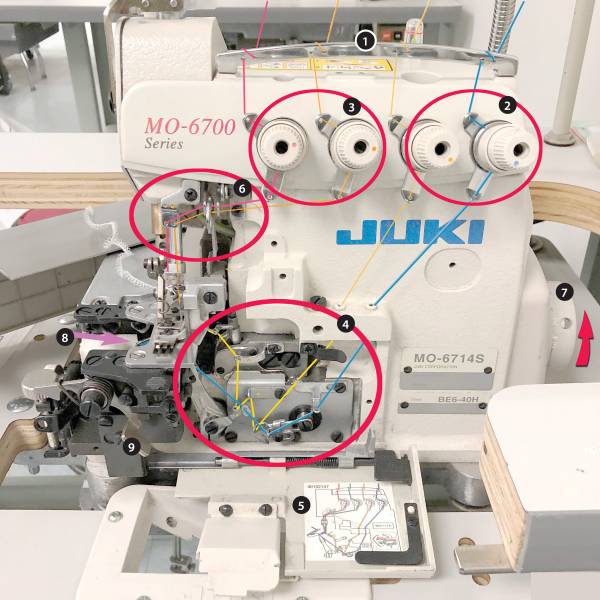
(photo with labels in process)
OVERVIEW
- Power On/Off
- Presser Foot Lift pedal
- Operation Pedal
- Thread holders
- Table latch (below)
- Tensioners
- Finger shield
- Needle(s)
- Oil level indicator
- Maintenance Tag - Manually tracks the usability status with Green/Yellow/Red cards
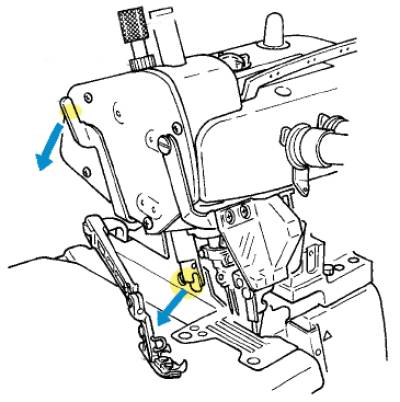
ALL DOORS OPEN - OVERVIEW OF INSIDE
- Thread guide bar - all threads
- Tensions for looper threads
- Tensions for needle threads
- Looper thread guides
- Threading door with diagram
- Needle thread guides
- Stitch size selector
- Access to looper threads
- Door latch
Tool Safety
COMMON HAZARDS
The most common hazards are thread jams and broken needles. Watch for binds and jams, stop immediately if they occur. Avoid pulling/pushing fabric, which may misalign and break the needle.
The most significant hazard is injury. Always power off and run the machine until the motor drains before handling, adjusting, or threading.
⚠️ Keep fingers 3” away from the needle
⚠️ Tie back hair and scarves
⚠️ Roll sleeves behind elbows
⚠️ Power off and drain the motor before:
   * Threading
   * Replacing needles
   * Removing jams
Pin Safety
The Serger will not “step over” pins in the fabric. Hitting one will damage the knife that cuts the fabric while sewing.
- Baste using a consumer machine with a large stitch, or by hand, so that pins aren’t needed on the serger.
- Use mini-clips, removing them as they get closer to the needle. You may need to stop the machine occasionally or sew slowly.
- Instead of typical pin placement perpendicular to the seam,
- Pins can be placed outside of the seam allowance parallel to the seam. Be sure to bury the points on the reverse side of the fabric to avoid pricked fingers!
PROHIBITED MATERIALS
Thread Jams and needle breakage are critical concerns. Material that is too thick or rigid will lead to needle breakage. Material that is too heavy may not be cut through by the knife. Leather will not need serging, and may dull the knife.
For those reasons, it is important to avoid:
- Abrasives
- Paper and cardboard products
- Pins in the fabric (see “pin safety”)
- Plastics
- Rigid Material (non-fabric)
SETUP CHECKLIST
✔ Wipe down the machine and bed to clean up any oil or dust.
✔ Open the underside of the machine and brush away accumulated lint.
✔ Add or take out the left needle, depending on desired seam type.
✔ Thread the machine with your thread.
✔ Power on the machine.
✔ Ensure the needle is usable and appropriate for the material and thread.
✔ Secure the presser foot in position and begin operation.
✔ Test sew on a scrap.
Inserting the Needles
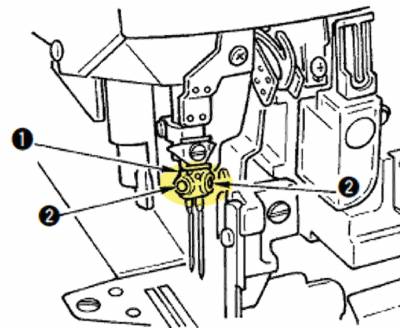
- Bring the needle clamp(1)to its highest position using the handwheel.
- Loosen needle clamp screws (2) and fully insert the needle into the clamp hole with the needle recess (scarf) facing backwards as viewed from the operator’s side.
- Tighten then eedle clamp screw.
- The left needle will sit higher than the right.
Threading the Machine
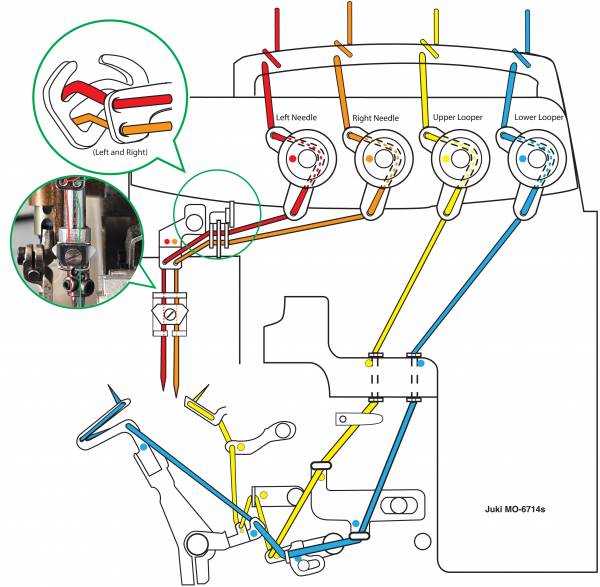
- From the thread holders,the thread goes up through the holes in the gray bars, down through and around the tree-like chrome bars (not shown) In and around the bar at the top of the machine, through the top hole on the tensioner, between the tension disc, out the bottom hole.
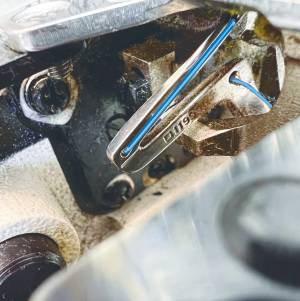
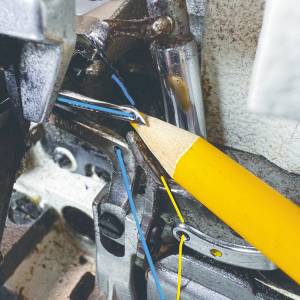
- The blue and yellow lines go through the tunnels in the front of the machine, use a floss threader to pull through the holes.
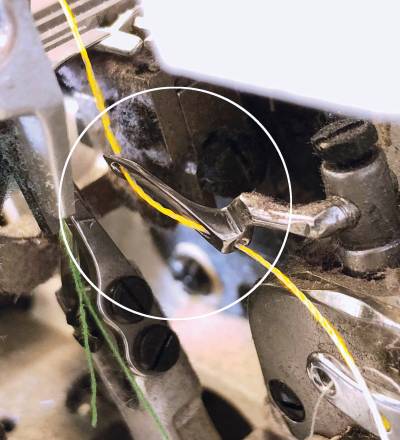
- Follow the yellow and blue line as marked by the dots, using tweezers.
ProTip:Thread the yellow line first! (The blue line overlaps it) - Follow the color coding until the loopers pass under the presser foot.
The red and orange (green) go to the needles.
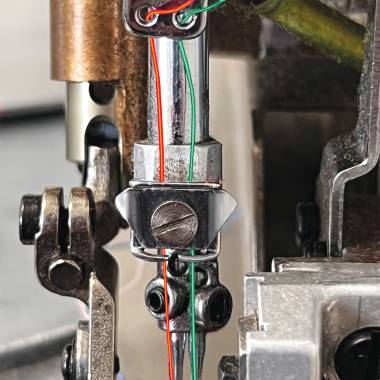
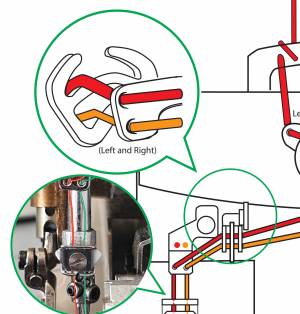 Thread the Needles, following the Orange and Red lines as in the diagram (left,) with special attention to the inset, there is a set of stationary holes on either side of the rocking hook.
Down through two sets of holes and under the keystone, last set of holes, and into the needles.
details
next
CLEANUP CHECKLIST
- Power off the Machine.
- Reset any modified stitch sizes to default. (average)
- Use a brush, tweezers and compressed air to remove fuzz around loopers and inside the bottom door. You should be able to see the thread guides inside.
- Note any maintenance needs or concerns on the tag and at protohaven.org/mainte- nance.
- Discard sliced edges, and all scrap fabric.
- Sweep the floor around the table and machine.
Maintenance Requests
If you encounter any of the issues listed in the Inspection area or have any other issues with the printer not working properly
- Update the physical Maintenance Tag at the machine
- 🟢Green can be used without issue
- 🟡Yellow can be used withcaution
- ⛔Red cannot be used without hazard to either the user or the equipment
- Record issues at http://protohaven.org/maintenance. This notifies our staff and volunteer maintenance crew of any issues.
SUPPLIES/CONSUMABLES
Needle: DC x 27 (standard) DC x 1 may be used Organ B27 / DC X 27
Thread for a serger is generally finer than for a normal sewing machine, and the spools are larger because of the interwoven pattern of the serger. A normal thread spool may not be enough for serging, however some sewists use it for the left needle thread to closely match the color of the fabric.
| Online sources for supplies | |
|---|---|
| Wawak.com | Place to buy Needles and thread of every type, including heavy duty and embroidery |
| The Thread Exchange | thread and needles |
Troubleshooting
| Common Issues | Possible Causes | Resolutions | |
|---|---|---|---|
| Thread breaks | Needle inserted incorrectly, Machine not threaded correctly, bent needle, wrong thread and needle size for the fabric. | Check that the scarf of the needle is facing the back of the machine, revisit threading instructions, paying close attention to the last steps of the looper threading | |
| Seam curls or threads are loose | Incorrect tension for the weight of the fabric and size of the needle | Be sure you are using needle and thread appropriate for your fabric. Adjustments should be done in quarter turn increments!! | |
| Difficult to pass thread through the yellow and blue “tunnels” | Lint is built up inside | Use a floss threader to pull a heavy thread through the tunnels and use heavy thread to clean the tunnels. | |
| Online sources for more information | |||
| Sewdaily.com | [[Doitbetteryourself.club]] - Photos of every combination of tension errors and how to fix them. | ||
Additional Resources
Staff Use
| ⚠️ AUTHORIZED MAINTENANCE GROUP ONLY |
If you are part of the maintenance group please log on to the #maintenance channel of our Discord server to:
- Perform a Maintenance Action
- Request a Maintenance Purchase
- Review complete Maintenance Logs for each machine
- Generally chit-chat about maintenance
Tools
The following should be in a Maintenance tool kit for the….
- item1
- item2

