Table of Contents
Sandblaster
- Manufacturer: SkatblastUSA
- Manual: Link, Dust Collector Manual
The sandblaster uses pressurized air to spray abrasive against your material inside a protective cabinet. This helps you to remove old coatings, surface corrosion and oxidation; prepare parts for painting or powder coating; or even etch patterns into your material.
The Tool Safety, Tool Care, Operation, section of this guide are what instructors use to ensure that you can use the equipment according to community expectations.
Requirements
Sandblaster clearance or class equivalent is required before use.
Warnings
🚫 Do not point the gun at the window, gauntlets, or anything other than the item being abraded
⚠️ Ensure all doors are closed and properly latched before use
⚠️ Always disconnect air before working on blasting gun
See the Safety Section for more information.
Tool Anatomy
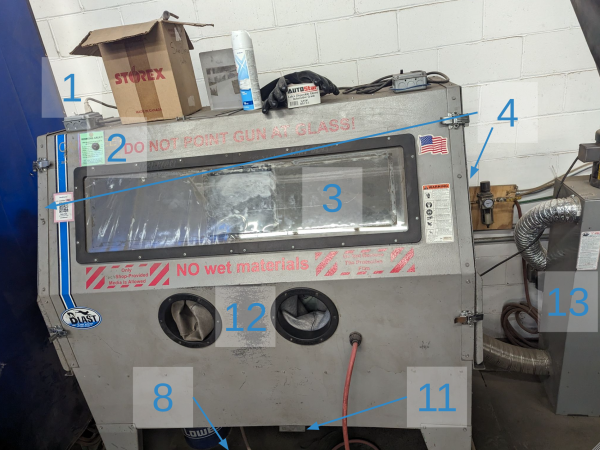
- Power Switch - on/off switch
- Maintenance Tag - Manually tracks the usability status with Green/Yellow/Red cards
- Viewport and protective film - allows the user to see what they’re doing. The replaceable protective film helps preserve the viewport from abrasive damage.
- Access Doors and Latches - allow access to the interior of the cabinet
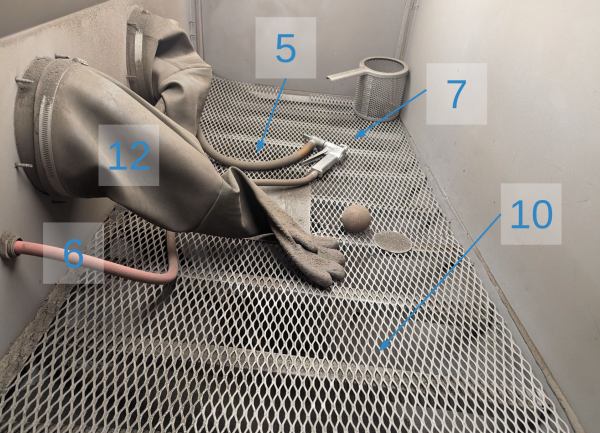
- Siphon hose - pulls media from the hopper to the gun
- Air Hose - provides air pressure to the sandblaster
- Blasting gun - directs the stream of abrasive
- Foot Pedal - must be pressed for blasting to occur
- Screen Filter- filters debris as material is removed
- Media hopper - holds the abrasive media underneath the cabinet
- Trap Door - Easy opening door for quick-access change of abrasive
- Gauntlet Gloves - permanently affixed heavy gloves that allow the user to manipulate items inside the cabinet with the doors closed.
- Dust Collector - keeps (most of) the dust generated by the sandblasting process from escaping into the vicinity of the sandblaster
Tool Safety
Common Hazards
Dust
The dust produced by the sandblaster is hazardous for your respiration
- Always ensure the access doors are properly latched before sandblasting
- Ensure your PPE is appropriate and properly rated for respiratory protection
- Always wear a respirator when adding/removing abrasive media or doing anything inside the cabinet
- Keep others safe by vacuuming any built-up dust on or around the cabinet
Abrasive Damage
Anything inside the cabinet will be damaged by the abrasive.
- Do not point the gun at the viewport
- Do not allow the abrasive blast to touch or abrade the gauntlets
Overloading
A specific amount of media must be present in the sandblaster - too much or too little will cause problems.
- Do not load more abrasive if you see poor sandblasting performance! Raise the issue to the tech on duty.
Prohibited Materials
Wet, Oily, or Grimy Materials
Wet or oily materials should not be used in the sandblaster, as it will cause the abrasive to gum up and become useless very quickly.
Large fragments of surface debris (e.g. chipped paint) can also get stuck in the feed tube and prevent abrasive from properly siphoning into the blasting gun.
The pool of abrasive can also be worn down with excess debris.
To avoid this, always remember to do the following before blasting:
- Ensure the material is clear of oil and moisture (e.g. clean with soapy water and dry with a towel)
- Remove dirt or any loose material from the surface by hand before attempting to sandblast.
Resilient Materials
Resilient materials (e.g. items dipped in vinyl, or covered in soft paint or powder coat, etc.), while not prohibited, will not respond well to the abrasive flow, as the particles will tend to bounce off rather than remove the material.
It is strongly recommended that you remove as much of such materials as possible through chemical or manual means, then use the sandblaster to finish up removal in tight crevices and similar.
Setup
- Check the level of abrasive supply in the hopper.
- Ensure that part(s) to be blasted are clean, dry, and oil-free.
- Unlock latches on the door.
- Place and secure part(s) inside.
- Close the door and Lock the latches.
- Ensure that the foot pedal is locked in the on position
- Begin operation
 The (a) abrasive level must be below the (b) air inlet. The level of abrasive in the hopper should be roughly ⅓ of the total depth (between 25 and 50 pounds of abrasive). If there is insufficient abrasive in the blast cabinet, or it does not appear to be abrading the material, please submit a maintenance request. Do not attempt to correct the abrasive level yourself as this can cause unnecessary contamination of new abrasive and prevent the sandblaster from functioning well.
Operation
- Turn on the switch on top of the cabinet to turn on lights and start the vacuum.
- Put your hands in the gauntlets.
- Aim the gun and the part at about 45 degrees to one another, a couple inches away.
- Squeeze the trigger to begin blasting.
- Move the gun and part closer together or further apart to adjust the blast area.
- Sweep the gun back and forth smoothly over the area to be blasted.
Before operation, always ensure both latches are firmly secured.

HOW IT WORKS

(1) Air from the compressor goes through (2) foot pedal control to (3) power gun. When pedal is pressed, air blows through the power gun, pulling makeup air into (4) pickup tube through (5) power zone, picking up abrasive through (6) gun venturi and out (7) nozzle.
Blast hits object. Most abrasive drops to (8) bottom for recycling. Dust is pulled out (9) vac hose outlet and into (10) vacuum container. (11) Lighter particles stick to (12) internal filter cartridge and clean air exhausts through (13) vac motor and into (14) optional Final Filter.
Workholding
 | L-brackets (as seen on left) can be used to support workpieces via clamps, magnets, or gravity. Small parts can be contained inside the basket (as seen on right). |
Small parts must be safely secured, lest they take wing and fly about the interior. Use of scrap wood, clamps, baskets, or strong magnets may be required; just be sure to use clean, dry, and oil-free materials such as metal or wood (which you don’t mind having abraded).
Larger parts can be held in the gauntlet not holding the gun (so long as there is clearance to avoid affecting the gauntlet with the abrasive), or allowed to rest in the cabinet under their own weight.
Back-Purging
 | ===== A rubber ball makes an ideal stop for back-purging. ===== Press the tip of the siphon gun directly against a piece of rubber or similar material. Then, squeeze the trigger for a few seconds. |
Cleanup
- Turn off the switch on top of the cabinet.
- Sweep or vacuum up any extraneous dust on or around the cabinet
- If necessary, wipe the interior of the viewport with a dry cloth to improve visibility.
- Invert (turn inside-out) the gauntlets, so that they can more easily dry out before the next user.
- Note any maintenance needs or concerns on the tag and at protohaven.org/maintenance|
Maintenance Requests
If you encounter any of the issues listed in the Inspection area or have any other issues with the tool not working properly:
- Update the physical Maintenance Tag at the machine
- 🟢Green can be used without issue
- 🟡Yellow can be used withcaution
- ⛔Red cannot be used without hazard to either the user or the equipment
- Record issues at protohaven.org/maintenance. This notifies our staff and volunteer maintenance crew of any issues.
Troubleshooting
| Common Issues | Possible Causes | Resolutions |
|---|---|---|
| No abrasive coming out of the gun | Insufficient level of abrasive | Ask a volunteer to add more abrasive, so that the hopper is no more than ⅓ full (roughly 25-50 pounds of abrasive) |
| Abrasive not piled in hopper | Shake the hopper gently with your knee, to encourage the abrasive to settle. | |
| Siphon hose not in abrasive | Make sure that the siphon hose is in the abrasive hopper, and that there is enough abrasive to cover its lower end well | |
| Siphon hose clogged | Back-purge the gun and line, by pressing the tip directly against a piece of rubber or similar material, then squeezing the trigger for a few seconds. | |
| Abrasive action seems poor | Bad angle or distance between gun and part | Experiment with different distances and angles between the gun and the part |
| Material being removed is soft or resilient | Remove as much of it as possible outside the blaster, using chemical (e.g. paint stripper) or mechanical (e.g. wire brush, scrapers) means. Softer materials take longer to be blasted away. | |
| The abrasive may be worn down from use, or gummed up from inappropriately damp or oily material. | Please submit a maintenance request, in order to have the abrasive replaced. |
Special Setups
Resists

 For etching materials such as glass, or protecting some portions of a part from being abraded, you may wish to use some form of resist…extra material used as a type of stencil to shield those surfaces you wish to protect.
Resists can be made of various materials…almost anything that is not easily abraded and can be securely fastened to the part will work.
For example, you could use the Vinyl Cutter to produce a resist that you could adhere to a glass bottle; after blasting the glass, peel the vinyl resist away, to reveal a clear pattern in the frosted glass.
Oversized Parts
If you wish to blast parts that are physically too long to fit into the cabinet with the doors closed, it is possible to construct a temporary extension out of materials such as duct tape and heavy cardboard, which you can fasten to the end of the cabinet with the door open.
Consult with a staff member before doing so, so that they can verify the safety, dust resistance, and structural integrity of the extension.
Additional Resources
Supply Resources
Buttercut Resist (local vinyl cut supplier, $$$)
Highly resilient, rubber sandblast masking used for creating stencils that can be sandblasted. Can be cut by hand or with a Vinyl Cutter.
Photo Resist Film ($$$)
An advanced photo-imageable film alternative to hand-cut and plotter-cut vinyl. Allows for a finer image quality without the hassle of weeding.
Staff Use
| ⚠️ AUTHORIZED MAINTENANCE GROUP ONLY |
If you are part of the maintenance group please log on to the #maintenance channel of our Discord server to:
- Perform a Maintenance Action
- Request a Maintenance Purchase
- Review complete Maintenance Logs for each machine
- Generally chit-chat about maintenance
Tools
The following should be in a Maintenance tool kit for the….
- item1
- item2
Regular Maintenance
For all maintenance, ensure proper PPE is observed: safety glasses, respirator/particulate mask
Weekly:
- With an allen key, rotate the carbide nozzle tip on the end of the sand blaster gun 1/4 turn to ensure even wear and lengthen the usable life of the tip.
Infrequently:
- Brush off any internal surfaces that have collected sandblasting media
- Remove the siphon tube (2 screws holding it in - careful not to drop them!) and blow air through it
- Empty the media into a plastic bucket using the drop gate on the bottom of the hopper. Bang the sides of the hopper with a dead blow hammer to ensure it all makes it out
- move the bucket outside and sift it into another bucket, discarding any non-media
- Dump the media back into the cabinet.
- replace the siphon tube