This is an old revision of the document!
Table of Contents
Portable Injection Molder (please check, needs manual)
- Manufacturer: Precious Plastic
- Manual: Link
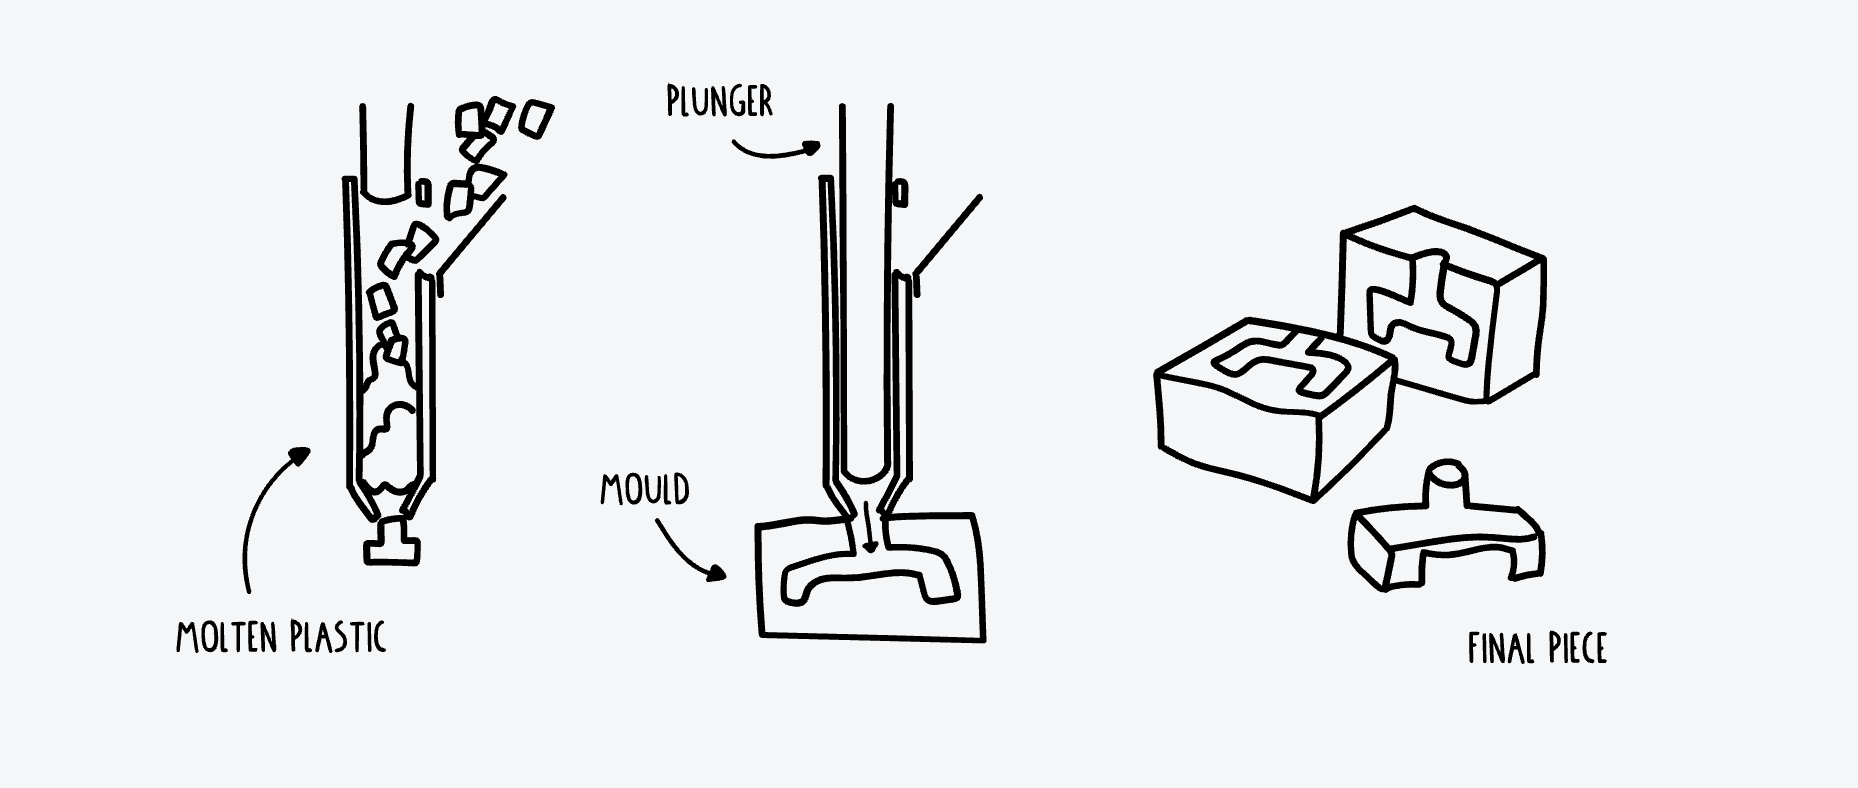
The Injection machine is a very simple concept, it heats the plastic and with pressure fills a mold. You can create really beautiful and well finished objects, and if your mold is well made then you can keep a consistent high quality across your production.
Requirements
Area clearance or class equivalent is required before use.
Warnings
🚫 Don’t burn the plastic
⚠️ Beware of heat and molten squeeze out
⚠️ Remember monkey tight not gorilla tight
See the Safety Section for more information.
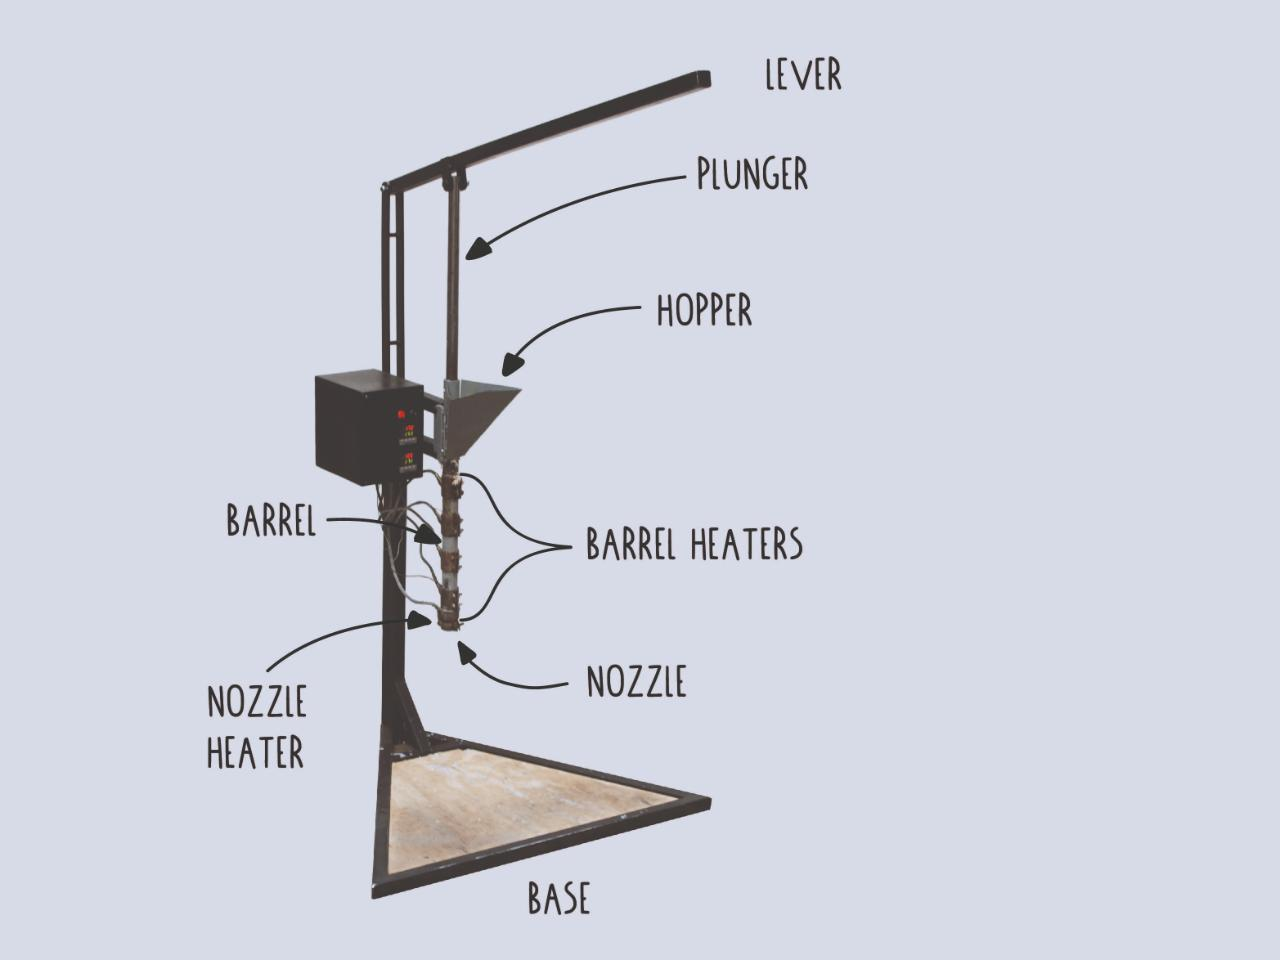
Tool Anatomy
- Lever - Controls the position of the plunger.
- Plunger - Forces molten material down the barrel and into the mould
- Hopper - Funnels new material into the barrel to be heated
- Heat Control - Monitors and controls the desired temperature
- Barrel Heaters - Heats the barrel according to the set temperature
- Barrel - Houses material as it is heated and then pushed into a mould
- Nozzle Heater - Heats the nozzle according to the set temperature
- Nozzle - 1/2“ NPT Female connection point between the barrel and a mould
- Maintenance Tag - Manually tracks the usability status with Green/Yellow/Red cards
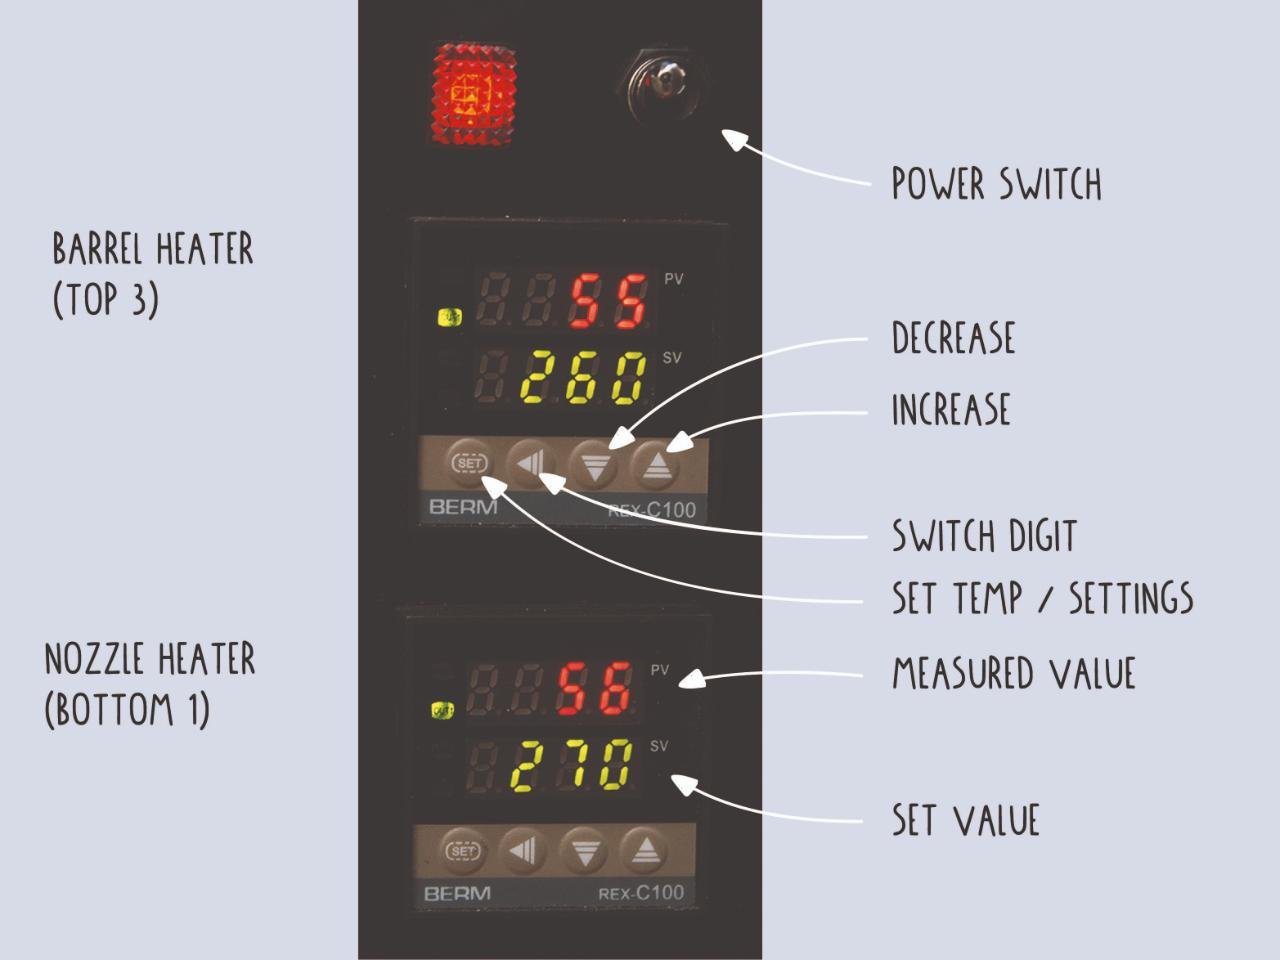
Control Panel
- Power Switch
- Barrel Heater Control
- Nozzle Heater Control
- Measured Value
- Set Value
- Decrease
- Increase
- Switch Digit
- Set Temperature
Check-out Kit
- Leather Gloves — To safely handle hot components
- *coming soon* Nozzle & Base Plate — The two end plates for a shared, basic, modular mould
- Nozzle Connector — 1/2 x 1/4 NPTF Threaded Male connector for moulds
- Plastic Scraper — For easy and safe clean-up
- Utility Knife — For refinement of excess material
- Precious Plastic Coins — To mark the final piece with the appropriate number plastic (you’ll need a soldering iron to heat them before making a mark)
Tool Safety
Personal Protective Equipment
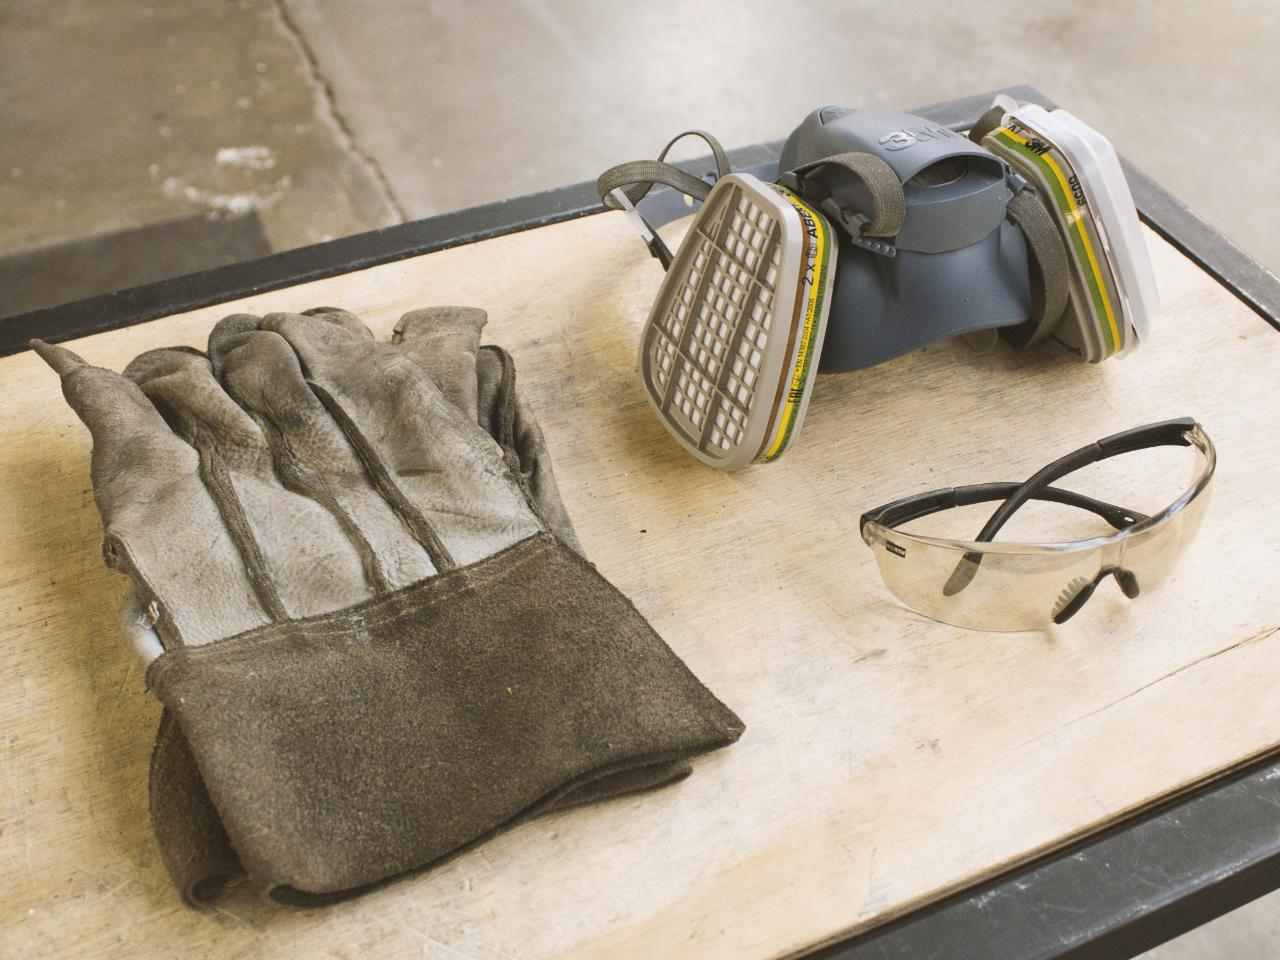
At the Portable Injection Molder, Safety Goggles and Heat Resistant Gloves (preferably smooth leather so plastic will not stick) are also required.
Clothing and closed-toed shoes (preferably boots) must be of natural materials that will burn quickly and not melt to skin (i.e. cotton, denim, leather). Respirators are recommended.
Common Hazards
Be cautious of burning yourself!
- Avoid contact with molten plastic at all times
- Be careful while opening the nozzle, plastic can drip out immediately after opening!
- Wear the proper PPE, including safety glasses, heat safe gloves, and masks
- Thick leather (not suede) welding gloves are ideal. They have a smooth surface so plastic cannot stick to it.
- Avoid contact with heated parts like: injection barrel, nozzle, plunger and the mould, which will heat up over time!
Worn connection points Make always sure your nozzle connectors are in a good condition! Defective connection points can enable the plastic to squeeze out from the barrel under high pressure and cause risk to health!
Setup
There are some physical limitations which have to be considered when using the injection machine.
The volume determines the maximum volume of the cavity together with gate, runners and sprue you can fill. The injection pressure determines how fine your details can be and what is the minimum achievable wall thickness.
Volume: 150cm³
Pressure: 44bar
- Plug in the machine to the transformer, then plug in the transformer to the outlet
- Power on the heat control to preheat and clear the barrel
- Set the temperature to 20° more than desired for production
- Wait for at least 20 minutes before moving the plunger—never force movement on the plunger when cold
- Turn down the temperature
- Fill the barrel with desired plastic
- Wait another 15 minutes for the plastic to melt
- Press the first batch of plastic to get rid of plastic from previous sessions
- Begin production! The machine is now warm and ready to use with your molds
Making a Mold
The most common material for small molds is aluminum. It’s easy to machine and has a high lifespan. Here we have an overview of options from Precious Plastic:
| Material | Application | Accuracy | Costs | Lifetime (shots) |
|---|---|---|---|---|
| Wood/MDF | Not recommended (plastic sticks to mould) | low-med | <$150 | — |
| Acrylic | Demo/prototype | low-med | <$150 | 5-10 |
| Silicone Casting | Prototype | low | <$150 | <20 |
| SLA Printing (high temp resin) | Prototype, Sm Series | med | >$250 | <100 |
| Cast Aluminum | Molds for organic geometry | low-med | <$150 | <2,000-10,000 |
| Machined Aluminum | Sml-Med Series | high | >$250 | <2,000-10,000 |
| Lasercut Steel | Prototyping/Lg Series | med | <$150 | <100,000 |
| Plasma Cut Steel | Prototyping/Lg Series | low-med | <$150 | <100,000 |
| Welded Steel | Prototyping/Lg Series | low-med | <$150 | <100,000 |
| Machined Steel | Lg Series | high | >$1,000 | <100,000 |
Operation
- Fill the barrel with desired plastic, leaving roughly 0.5” to the top of the opening
- Press the lever into the barrel
- Pull the lever up every 5 to 10 minutes and add more plastic, always careful to leave a small opening at the top
- Wait at least 10 minutes
- Secure the mold to the nozzle (be quick or plastic will start to flow out!)
- Preheat the base plate of the mold with a propane torch
- Pull the lever down as far as possible
- Hold the downward position for at least 5-10 seconds
- Detach the mold from the nozzle
- Pull the lever to the furthest upright position
- Close the nozzle with its cap
- Let the mold cool for 10-15 minutes before opening
- Heat the appropriate Precious Plastic coin with a soldering iron
- Stamp your piece!
Cleanup
It’s important to clean the area of all leftover plastic at the end of use. If not, this will lead to cross-contamination since the next person won’t be able to identify which type of plastic was used!
- Power off the heat control
- Unplug the transformer and the machine
- Clean the area from all leftover plastic
Scrap Breakdown
Protohaven is working to carefully measure and monitor the intake of #5 Plastic. If you wish to add to our collection, please notify someone on duty to help track the new input or attend one of our Shredding Sunday Events!
Maintenance Requests
If you encounter any of the issues listed in the Inspection area or have any other issues with the tool not working properly:
- Update the physical Maintenance Tag at the machine
- 🟢Green can be used without issue
- 🟡Yellow can be used withcaution
- ⛔Red cannot be used without hazard to either the user or the equipment
- Record issues at protohaven.org/maintenance. This notifies our staff and volunteer maintenance crew of any issues.
Troubleshooting
NOZZLE/BARREL IS CLOGGED
Ensure the equipment is preheated before attempting to clear the barrel or nozzle
- Be sure to follow the proper setup procedure
- If nozzle is not reaching appropriate temperature during setup, a supplemental torch may be used to carefully warm the metal components—be sure not to burn plastic or other non-metal elements
INCOMPLETE FILL
When the plastic does not entirely fill the mold
- Check if there is enough material in the barrel at the next try
- Check if the machine volume is at least +20% larger than your mold volume
If your mold volume is just under the machine volume, try to pre-compress the material several times with a closed nozzle to densify
- Check there is no “cold material” at the nozzle front
- Increase the speed between opening the injection chamber and injecting
- Increase material temperature
- Increase mold temperature
- Add air vents no deeper than 0.1 mm to avoid flash
- Increase the gate size to decrease the injection pressure needed
FLASH
When plastic seeps through the seams of your mold assembly or air vents
- If possible, increase the clamping pressure at the next try
- Ensure there is nothing preventing your mold from closing properly
- Check that your mold is flat
- Decrease the material temperature and/or the injection pressure
SINK MARKS
When an area of the surface shrinks more than others, creating indents or hole
- Increase the holding pressure after the injection operation.
- After injecting it is recommended to hold the pressure for 2-15sec. depending on your wall thicknesses and part design
- Decrease the material temperature
AIR BUBBLES
Trapped bubbles within your part
- Pre-compress the material with a closed nozzle
- Ensure the material is fully molten
- Decrease the material temperature
- Pre-dry your plastic material before melting to reduce moisture content
- Increase the injection pressure
Special Setups
When using plastics other than #5 (Polypropylene), please be extra careful to properly clean up and avoid cross contamination.
We’ve set up our machines to focus on diverting Plastic #5 (Polypropylene) from the landfill, which doesn’t currently have an easy municipal solution! Of course, you are welcome to bring in different Plastic materials to use on our machines.
Additional Resources
The reason we love the global Precious Plastic community is because they provide a wealth of open source community resources! Here are some resources you may find helpful:
Oshcut: An Online Metal Laser Cutting Service
Good design with recycled plastic
How to finish objects from recycled plastic
Staff Use
| ⚠️ AUTHORIZED MAINTENANCE GROUP ONLY |
If you are part of the maintenance group please log on to the #maintenance channel of our Discord server to:
- Perform a Maintenance Action
- Request a Maintenance Purchase
- Review complete Maintenance Logs for each machine
- Generally chit-chat about maintenance
Tools
The following should be in a Maintenance tool kit for the….
- item1
- item2


