Table of Contents
Dye Sublimation Printer (DRAFT)
- Model: Sawgrass SG1000
- Manufacturer: Sawgrass
- Manual: Download
Dye sublimation is a digital printing technology that uses heat transfer to apply an image to the intended substrate. Also referred to as digital sublimation, the process is commonly used for decorating apparel, signs and banners as well as other items with sublimation-friendly surfaces.
The Tool Safety, Tool Care, Operation, section of this guide are what instructors use to ensure that you can use the equipment according to community expectations.
Requirements
Dye Sublimation clearance or class equivalent is required before use.
Warnings
🚫 Do not remove any screws or covers.
🚫 Do not Power Off the Printer.
⚠️ Check that your substrate is heat-safe.
See the Safety Section for more information.
Tool Anatomy
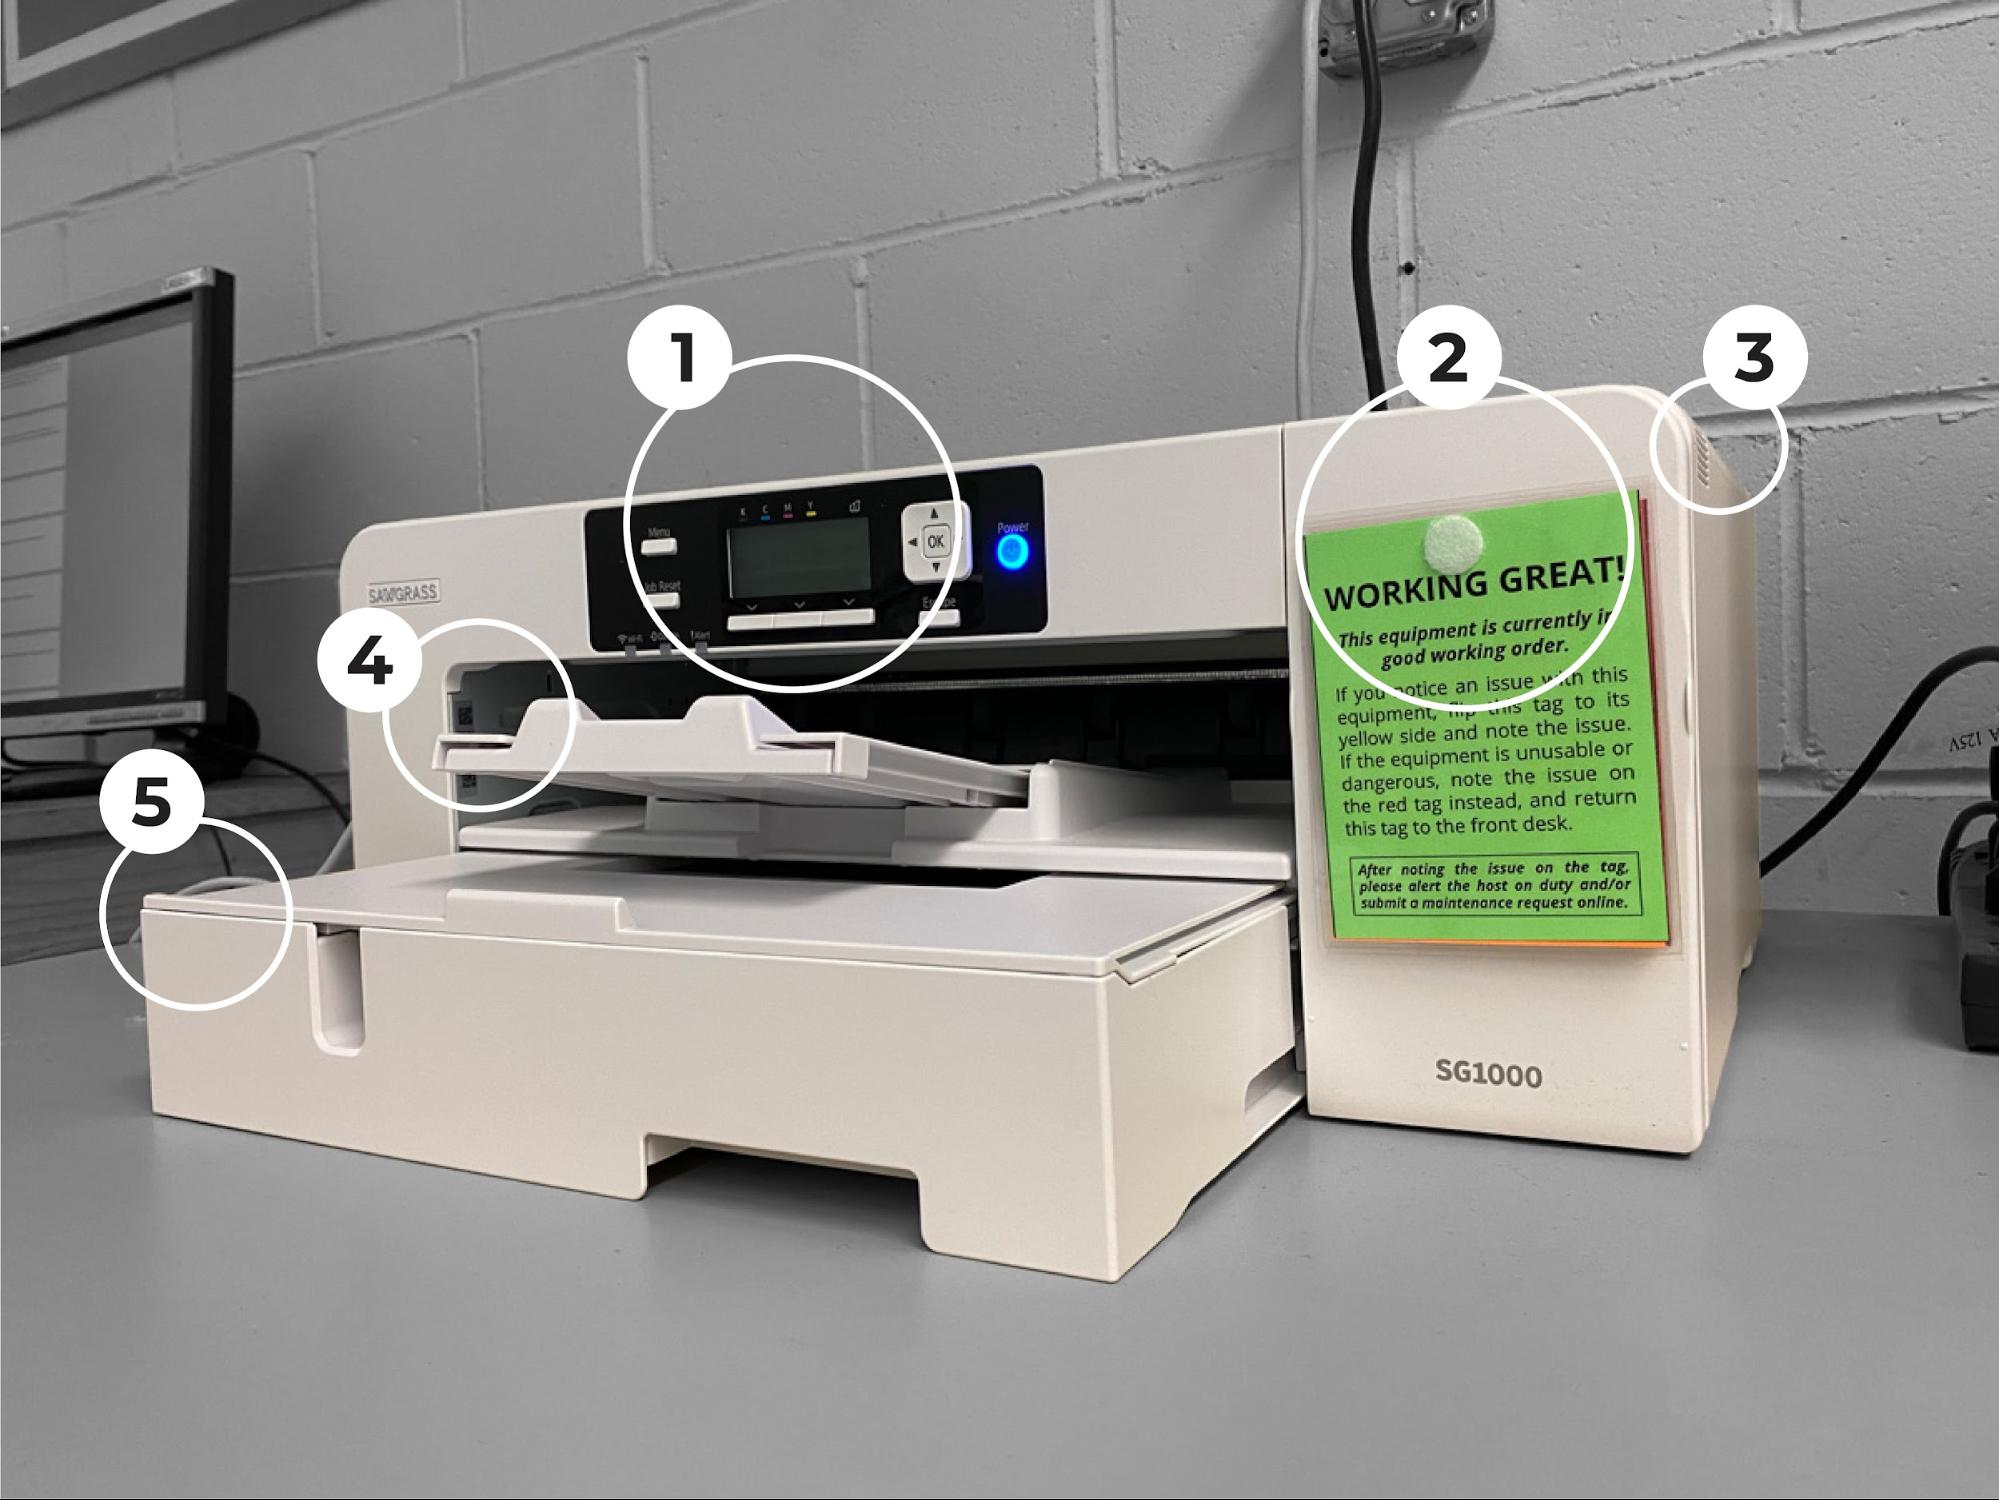
- Control Panel - LCD interface with commands to check the printer status
- Maintenance Tag - Manually tracks the usability status with Green/Yellow/Red cards
- Air Vent - Prevents the interior from overheating so it can function properly
- Output Ramp with Extension - Supports freshly printed material up to 11” x 17”
- Paper Tray with Cover & Extension - Load transfer paper here. Always ensure the cover is properly engaged. Use the tray extension for larger paper sizes
CONTROL PANEL
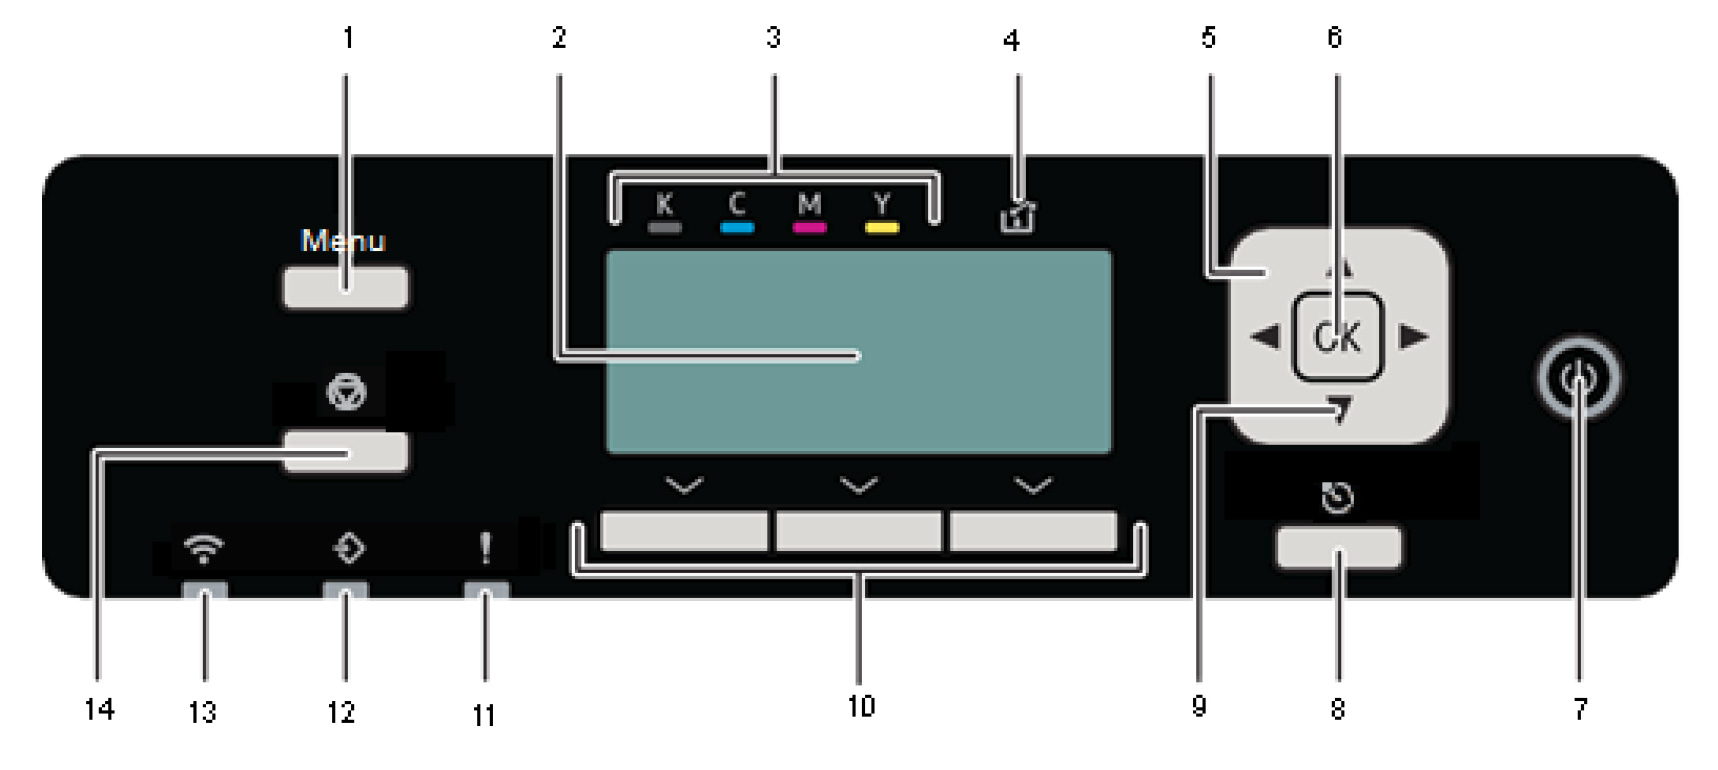
- Displays the menu
- Displays the current printer status and messages
- Cartridge Replacement Indicator. K, C, M, Y indicate black, cyan, magenta, and yellow, respectively
- Waste Ink Full Indicator
- Scroll through the menu
- Confirm the setting or setting values
- Printer must remain on at all times to allow for auto-maintenance cycle that is critical to keeping the printer functioning optimally
- Escape/return to the previous screen
- Press and hold for 3 seconds to perform a head clean on all channels
- Press to select an item displayed at the bottom of the screen
- Alert Indicator
- Flashes when receiving data sent from the computer. Lights up when there is a print in the job queue
- WIFI Indicator
- Job Reset. When the printer is online, press this key to cancel an ongoing print job
Tool Safety
Common Hazards
Incompatible Paper can cause ink to bleed through and damage the printer head.
- Members must use Protohaven-Supplied Sublimation Paper or make a Special Setup Arrangement with Protohaven Staff.
Blockage and/or Overheating
- The printer must remain powered on to allow for an auto-maintenance cycle
- The air vent must be free of obstacles at all times to prevent overheating
- The tray cover must be properly closed
- Any paper loaded into the tray must be free of dust and particulate
Burns & Fire Once printing is complete, a heat press must be used to vaporize the ink and transfer the image to the final material. At this stage, burns are a significant hazard.
- Avoid contact with any heated elements associated with sublimation process
- Ensure the work area is clear before pre-heating
- Do not leave a heat press unattended until it has cooled down
Permitted Materials
For general use, members must use Protohaven-Supplied Sublimation Paper. This can be purchased at the store front at 8 ½” x 11” and 11” x 17” dimensions. This covers ink and maintenance costs while ensuring compatibility with the printer.
To use your own paper for larger production runs, please make a Special Setup Arrangement with Protohaven Staff to ensure compatibility and arrange ink costs.
Setup
- Ensure the USB cable between the Printer and PC is connected
- Verify the Printer is Powered On
- Power on the Computer
- Import your file to Sawgrass Print Manager
- Set the substrate, paper size, and color profile in Sawgrass Print Manager
Choosing A Substrate
Sublimation Ink must have a polymer, polyester, or polyester blended fabric in order to properly bond. There are more than 1,000 sublimation-ready “blanks” available, meaning they already have a polymer coating. This includes:
- Acrylic & Hard Plastics
- Ceramics
- Glass
- Metal
- Slate
- Wood
To bond to cotton fabric and natural materials, a special transfer paper or EasiSubli solution is needed.
Sawgrass Print Manager
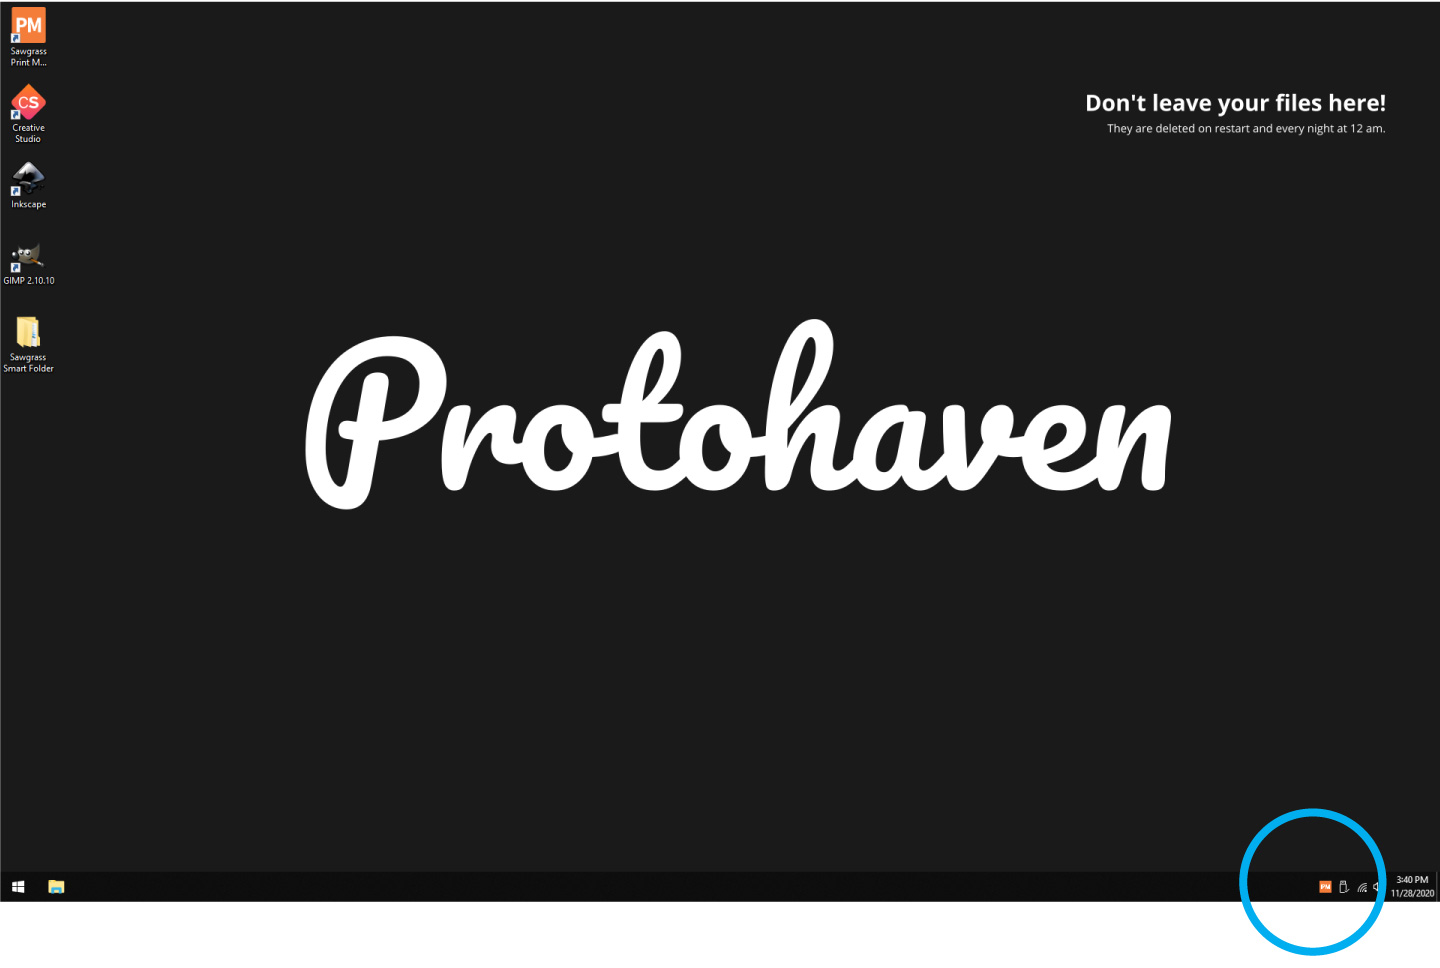
Click on the Sawgrass Print Manager icon situated in the hidden icons menu at the bottom right hand corner of the desktop.
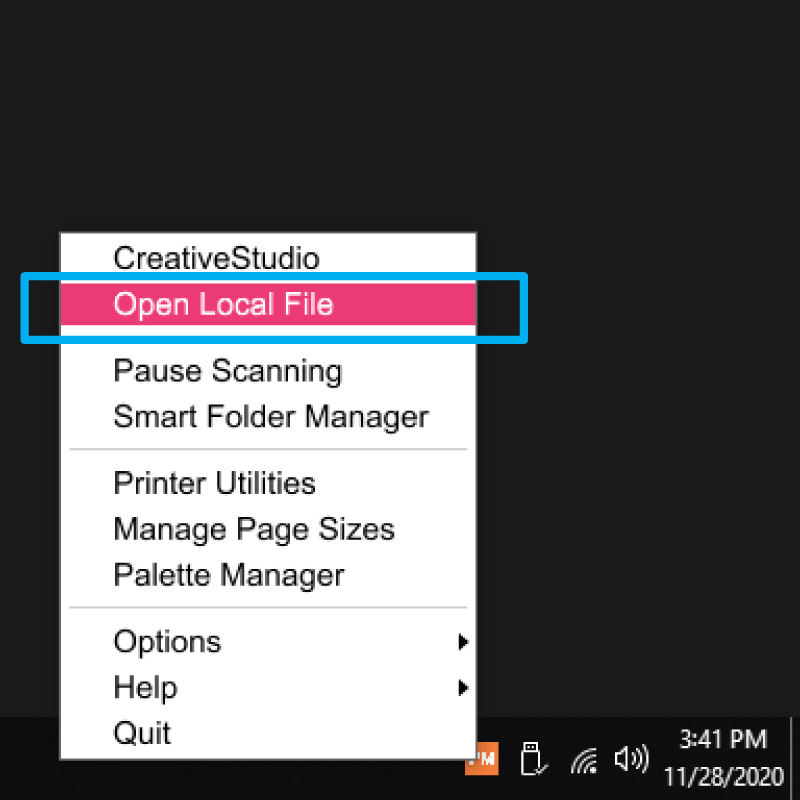
Select “Open Local File” to upload your artwork.
Sawgrass Print Manager accepts a range of file formats.
Supported vector files:
.eps .pdf
Supported image files:
.jpeg .png .tiff .tif .sg
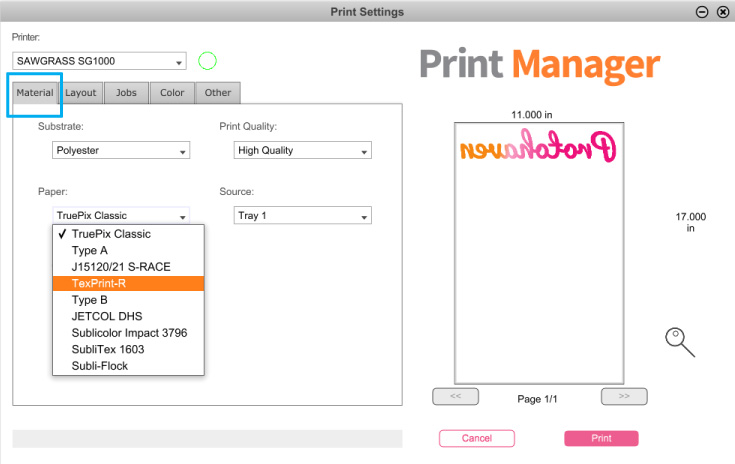
Set the type of substrate you’ll be using for your final material surface.
Select “TexPrint-R” for Protohaven-supplied paper.
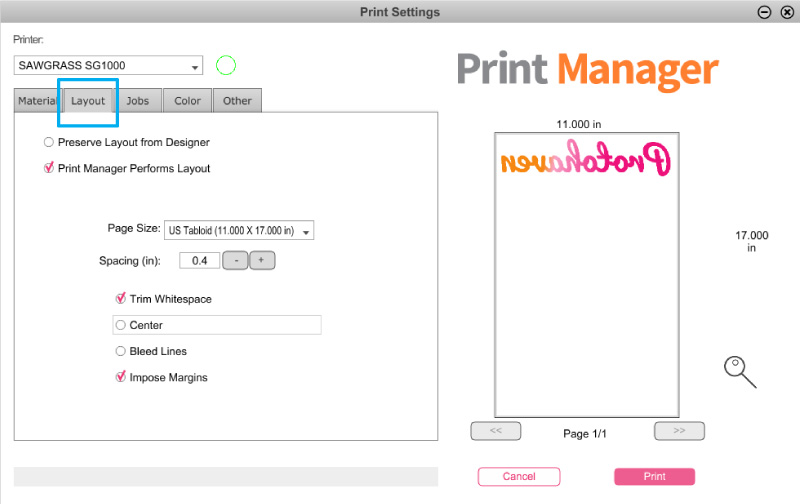
Set the layout.
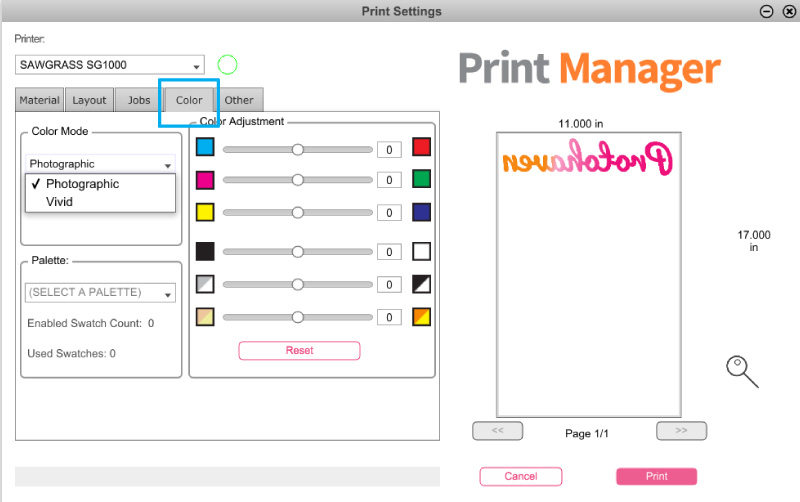
Set the color mode.
Photographic mode optimizes color output for photos.
Vivid mode optimizes for high contrasting elements, like vectorized graphics.
Color Output
Color management is an important aspect for all forms of digital printing. In terms of sublimation, there are several factors that can affect the color including the printer, the ink, the paper and the substrates.
Sawgrass created Sawgrass Print Manager to address these issues and provide tools to ensure the accuracy of the color output.
Common Settings
| Substrate | Press Time | Temp | Tips |
|---|---|---|---|
| Ceramic Mugs | 150-210 sec | 350-400º F | Time varies. Press into silicon pad. Mugs should be cooled in warm water or using a cooling plate after transfer. |
| Poly Fabric | 35-40 sec | 400º F | Pre-press shirt for 3-5 min to eliminate moisture. |
| Vapor Apparel | 45-55 sec | 380-390º F | See vaporapparel.com for tips on reducing presslines |
| Mousepads (neoprene) | 45 sec | 400º F | Look for a tight knit and high white point for more brilliant color results. |
| Metal (Unisub) | 60 sec | 400º F | Use blow-out paper. Remove plastic coating before pressing. |
| Metal (Other Brands) | 60 sec | 375-400º F | Time varies. Place absorbent sheet on the bottom of heat press. Then, place product transfer side DOWN on top of the absorbent sheet. |
| Outdoor Metal Panels | 60-90 sec | 400º F | Time varies. Place absorbent sheet on the bottom of heat press. Then, place product transfer side DOWN on top of the absorbent sheet. |
| Unisub Products | 60 sec | 400º F | Remove plastic coating. Tear transfer paper away immediately after pressing. |
| Fire Retardant Plastics | 40-75 sec | 400º F | Remove plastic coating. Tear transfer paper away immediately after pressing. |
| Glass/Ceramic Flat Tiles | 300-720 sec | 400º F | Time varies. Press tiles from back (transfer side down). Press into silicon pad. |
Operation
- Ensure the printer is powered on
- Confirm Ink levels are usable
- Load Protohaven-supplied Sublimation Paper
- Test Print one sample if printing multiple copies to ensure quality of production
- Print Final production
- Trim to your artwork
- Use heat press to transfer to substrate
- Cleanup
Cleanup
- Clear Printer and Work Area of any unused material
- Reset any modified computer settings to default
- Power off the Computer
- Ensure the printer remains powered on so auto-maintenance cycle can run
- Note dwindling ink levels, maintenance needs, or concerns on the tag and at protohaven.org/maintenance
Scrap Breakdown
There is one blue scrap bin reserved for vinyl waste and several trash bins in the studio. Maintaining these are a shared, communal responsibility.
When you notice the scrap bins are full, it’s time to take it to the dumpster out back. Feel free to enlist a helping hand.
If you notice valuable material while emptying the bins, use your judgment to selectively save a few pieces or take it home for your personal use.
Maintenance Requests
If you encounter any of the issues listed in the Inspection area or have any other issues with the tool not working properly:
- Update the physical Maintenance Tag at the machine
- 🟢Green can be used without issue
- 🟡Yellow can be used withcaution
- ⛔Red cannot be used without hazard to either the user or the equipment
- Record issues at protohaven.org/maintenance. This notifies our staff and volunteer maintenance crew of any issues.
Troubleshooting
Banding is usually caused by a blockage in the print head preventing the ink from being properly dispersed to the paper. It can also be caused by low ink levels.
- Perform a nozzle check. If blockage is found, perform a head cleaning. These functions can be accessed via the control panel on the printer or through Sawgrass Print Manager.
- Check the ink levels on the Printer Control Panel. Update the physical maintenance cards and make a maintenance request to notify staff if ink levels will need to be replaced soon.
If troubleshooting requires the removal of any covers or screws, please notify staff by filling out a maintenance request. Inside this printer are high voltage components that are an electric shock hazard and may void the warranty.
www.youtube.com/watch?v=RJlgCszW7_s
supportdesk.sawgrassink.com/en/support/home
Special Setups
User-Supplied Paper
For general use, members must use Protohaven-Supplied Sublimation Paper.
To use your own paper for larger production runs, please make a Special Setup Arrangement with a Protohaven Staff Member to ensure compatibility and arrange ink costs.
Complex Cuts
Dye Sublimation is a versatile printing process that allows you to get extremely creative with your work! Combining your use of the Printer with other tools is what will help you push the boundaries.
Printing registration marks in your artwork will allow you to make highly repeatable, complex cuts at the Vinyl Cutter, Laser Cutter, or CNC Router once your artwork is sublimated to new material.
Printing on Dark Tones
Neenah Ink-Jet Opaque Sublimation Transfer Paper will allow you to print vivid colors on dark tones
Cotton Substrates
Easy Subli & Special Sublimation Transfer Paper can be used to print onto natural materials like Cotton Fabric.
Additional Resources
Sawgrass s1000 Manual
Sawgrass "Ink Differently" Blog
Free, Basic Sawgrass Courses
Inkscape: The Basics
Inkscape: Hand Trace Images
Inkscape: Auto-trace images into vectors
Corel Draw: Anatomy of Vectors
Corel Draw: Vector Tracing Tutorial
Corel Draw: Envelope & Perspective Tool
Adobe Illustrator in 5 minutes
Adobe Illustrator: Turn Images into Vectors
Adobe Illustrator Pen Tool Tips
Adobe Illustrator: Turn Type into Shapes
Staff Use
| ⚠️ AUTHORIZED MAINTENANCE GROUP ONLY |
If you are part of the maintenance group please log on to the #maintenance channel of our Discord server to:
- Perform a Maintenance Action
- Request a Maintenance Purchase
- Review complete Maintenance Logs for each machine
- Generally chit-chat about maintenance
Tools
The following should be in a Maintenance tool kit for the….
- item1
- item2
