Table of Contents
Drum Sander (DRAFT)
- Model: Jet 16-32 Plus
- Manufacturer: Jet Tools
- Manual: Our ModelCurrent Revision
A drum sander is similar to a thicknessing planer in that it removes material from the top of a piece while moving it along a conveyor. It can be used to make fine thickness adjustments, remove milling marks from the planer, or get a start on finish sanding.
The Tool Safety, Tool Care, Operation, section of this guide are what instructors use to ensure that you can use the equipment according to community expectations.
Requirements
Millwork & Joinery clearance or class equivalent is required before use.
Warnings
See the Safety Section for more information.
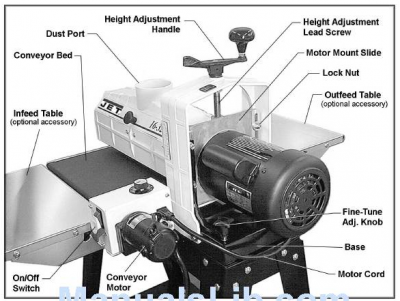
Tool Anatomy
- Height Adjustment Handle
- Height Adjustment Screw
- Motor Mount Slide
- Lock Nut
- Outfeed Table
- Fine Tune Adjustment Knob
- Base
- Motor Cord
- Conveyor Motor
- On/Off Switch
- Infeed Table
- Conveyor Bed
- Dust Port
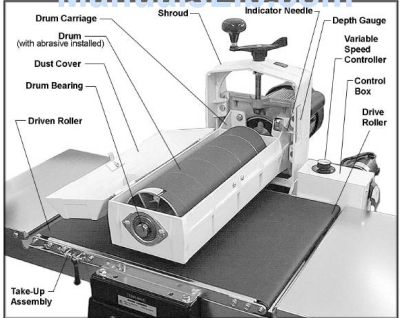
- Indicator Needle
- Depth Gauge
- Variable Speed Controller
- Control Box
- Drive Roller
- Take-up Assembly
- Driven Roller
- Drum Bearing
- Dust Cover
- Drum (with abrasive installed)
- Drum Carriage
- Shroud
For more visit the manufacturers website and user manual both linked at the top of this document.
Tool Safety
Safety
Personal Protective Equipment
⚠️ Safety glasses, hearing protection, and nonskid closed-toed shoes are required.
⚠️ Remove tie, rings, watches and other jewelry, and roll sleeves up past the elbows.
⚠️ All hair, clothing and accessories should be secured close to the body.
🚫 Do not wear gloves.
Common Hazards
Pull/Crush Risk
- Keep safety guards in place at all times when the machine is in use. If removed for maintenance purposes, use extreme caution and replace the guards immediately.
- Keep your hands clear when feeding parts onto the conveyor. The part will be forced down as it begins to feed, causing a pinching action between the part and the conveyor bed.
- Maintain a balanced stance at all times so that you do not fall or lean against moving parts. Do not over-reach or use excessive force to perform any machine operation.
- Make all machine adjustments or maintenance with the machine unplugged from the power source.
- Never reach into a running machine. Turn off sander and disconnect from power before attempting to retrieve parts from within the machine.
Flying Stock Risk
- Stand to one side of the conveyor and make sure no one else is standing in line with the conveyor while feeding stock into the machine. Should a part slip while being fed, it may exit the machine at a high rate of speed and can cause injuries to anyone standing directly in front of the infeed.
- Always feed stock against the rotation of the drum.
Tool Care
Cleaning
- Turn off the machine and disconnect from power before cleaning.
- Leave the dust collector on when cleaning dust from the drums.
- Use a brush or compressed air to remove chips or debris — do not use your hands.
- Brush the conveyor belt after cleaning operations. If not cleaned, the conveyor belt could allow stock to slip during sanding operations.
Cleaning Abrasive Strips
Regularly clean the abrasive strips on the drums with commercially available cleaning sticks, following the manufacturer's directions. When cleaning, also brush the stick crumbs from the drum while it is still rotating.
⚠️ While performing sandpaper cleaning, and take all precautions to avoid any contact of hands or clothing with uncovered rotating drums.
Cloth-backed abrasives can be cleaned by soaking in paint thinner or mineral spirits for 20 minutes to 1 hour, then using a brush to remove any build-up or burns. Dry the abrasive strips completely before using.
Increasing Abrasive Life
Abrasive life can be increased not only by cleaning, but by removing the abrasive strip from the drum and reversing it. To do this, remove the strip and use what was the trailing end as the starting end on the left (outboard) side of the drum. Reversing the strip will provide a fresh set of cutting edges on the abrasive.
Inspection
Before you start using the sander you are expected to do an initial inspection and assess its readiness for use.
- Make certain the switch is in the OFF position before connecting the machine to the power supply.
- Make all machine adjustments or maintenance with the machine unplugged from the power source.
- Remove adjusting keys and wrenches. Form a habit of checking to see that keys and adjusting wrenches are removed from the machine before turning it on.
- Check damaged parts. Before further use of the machine, a guard or other part that is damaged should be carefully checked to determine that it will operate properly and perform its intended function. Check for alignment of moving parts, binding of moving parts, breakage of parts, mounting and any other conditions that may affect its operation. A guard or other part that is damaged should be properly repaired or replaced.
- Ensure that the dust collection gate is open.
Maintenance Requests
If you encounter any of the issues listed in the Inspection area or have any other issues with the printer not working properly
- Update the physical Maintenance Tag at the machine
- 🟢Green can be used without issue
- 🟡Yellow can be used withcaution
- ⛔Red cannot be used without hazard to either the user or the equipment
- Record issues at protohaven.org/maintenance. This notifies our staff and volunteer maintenance crew of any issues.
Operation
Consumables
The sand paper wrapping the drum is a consumable. Some pre-cut strips are available in the store.Abrasive Selection Guide
Installing & Tightening Abrasive Paper
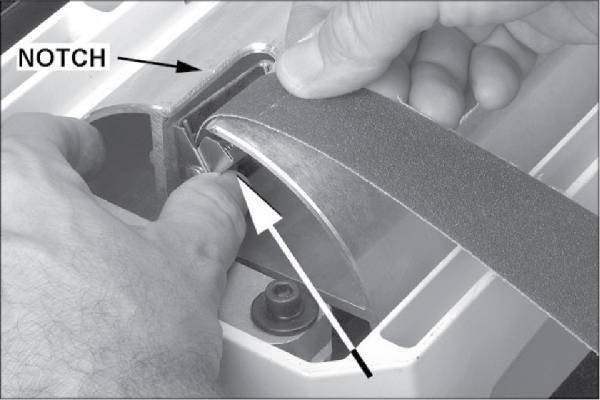
- Press the fastener lever on the left end of the drum
- Insert the tapered end of your abrasive strip through the slit in the fastener until the right edge aligns with the reference notch
* Ensure the tapered edge of your strip is aligned with the left edge of the drum - Release the lever to secure in place
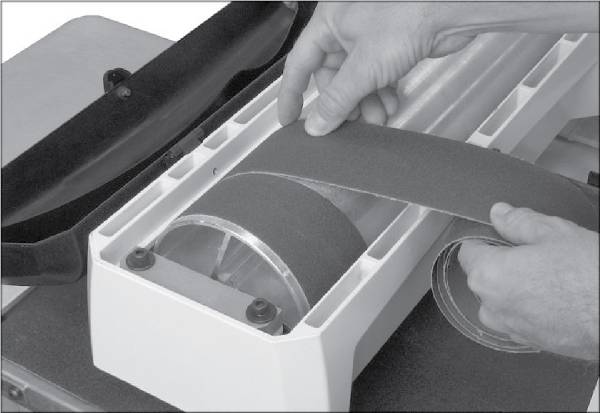
- Wrap the strip in a spiral fashion by rotating the drum while you guide the strip
- Ensure the spiral does not overlap at any point
- Make sure it’s flush and without large gaps
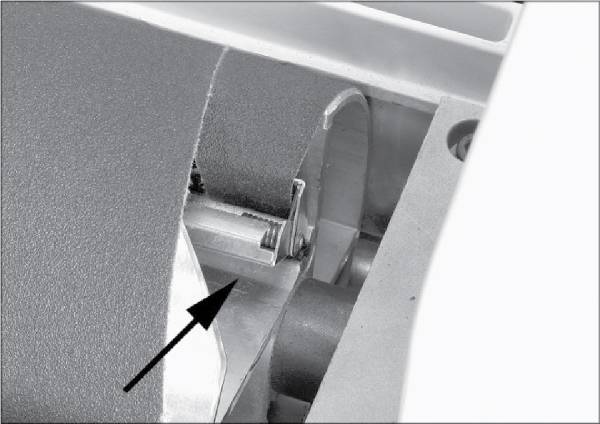
- Press the inboard take-up lever
- Insert the end of the strip as far as it will go
- If necessary, trim the tapered end of the strip
- Release inboard take-up lever to secure
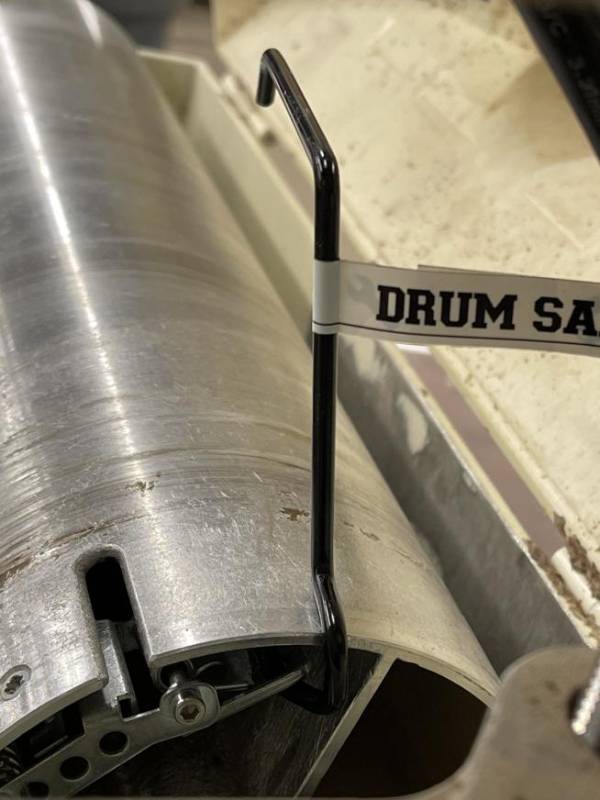
Using the Tuftool
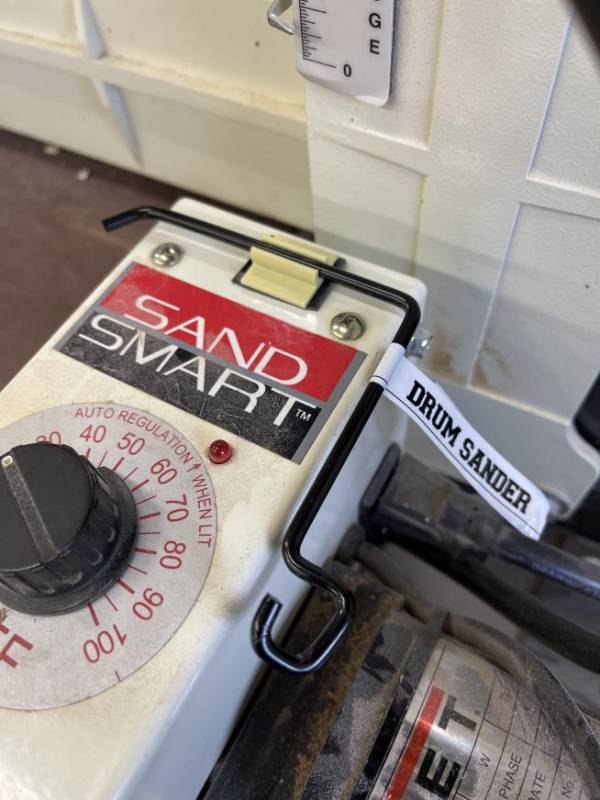
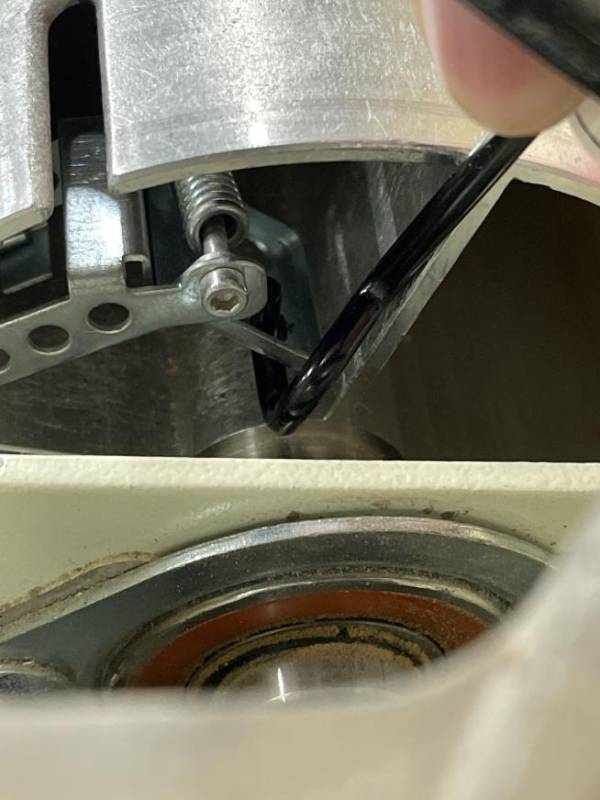
As you can see in the photos below you can use the tuftool to raise and latch open the inboard take-up lever.
Basic Operation
- Establish depth of cut
- Start dust collection system
- Start sanding drum
- Start conveyor
- Select feed rate
- Feed your material through machine
- Once material is halfway through, reposition yourself to outfeed to control your board as it exits
Setting Depth of Cut
Adjusting the drum sander for the proper contact between the abrasive and the stock determines the mechanical depth of cut. It may take some experimentation to determine the proper depth of cut, given the variables of abrasive grit, type of wood, and feed rate. For best results, use scrap wood to practice sanding and to develop skill and familiarity with the machine before doing finish work. A good rule of thumb when sanding with grits finer than 80 is to lower the drum so it contacts the workpiece but drum can still be rotated by hand. When using grits coarser than 80, you can lower the drum slightly more. However, a combination of several variables will determine the proper depth of cut to use, including the following:
- Abrasive type and grit size.
- Width of the piece being processed.
- Hardness of the piece.
- Feed rate of the conveyor belt.
Establishing Proper Drum Height
- To establish drum height, position the stock to be sanded under the drum. Do NOT start drum.
- Lower the drum to the stock thickness, making sure drum can be rotated by hand while contacting stock. 🚫Do not start drum while in contact with stock!
- Without changing drum height, turn on conveyor and run the stock out from under the drum. Start sanding drum and sand stock at that same position.
- With the drum operating, feed stock under the drum from the infeed side and against the rotation of the drum. Always maintain control of the stock to avoid kick-back and/or slippage.
NOTE: If motor heats up during operation, depth of cut may be too great for size of grit and/or feed rate may be too fast.
Adjustments
Drum Height Control
The drum height and depth of cut are controlled by the height adjustment handle (see Figure 5).Rotating the handle counterclockwise lowers the drum, clockwise raises it. One revolution of the handle will move the drum approximately 1/16“(or 1/4 turn = approx. 1/64”).
Depth Gauge
The depth gauge indicates the distance between the bottom of the sanding drum and the top of the conveyor surface. Adjustment is performed by “zeroing” the gauge.
- Loosen screw (A, Figure 21) with a 9/16“wrench sufficiently to allow indicator needle(B) to be turned to depth gauge scale (C).
- With an abrasive strip on the drum, lower sanding drum to where it touches top of conveyor belt.
- At this drum position, the depth gauge indicator needle (B) should align with the zero mark of the scale. If it does not, loosen screw (A) and raise or lower indicator needle to align with zero on the scale.
- Re-tighten screw (A)
Troubleshooting
| Trouble | Probable Cause | Remedy |
|---|---|---|
| Sander will not start. | No incoming power. | Check plug connection. Make sure fuse is not blown/circuit breaker is not tripped. Push the circuit breaker button on the sander motor to re-set. |
| Switch is malfunctioning. | Replace switch. | |
| Conveyor motor stalls. | Excessive depth of cut. | Reduce depth of cut; use coarser grit; reduce feed rate. |
| Conveyor belt does not move. | Shaft coupler is loose or unattached. | Adjust shaft coupler. |
| Conveyor rollers run intermittently. | Shaft coupling is loose. | Align the shaft flats of the gear motor and the drive roller and tighten the shaft-coupling set screws. |
| Abrasive strip comes off drum. | Slack in abrasive strip on drum. | Remove slack in strip. |
| Abrasive improperly wrapped. | Read the section on wrapping abrasive strips, pages 12-13. | |
| Abrasive strip is loose. | Strip caught on inside edge of slot, or on inboard side of drum. | Re-adjust the strip end in the slot and/or trim the abrasive edge. |
| Strip not cut properly. | Re-cut and re-install the abrasive strip. | |
| Abrasive loads up prematurely. | Excessive depth of cut. | Reduce depth of cut. |
| Excessive feed rate. | Reduce feed rate. | |
| Inadequate dust collection. | Increase airflow at dust port. | |
| Inadequate abrasive. | Use an open-coat abrasive. | |
| Line or groove in stock. | Inconsistent feed rate. | Do not stop or change the feed rate while feeding stock. |
| Snipe marks. | Improper tension on rollers. | Re-tension rollers see page 19 |
| Conveyor rollers run intermittently. | Shaft coupling loose. | Align shaft flats of gear motor and drive roller, and tighten shaft coupling set screws. |
| Sander burns wood. | Abrasive strip is overlapped. | Re-wrap abrasive strip page 12-13 |
| Abrasive is loaded. | Clean abrasive. | |
| Depth of cut excessive for fine grit. | Use coarser grit or reduce depth of cut. | |
| Feed rate too slow. | Increase feed rate. | |
| Abrasive is worn. | Replace abrasive. | |
| Conveyor belt slips on drive roller. | Improper conveyor belt tension. | Adjust belt tension page 16. |
| Excessive depth of cut and/or feed rate. | Reduce depth of cut and/or feed rate. | |
| Board slips on conveyor belt. | Tension rollers too high. | Lower tension rollers see page 19. |
| Excessive feed rate. | Reduce feed rate. | |
| Dirty or worn conveyor belt. | Replace conveyor belt. | |
| Sander motor slows or stalls. | Improper conveyor belt tension. | Adjust belt tension. If necessary, reduce depth of cut and/or feed rate. |
| Excessive depth of cut and/or excessive feed rate. | Reduce depth of cut or feed rate. | |
| Ripples in sanded surface. A. Non-uniformly spaced ripples. | A. Uneven feed rate. | Conveyor belt slipping (see above) Board slips on conveyor belt (see above). Conveyor motor stalls (see above). |
| B. Uniformly spaced ripples. | B. Conveyor bed flexing or vibration. | Reduce depth of cut and/or feed rate. Check for loose bolts, loose shaft coupling set screws, or out-of-balance drum. |
| Wood is gouged. | Stock slipping on conveyor. | Correct depth of cut or roller tension. |
| Work piece not properly supported. | Add work supports for long workpieces. | |
| Table height adjustment works improperly. | Improper adjustment of height control. | Readjust height control. See pages 18-19. |
| Motor overload protector trips or shop wiring breaker trips. | Excessive load on sanding drum and motor. | Allow motor to cool and re-set overload button. Connect sander to a dedicated circuit. |
| Too many tools on circuit. | Have a certified electrician correct any shop wiring problem. | |
| Excessive length or inadequate size extension cord. | Use a shorter or heavier gauge extension cord see Figure 19. |
Additional Resources
Staff Use
| ⚠️ AUTHORIZED MAINTENANCE GROUP ONLY |
If you are part of the maintenance group please log on to the #maintenance channel of our Discord server to:
- Perform a Maintenance Action
- Request a Maintenance Purchase
- Review complete Maintenance Logs for each machine
- Generally chit-chat about maintenance
Tools
The following should be in a Maintenance tool kit for the….
- item1
- item2
Regular Maintenance
- Conveyor belt tension and tracking adjustments may occasionally be necessary during break-in and normal operation to compensate for belt stretching. Instructions can be found on page 16 of the manual.
Monthly Maintenance
- Lubricate conveyor bushings and check for wear.
- Lubricate all moving parts, such as threaded rods, washers, and bushings. (Bearings are pre-sealed and require no lubrication.)
- Clean sawdust from the abrasive strip and the conveyor belt.
- Blow dust from motors and switches. Blow dust from inside of sanding drum.
- Check all set screws for tightness on parts such as bearings, conveyor and couplings.
