Table of Contents
CNC Plasma Cutter (Avid Pro)
The Avid Pro Plasma 4x8 CNC system plus Hypertherm PowerMax 65 plasma cutter can run cutting operations on sheet metal including mild steel, stainless steel, and aluminum.
Quick Facts
- Clearance Required: CNC Plasma Proficiency Based Clearance.
- Max cut size 1“ (at 65A)
- 🔷 Members need to supply their own plasma consumables
Manuals
- Avid Pro
- Mach3
- Hypertherm
Tool Anatomy
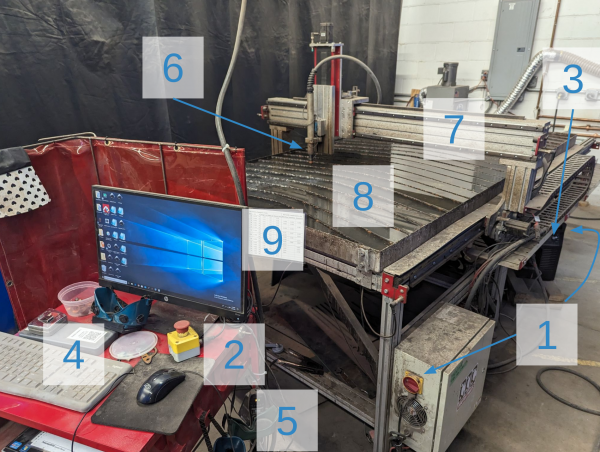
- Power switches (motor & plasma cutter)
- E-Stop
- Amperage control (45A/65A)
- Control Computer
- Welding Goggles
- Torch Head
- Gantry
- Water Table
- Speeds & Feeds Chart
Initial Setup: Powering On
It's strongly recommended to reserve a timeslot so you know the machine is available.
- Top up the water in the water table if there's >5mm of open space to the top of the slats
- Roll the trash bin by the plasma over to the sink, fill it, return to CNC plasma, and slowly pour water in the center of the water table using the included bucket.
- Ensure a good nozzle and electrode are loaded in the torch head
- Disconnect the THC wire and unscrew the head
- Verify the amperage rating of the nozzle (45A or 65A printed on the side)
- Replace electrode and/or nozzle if the wear pattern is not symmetric
- Screw down the head until it gently stops, then reattach THC wire
- Turn on the Hypertherm and ensure its amperage setting matches the nozzle rating
- Turn on the control box and use Mach3 to move the head free of your work area
- Load your material and attach the ground clamp nearby
- Draw the curtain behind you to protect other members from arc flash
Preparing G-Code: SheetCam
- Create/edit an existing tool for Material Type & Thickness by referencing the Hypertherm Torch Operator Manuall to your Material Type & Thickness:
- Feed Rate
- Pierce Delay
- Pierce Height
- Cut Height
- Import your plasma .DXF file as “new part”
- Select your part
- Create new “Plasma Cut” Operation (Operation>Plasma Cut)
- Select the layer that contains the vectors you want to cut
- Choose Contour Method
- Outside Offset is typical for jobs with a mix of closed/open profiles
- Enter the feed rate based on your material type and thickness
- Configure lead-in and lead-out settings and press OK
- Verify that the cutting preview shows the appropriate direction & leads
- To prevent the cutter from crashing into parts that flip up during operation, go to Options → Job Options and ensure the Rapid Clearance field is set to 3” or larger (a higher value takes longer to touch off when starting a cut, but is less likely to crash on already cut pieces)
- Run the Post Processor to create your .TAP g-code file
Operation: Mach 3
- Hit flashing red “Reset” button to clear Emergency Stop condition
- If the button does not reset when clicked, check that E-Stops & Proximity Limit Switches are unlocked
- Select “Reference All Home” (wait until all three axis lights are green)
- Zero X, Y, and Z axis
- Load your file (File>Load G-Code)
- Jog the machine head to the left/front corner of the desired origin (arrow keys)
- Before zeroing, make note of the coordinates so that, if you need to restart mid-cut, you’ll have the exact location to return to
- If prefered, select ”MDI Alt 2” to manually jog to the nearest whole number for your desired origin
- Zero X and Y on the left/front corner of the desired origin
- Zero Z with torch approximately ¼” above the material surface (page up/down)
- Trace the job location using jog/arrow keys to ensure your file fits where desired
- Safety Check:
- Identify nearest fire extinguisher
- Ensure E-Stop is easily accessible
- Put on appropriate eye protection
- Select “Cycle Start” to begin cutting
Cleanup
- Turn off the control box
- Turn off the plasma cutter (Hypertherm)
- Remove any remaining material from the table
- Detach the ground clamp and store it clear of the water table
- If using your own consumables, remove them from the nozzle and replace them with a spare from the workstation table.
- If using one, remember to take your flash drive with you!