Table of Contents
Blacksmithing Forge
- Manufacturer: NC Tool Company
- Manual: Download
Write Tool Introduction Here.
The Tool Safety, Tool Care, Operation, section of this guide are what instructors use to ensure that you can use the equipment according to community expectations.
Requirements
Blacksmithing Clearance clearance or class equivalent is required before use.
Warnings
See the Safety Section for more information.
Tool Anatomy
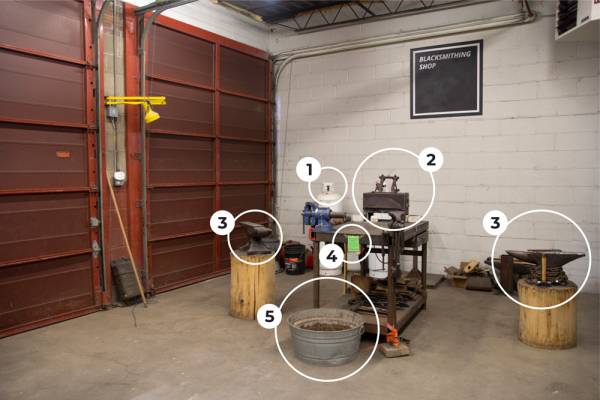
Shop Layout
- Propane Tank - Fuels the 2-burner forge
- Forge - 3” x 12” x 6” firebox, retains 2350º heat
- Anvils - Primary work surface used to forge and form different shapes
- Maintenance Tag - Manually tracks the usability status with Green/Yellow/Red cards
- Quench Tub - Used for cooling heated material
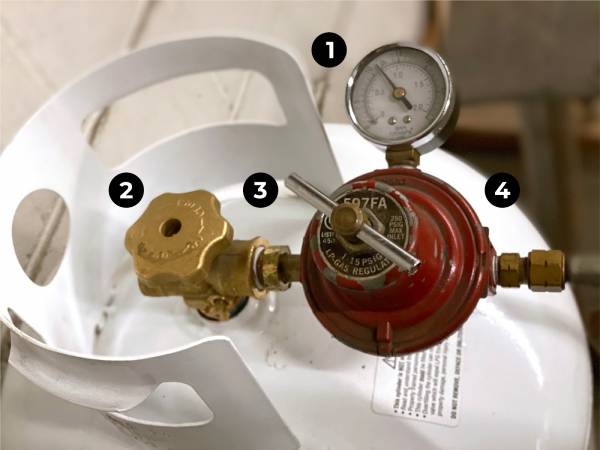
Propane Tank
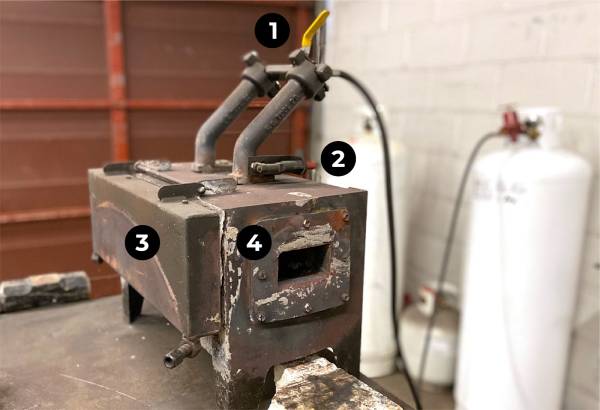
Forge
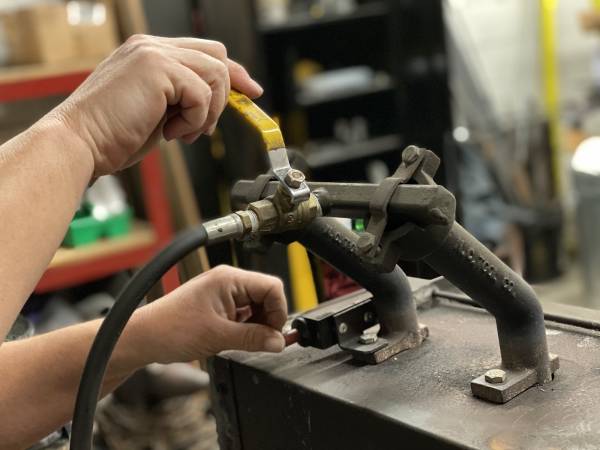
- Open/Shut-off Valve
- Ignition Button
- Side Door (for wide pieces) 12” x 3
- Thru-Port (both sides) 3” x 1 ½”
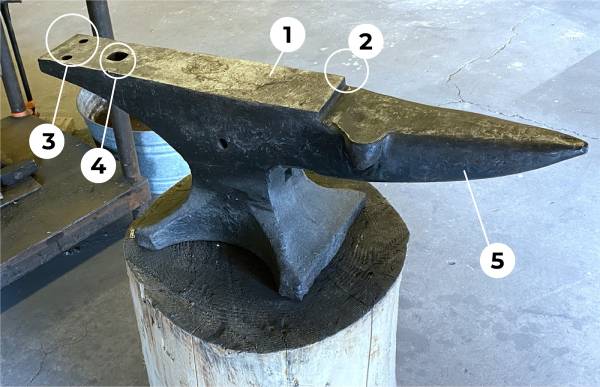
Anvil
- Face - primary surface of the anvil used for flattening metal
- Step - separation of face and horn also referred to as the cutting table
- Pritchel Holes - round openings used to punch holes or fit various tools with a round shank to allow for 360º rotation
- Hardie Hole - square opening where the square shank of various hardie tools fit
- Horn - used for bending or drawing down stock
For more visit the manufacturers website and user manual both linked at the top of this document.
Tool Safety
Starting the forge takes just a few steps, but working at 2350º with combustible gas is dangerous. Proper setup is essential to preventing injury.
Personal Protective Equipment
At the Forge, Hearing Protection, Safety Goggles, and a Leather Apron are also required.
Clothing and closed-toed shoes (preferably boots) must be of natural materials that will burn quickly and not melt to skin (i.e. cotton, denim, leather).
Common Hazards
The most common hazard is hot flying debris, slag, or material that causes injury due to burns or shear weight
- Be aware of others in your space at all times.
- Make sure work areas are clear before hammering to avoid sending tools, materials, and debris from flying unnecessarily
- Ensure there are no tripping hazards
- Securely handle hot materials with appropriate tools and workholding
- The most significant hazard is fire and toxic fumes
- Ensure your material is safe to heat and forge
- Only place hot metals in the quench tub or on the metal table
- Avoid wearing synthetic materials which don’t just burn, but melt directly to skin
- Stay vigilant and be sure to listen and smell for possible gas leaks
Prohibited Materials
Off-gassing toxic fumes is a critical concern. If you are unsure of the metal content, do not use it at the forge. For that reason, it is important to avoid:
- Any galvanized, coated, or painted metal
- Any metal containing zinc, lead or chromium
- Any unknown metal content
Tool Operation
Initial Setup
- Check that work area is clear and free of tripping hazards
- Check that clothes, shoes, and PPE is safe to use
- Line up tools needed
- Turn on vent fan
- Open the garage door
Basic Operation
Operation Checklist
- Open gas flow from tank
- Check that flow is in range of 10 PSI
- Listen and smell for potential leaks
- Open shut-off valve to forge and immediately press ignition button - if you wait too long, the forge will not ignite due to all the oxygen leaving the burner. If no ignition occurs within 1 second of opening, turn the valve off and wait at least 30 seconds for the burner to air out.
- Heat material at side port or front door using proper tongs to securely handle
- Use proper tongs and workholding to securely bring material to anvil, post-vice, or work surface
- Forge material as desired, reheating and quenching when necessary
- Monitor the forge until the job is complete and cleanup
Igniting the Forge
Starting the forge takes just a few steps, working with combustible gas is dangerous. Proper setup is essential to preventing injury.
Immediately press the ignition button when opening the shut-off valve to the forge
Heating Material
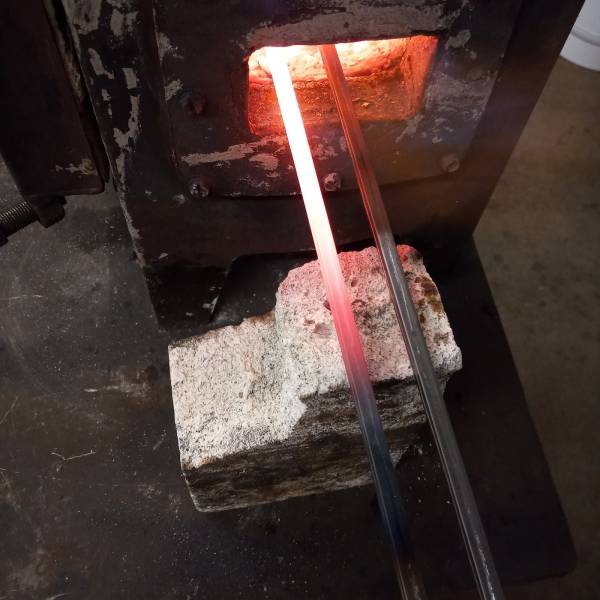
Make sure that area you want to work is glowing yellow
Here, the desired work area on the rod on the left is glowing and ready to forge
The rod on the right is still cold and needs more time to heat up
Quenching Material
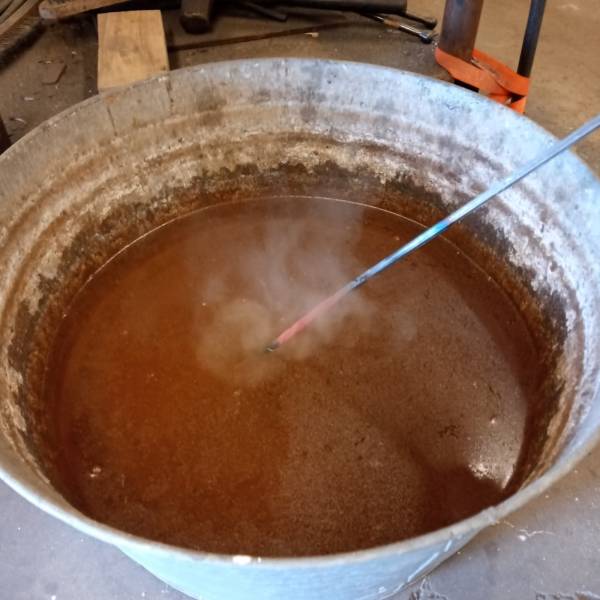
Quench areas of a workpiece that you don’t want to distort while you’re forging
Quench a tool or the full workpiece to cool it off before touching
Cleanup
Cleanup Checklist
- Close gas flow at propane tank
- Close shut-off valve at the forge
- Power off vent fan
- Close garage door
- Return tools to their home
- Sweep up slag and debris
- Recycle waste in metal scrap bins
- Note any maintenance needs or concerns on the tag and at protohaven.org/maintenance
Tool Care
Inspection
Before you start using the printer you are expected to do an initial inspection of the printer and access its readiness for use. Consult the checklist at the end of this document as well as the detailed processes here.
Maintenance Requests
If you encounter any of the issues listed in the Inspection area or have any other issues with the printer not working properly
- Update the physical Maintenance Tag at the machine
- 🟢Green can be used without issue
- 🟡Yellow can be used withcaution
- ⛔Red cannot be used without hazard to either the user or the equipment
- Record issues at http://protohaven.org/maintenance. This notifies our staff and volunteer maintenance crew of any issues.
Troubleshooting
When the flame is sputtering, the propane tank may be low or empty. Fill out a maintenance report and notify the staff so a certified team member can swap the tank.
If you notice a heavy propane odor, there may be a leak at one of the connection points. Close the propane tank immediately. Fill out a maintenance report and notify staff.
If the forge is failing to ignite, remember to immediately push the igniter button as you open the gas valve to prevent the propane from pushing all the oxygen out of the chamber.
Additional Resources
Blacksmithing Supplies:
Local metal resources:
Local Workshops:
Special Setups
Here’s what we have available at the shop:
- Assortment of tongs in various sizes and shapes
- V-bit Bolt Tong
- Wolf Jaw Tong
- Z Offset Tong
- Assortment of hammers of various weights
- Assortment of punches of various sizes
- Cut-off Hardie Tool
- Hold Down Hardie Tool
Staff Use
| ⚠️ AUTHORIZED MAINTENANCE GROUP ONLY |
If you are part of the maintenance group please log on to the #maintenance channel of our Discord server to:
- Perform a Maintenance Action
- Request a Maintenance Purchase
- Review complete Maintenance Logs for each machine
- Generally chit-chat about maintenance
Tools
The following should be in a Maintenance tool kit for the….
