Table of Contents
3D Printers
- Model: Prusa MK2s and MK3s
- Manufacturer: Prusa 3D
- Manual: Download
- Clearance Required: 3D Printing Proficiency Based Clearance
The Tool Safety, Tool Care, Printer Operation, section of this guide are what instructors use to ensure that you can use the equipment according to community expectations.
Requirements
Filament 3D Printer clearance or class equivalent is required before use.
Warnings
🚫Do not use unapproved filaments at Protohaven. It could lead to damage to the printer or emit particles or fumes irritating to people working in the studio.
🚫Do not use metal tools on the build sheet. There are plastic scrapers provided, do not use any metal razor blades, Spatulas, or Putty knives.
⚠️ The hotend component on the printer operates at over 200C (400F) which will cause immediate burns if it contacts your skin
⚠️There is a small but present risk of fire when using 3D printers ensure that prints are monitored and that the additional smoke detectors are present and working.
See the Safety Section for more information.
Tool Anatomy
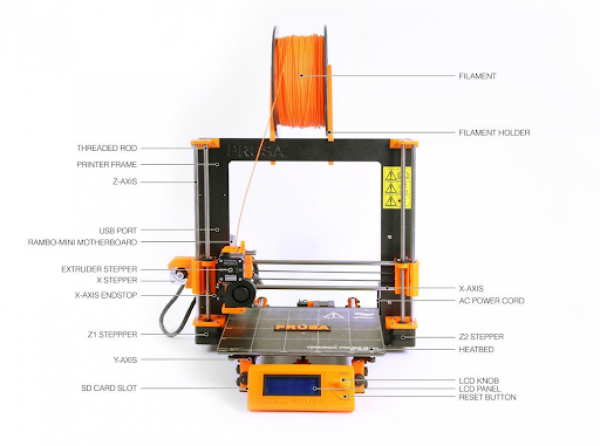
- Power Switch - This is located on the right side of the printer next to the label for AC Power Cord in the diagram.
- LCD Panel & Knob - This is how you will interface with and control the printer, adjust settings and load print jobs.
- Maintenance Tag - Manually tracks the usability status with Green/Yellow/Red cards (not pictured)
- Hotend - A component group that includes a heater element, nozzle, extruder and some cooling fans. (Contains the part labeled Extruder Stepper in the diagram above.)
- Heatbed - The surface that the hot end extrudes plastic onto. It consists of an aluminum plate integrated with a heating element and a PEI plastic sheet affixed to it.
- USB Port - Used as one method to send printing commands to the printer.
- SD Card Slot - Used as one method to load printing command files onto the printer.
- Printer control board / Motherboard- Interprets the printing commands and turns those into stepper motor movements.
- Stepper motors / Rods / Belts - These are the parts that move or facilitate movement of the hotend or heatbed.
For more visit the manufacturers website and user manual both linked at the top of this document.
Tool Safety
Burns ♨️
The Hotend heater block and nozzle run at temperatures around 200C / 400F and present a significant burn hazard during operation.
The heatbed commonly runs at 60C / 140F. This has a small burn risk but it’s something to be aware of. There is the potential for it to run up to 90C for some kinds of plastics and that is hot enough to burn skin.
Pay Attention to the temperature readings represented on the LCD to ensure the components are cool enough for you to touch if you intend on touching them.
Fire 🔥
There is a small risk of fire when using 3D printers. In the event of a thermal runaway a component in the printer control board called a mosfet malfunctions and gets “stuck open” supplying energy to and heating the hotend well beyond what the printer is designed to handle. The heater cartridge is capable of getting hot enough to melt the insulation off the wires and start a fire. In some cases it can even melt the aluminum heather block.
To help mitigate the risk of thermal runaway printer firmware have implemented algorithms that will notice when the measured temperature does not align with the amount of energy it thinks it’s putting into the system. If the firmware sees this discrepancy it will halt the printer and sound an alarm.
It is always good practice to not leave a printer unattended and to implement some basic safety precautions. The risk is low enough that we don’t require you to sit and monitor every moment of a multi hour print. However the smoke alarms supplied to the 3D printing area must be present and working. And there should be at least 1 person in the studio portion of Protohaven when the printers are in operation.
Emissions of UFP and VOC 🌫️
Operating a filament 3D printer is known to emit Ultrafine Particles (UFP) and Volatile Organic Compounds (VOC) both of which can contribute adverse health effects. The amounts and kinds of chemicals emitted varies based on the material being printed. PLA filaments approved for use at Protohaven tend to emit the fewest out of popular filament types. The compound found to be emitted from PLA is lactide and isn't known to be carcinogenic. The research makes the following recommendation:
…we continue to suggest that caution should be used when operating many printer and filament combinations in enclosed or poorly ventilated spaces or without the aid of gas and particle filtration systems.
(Emissions of Ultrafine Particles and Volatile Organic Compounds from Commercially Available Desktop Three-Dimensional Printers with Multiple Filaments)
Crush Risk
There is also a low risk that you could pinch or crush a finger or other body part if you put it in the wrong place while the machine is operating. The motors on the printer are not very strong and likely won’t cause damage but the risk should be stated. And it’s a good practice to always stay away from motion systems for when you start using bigger things that can hurt you.
Tool Care
Inspection
Before you start using the printer you are expected to do an initial inspection of the printer and access its readiness for use. Consult the checklist at the end of this document as well as the detailed processes here.
Maintenance Requests
If you encounter any of the issues listed in the Inspection area or have any other issues with the printer not working properly
- Update the physical Maintenance Tag at the machine
- 🟢Green can be used without issue
- 🟡Yellow can be used with caution
- ⛔Red cannot be used without hazard to either the user or the equipment
- Record issues at https://protohaven.org/maintenance. This notifies our staff and volunteer maintenance crew of any issues.
Heatbreak Fan
There are two fans on the hotend of the printer. There is a small one on the left side of the hot end this one runs once the printer starts to warm up and blows onto a heatsink attached to the heatbreak. Before powering on the printer observe the fan Dust or plastic build-up can decrease their efficiency or even damage them.
A cotton swab can also be used to clean off dust and debris from the propeller or canned air will clear the dust. Tweezers can be used to take out any plastic strands. With the printer powered off, hold the propeller of the fan to prevent it from spinning while cleaning it with canned air. Otherwise, it can get damaged. Clear away any debris that may be stuck and check that it can rotate freely.
Fans making excessive noise can be lubricated with a drop or two of lightweight oil (like sewing machine oil) underneath the sticker on the back of either fan.
If when the fan starts to spin ensure that it runs smoothly and quietly. If it's making a lot of noise, or if you are unable to clear debris 🟡 file yellow maintenance request.
If the fan is not running at all or running slow when the hotend starts to heat ⛔ file a red maintenance request and don’t use the printer A print will likely halt when the printer detects the fan has stopped, or fail due to heat creep.
Wire whips
There are 3 wrapped bundles of wires on the printer. Inspect each wire bundle and make sure they are unobstructed so that the printer elements can move freely. If any unusual wear is noted 🟡 file yellow maintenance request.
Nozzle
Inspect the nozzle and confirm that it is clean and mostly free from debris. If you find that the nozzle is dirty you can clean it with the Copper Toothbrush from the tool tray.
⚠️ WARNING: You will be working in close proximity to something that can give you a 2nd degree burn upon contact. Be careful of the Heater Block and Nozzle when doing this step.
- Preheat the nozzle to 160C
- Raise the Z level so that it’s about 150mm off of the bed. This will give you room to see and access the nozzle.
- LIGHTLY brush the nozzle with the copper toothbrush. You will find that the debris will come off with little effort leaving the nozzle bright and shiny again.
- Once the nozzle is clean, make sure you set the printer to cooldown.
If the nozzle has significant blobby buildup or if it is encased in plastic you will need to file a ⛔ file a red maintenance request
Buildsheet
Inspect the build sheet for debris and damage. If the sheet is damaged 🟡 file yellow maintenance request.
PLA sticks excellently to a clean PEI buildsheet. Oils from skin prevent prints from adhering to the buildsheet. A clean build plate is a happy build plate. You should always wipe down the build plate with 90% Isopropyl Alcohol before you start using the printer.
On a cool printer bed, alcohol is flammable remember?, squeeze out enough alcohol in the center of the build plate to create a puddle about 2 inches across. With a clean paper towel wipe from the center to the edges working in a circle, each time picking up a little alcohol from the puddle.
Once you’ve swept all of the oils and debris away from the center to the edge of the bed then you can use a second towel to wipe and dry the bed.
Once it is clean keep your grimy fingers off of the build plate. 😁
You do not need to clean the plate between prints as long as you don’t touch the plate when removing the previous print.
🚫Do not use Acetone🚫
Acetone is to be used by the maintenance group only on rare occasions. It can be used to refresh a PEI surface by removing oxidation, but repeated use will cause the PEI to get brittle and crack, shortening its life. It should not be needed more than twice a year if bed adhesion becomes problematic.|
Motion Test
Once the printer is on use the knob and the LCD to run a homing sequence if it does not behave as expected ⛔ file a red maintenance request
Permitted Filament Material
Protohaven currently has a large assortment of donated filaments that may be used on the 3D printers. If you wish use your own, the following Materials are permitted for use in the Protohaven 3D printers:
- ✅PLA
- ✅PLA+
- ✅ABS
- ✅PETG
- ✅TPU
The following materials are not permitted:
- 🚫Abrasive Filaments including:
- 🚫 Glow in the Dark PLA
- 🚫Wood-Fill or Bronze-Fill PLA
PLA / PLA+
The easiest filament material to work with and is recommended for all users unless there is a requirement that makes one of the other materials a better choice.
🚫 Abrasive PLA like glow in the dark filaments or ones with filler or reinforcements will contribute to quicker wear and replacement of the nozzle. If you wish to print with an abrasive filament speak to an Instructor and we will see what we can do in so far as providing the ability to print with a hardened nozzle.
PETG
ABS
TPU
Changing Nozzles
The printer is installed with a 0.4mm standard nozzle from Prusa. If you would like to see different diameters or the ability to print with abrasive material lets discuss on Discord.
🚫 Members are not permitted to change the nozzle.
Proper installation of a nozzle requires working in close proximity to very hot parts. And require a specific technique to set the appropriate torque. Too loose and the nozzle will leak out of the heater block potentially damaging the hot end. Overtightening could strip threads on the heater block or break the neck of the thermal tube disabling the printer.
Tool Tray
There will be a tool tray for each 3d printer please take care to ensure that it is fully populated before and after each use. The tool tray contains:
- Squeeze / Spray Bottle of 90% Isopropyl Alcohol
- Copper Bristle Toothbrush
- Plastic Blade Scraper
- 3D Printed removal wedges
- Deburring Knife
- Flush Cut Trimmers
- Needle Nose Pliers
- SD Card
- USB SD Card Reader
- Digital Calipers
Printer Operation
Model Selection
This document isn’t going to get into too much details about models beyond the fact that the STL file format is by far the most common file format to use when taking a digital 3D model and preparing it for 3D printing. The rest of the tutorial assumes STL files.
For more information check out the 3D Printing 101 class.
Preparing Gcode aka Slicing
Slicer Setup
The design computers will all have a recent version of PrusaSlicer installed; this is the recommended slicer for people who don’t have preferred requirements. It’s easy to get going on PrusaSlicer since it’s default settings are tested and maintained by the same company who makes the printer.
You can skip to the next section if you don’t need to install and configure PrusaSlicer.
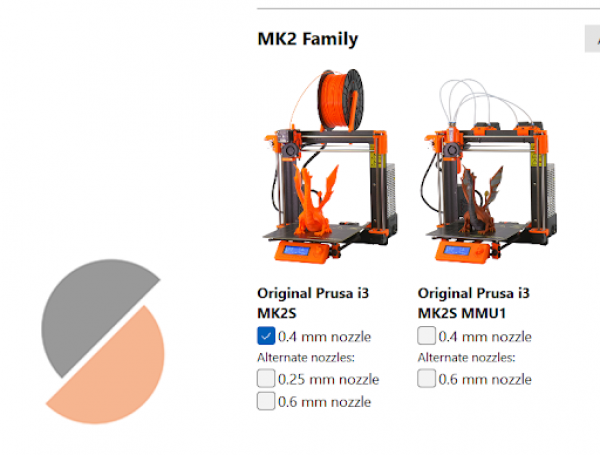
When setting up PrusaSlicer it will set up a wizard you will want to select the MK2S with the 0.4mm nozzle option. These Match the printer available.
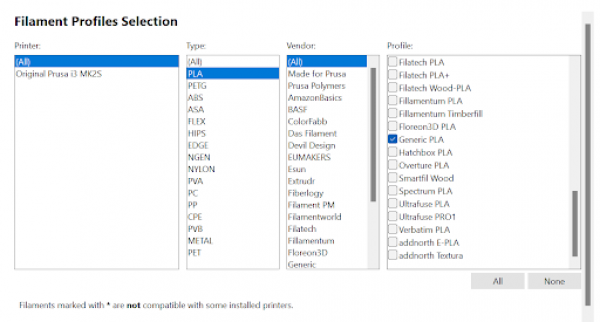
When you get to Filiment selection you can look for what you’re using. Otherwise just use the pre-selected Generic PLA option.
Finish up the install wizard and continue on to the sections below.
Slicer Use
This is the step that turns a digital 3D model into CNC instructructions so that the printer can make it.
When you get to the PrusaSlicer UI you will find that you can pick your settings on the right side Use the 0.20mm NORMAL setting while you’re still new. It’s perfectly suitable for most models with a good balance between print time and detail reproduction.
The nice thing about using PrusaSlicer with a Prusa Printer is that it comes with optimized settings tested by Prusa Research and they should be very reliable.
For the Filimanet however we should check the temperature settings. Click on the gear icon beside “Generic PLA” and inspect the temperatures used:
Those might be a little hot from some filaments. Check out what the manufacturer suggests on the side of the spool. 180-220C are all valid ranges for various brands or colors of PLA; you should have little to no need to stray from that range.
| 🚫DO NOT try to print over 240C. It will cause increased wear on the printer. |
60C for the bed is a universal setting for PLA and won’t need to be changed.
Next Import your model into the slicer with the add button.
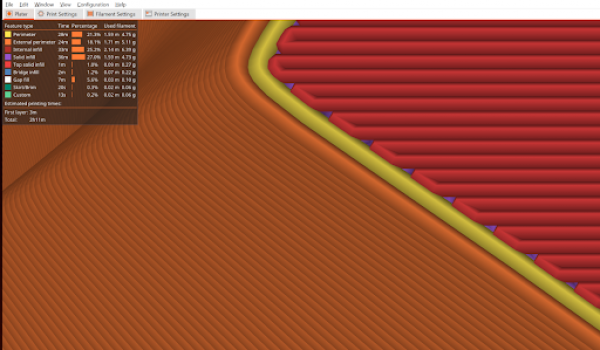
Then click preview
This will have the slicer “slice” the model and show you a preview of the layers and paths the printer will take.
Note: If your model has overhangs it will show up in the preview. You may need to print with supports when physics comes into play in those overhangs and you’re trying to make plastic float on thin air.
Make sure you check out the estimated printing time to ensure you have the printer reserved for long enough.
Click Export Gcode in PrusaSlicer and save it to a file.
Transferring Gcode to Printer
Now that you have the gcode that will tell the printer how to move to make your print you need to transfer it to the printer. There are a few options but this document will start with the basic one of using a SD card and having the printer read the file from the card.
The computer next to the printer has a SD card reader plugged into it if not there will be one in your tools tray. Insert an SD card into the reader. Click Export Gcode in Prusa Slicer and save it to the SD Card, currently the F: Drive.
Once you have copied the file remove the SD card from the card reader and insert it into the printer. The slot is on the left side of the LCD housing, The card goes in label facing away from you.
Loading Filament
If you need to load or change filament follow these directions. You will be able to preheat the hot end and load and unload filament via options in the menu on the LCD Screen.
- Heat the hotend to 200C
- Unload Filament using the menu
- Load and Feed roughly 250mm (10 inches) of cleaning filament through the extruder.
- Unload the cleaning filament.
- Snip the new filament with the flush cut snips to a 45 degree angle.
- Put a filament filter on the new filament before inserting it into the extruder. This will help remove dust from the filament before it enters the hot end reducing the build up of jam inducing gunk.
- Load the new filament and extrude around 100mm to ensure that it is loaded and has flushed out the remaining cleaning filament from the nozzle..
Start Print
When you insert the SD card into the printer it will detect it and update the LCD display to the Print from SD Menu. Navigate to your file and start the print.
Observe the first layer
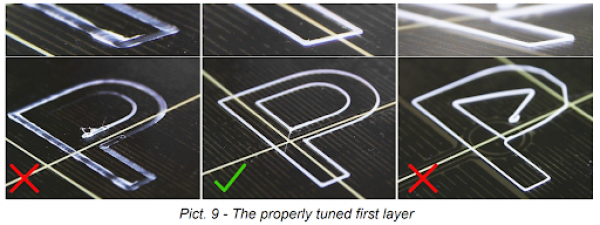
Ensuring your first layer is correct is a huge part of achieving a successful print. Observing and adjusting how well your first layer is going down is important to protect the build surface if the nozzle is too low and digging into the PEI sheet or too high and you won't have enough stick for a successful print.
If you find that the nozzle is digging into the build sheet SMASH THAT RESET BUTTON to stop the print and minimize the damage.
It’s also important that you have the right amount of squish in that first layer. This is also one of those skills that comes with practice but you’re looking to make sure the plastic is sticking to the bed and has a flat top and is oval in shape. Prusa Knowledgebase for first layer calibraration.
You can also adjust the z offset live during the first layer to make small adjustments to the squish. Check out this video for an example for Live Adjust Z or there is more in the manual.
Removing prints
When the print finishes. You need to be patient. I know the desire to get the print off and the next one started. But if you wait 5-8 minutes for the bed to cool, the expansion differential will release the print from the bed. This will keep you from getting your finger grease all over the bed. See above.
There is a plastic scraper tool and 3D printed wedges that you can use to help lift the print off of the bed. Don’t use a metal putty knife, just wait for the bed to cool and the print will release.
Cleanup
When you’re done using the printer please consider the following:
- ⚠️Ensure that both the Hot End and the Bed have their heaters off. It could be on if you did some manual operations during your use.
- Clean all skirting and debris from the build plate.
- Ensure the tool tray is complete and return to the 3D Printing Cabinet.
- Dispose of waste and clear area
- Remove your file from the Tool Tray SD Card.
Troubleshooting
Bed Adhesion Problems
This is where either your first layer does not stick or that your print becomes detached from the bed before your print is finished. Sometimes this makes some beautiful pieces of art called Spaghetti.
- Ensure you have a clean build plate, by following the above listed handling and cleaning directions
- Ensure the first layer “squish” looks good and adjust the z offset for the bed leveling as described above.
- If your model just does not have a surface area in contact with the bed you can in the slicer settings add a brim. This will increase surface area but the brim will need to be manually removed/cut away after printing.
Filament Jams
This is where the printer keeps moving but it’s stopped extruding plastic. Sometimes accompanied by an awful grinding noise from the extruder gear chomping on the filament.
1. There could be dirt or debris in the hot end.
- Run through about 30cm/12 inches of cleaning filament if it’s not completely clogged.
- Do a “Cold Pull” load in some filament, let the nozzle cool down to at least 120C. Then heat it back up to 200C all the while gently pulling on the filament with some pliers. IF YOU ARE CAUSING THE PRINTER TO BEND YOU’RE PULLING TOO HARD. When the hotend heats up enough to release it often will pull out the gunk causing your problems. If you do it well you will see the shape of the inside of the nozzle at the end of the cold pull.
2. Your Retraction settings in the slicer profile you used are too high. Make sure your retraction settings are no more than 1mm.
Layer Shift
If you notice a layer shift on your prints the belts may be too loose or the acceleration settings used in the slicer are too high. Check the belts that they aren’t obviously too loose. Adjusting the belts should be done by the maintenance group. File a yellow maintenance request. You can try printing at lower speeds and accelerations to see if you can get your print to complete.
Printer Stops Mid-print
- Make sure the power didn’t go out :)
- Make sure your SD Card is healthy or try a different SD card.
Thermal Runaway Fault
If the printer halts with a thermal runaway fault the printer will need to be looked at by a tech. Mark it as red and file a maintenance request. It could be something as little as a breeze on the heater block that caused it to trip, but it could also be something dangerous like a faulty heater cartridge or broken thermistor either of which could lead to fire.
Incorrect Bed Leveling
If the Automatic Bed Leveling has a glitch it could cause the nozzle’s first layer to be set too low and drag it across the build sheet. This could scratch, tear and otherwise ruin the surface so that it will be unsuitable for printing.
Always monitor the first layer of your print to ensure good layer height and that the printer isn’t wrecking itself.
Additional Resources
- 3DPPGH Discord Server - Local 3D Printing Club
Printing Checklist
- Inspection and Power On
- Ensure Tool Tray is complete, report any missing tools.
- Heartbreak Fan does not have excessive dust buildup. (Inspect with printer power off)
- Power on and perform a homing sequence.
- Nozzle is clean and free from debris.
- Bed wires are free from obstruction.
- Hotend wires are free from obstruction.
- Smoke Detector is present and working.
- Clean Build Plate
- Wipe down build plate with Isopropyl Alcohol when still cool.
- Avoid touching PEI surface with bare hands.
- Load and test filament
- Preheat and unload old filament if necessary.
- Load and run approx 250mm of cleaning filament and unload.
- Load and run approx 100mm of desired filament.
- Cooldown hotend.
- Bed Leveling and First Layer
- Run manual bed leveling sequence.
- Observe the first layer of print for proper printing.
- Cleanup
- ⚠️Ensure heaters are off⚠️
- Inspect nozzle for debris
- Once the hotend is below 130C you can turn off the printer.
- Ensure the build plate is cleared.
- Clean up work area
- Ensure Tool Tray is complete
- Return Tool Tray
